![]()
RJ45 pins
-
Pins 1–2 = TX, Pins 3–6 = RX (10/100 Mbps)
-
Gigabit Ethernet uses all 8 pins
-
Straight-through cable: same standard on both ends
-
Crossover cable: T568A on one end, T568B on the other
RJ-45 Crimp Order (looking at the plug, clip down, pins facing you)
T568B (most common)
-
White-Orange
-
Orange
-
White-Green
-
Blue
-
White-Blue
-
Green
-
White-Brown
-
Brown
Mnemonic:
“White-Orange, Orange, White-Green, Blue, White-Blue, Green, White-Brown, Brown”
T568A
-
White-Green
-
Green
-
White-Orange
-
Blue
-
White-Blue
-
Orange
-
White-Brown
-
Brown
Exam Memory Tricks
TX/RX Pins
-
1–2 transmit
-
3–6 receive
? Remember: “1-2 talk, 3-6 listen”
..............................
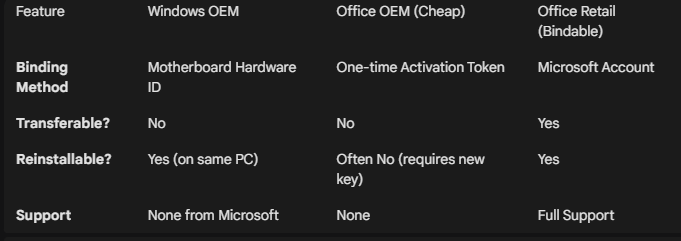
Office 21 key activation:
In PS as Admin - needs "" for spaces:
cd "C:\Program Files\Microsoft Office\Office16"
or cmd as Admin - no "" needed:
cd C:\Program Files\Microsoft Office\Office16
PS C:\Program Files\Microsoft Office\Office16> cscript ospp.vbs /inpkey:9N72W-QYGR6-JDB4J-W6DYJ-9TRY9
Microsoft (R) Windows Script Host Version 5.812
Copyright (C) Microsoft Corporation. All rights reserved.
---Processing--------------------------
---------------------------------------
<Product key installation successful>
---------------------------------------
---Exiting-----------------------------
PS C:\Program Files\Microsoft Office\Office16> cscript ospp.vbs /act
Microsoft (R) Windows Script Host Version 5.812
Copyright (C) Microsoft Corporation. All rights reserved.
---Processing--------------------------
---------------------------------------
Installed product key detected - attempting to activate the following product:
SKU ID: 436366de-5579-4f24-96db-3893e4400030
LICENSE NAME: Office 16, Office16OneNoteFreeR_Bypass edition
LICENSE DESCRIPTION: Office 16, RETAIL(Free) channel
Last 5 characters of installed product key: 7CFGB
ERROR CODE: 0xC004F017
ERROR DESCRIPTION: The Software Licensing Service reported that the license is not installed.
---------------------------------------
Installed product key detected - attempting to activate the following product:
SKU ID: 8d77de46-78fb-428d-b8c4-c4a078e8912d
LICENSE NAME: Office 21, Office21ProPlus2021MSDNR_Retail edition
LICENSE DESCRIPTION: Office 21, RETAIL channel
Last 5 characters of installed product key: 9TRY9
<Product activation successful>
---Exiting-----------------------------
VMs folders cant be deleted:
Hyper-V creates a "Virtual Compute" session that survives a standard reboot if "Fast Startup" is enabled on your laptop. Running the Stop-Service command above bypasses that "Fast Startup" hibernation and forces the service to release the folder.
? Why you should "Remove" before "Delete"
For the future, the cleanest way to do this is:
-
Right-click the VM in Hyper-V Manager and select Delete. (This doesn't delete the virtual disk, just the "link" to the VM).
-
Then delete the folder. If the VM is still listed in the Hyper-V console, it will fight you for the files until it is removed from the list.
BEFORE A BACKUP to ensure no open files left when closing HyperV App:
PS C:\Windows\system32> net stop vmms
The Hyper-V Virtual Machine Management service is stopping.
The Hyper-V Virtual Machine Management service was stopped successfully.
Using "Export" can create messy nested folders and double drives. Just copy the whole VM folder when all is shut down.
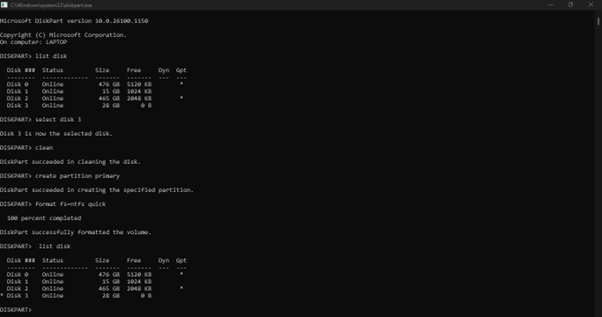
Using DISKPART when WSL2 Linux cannot see the /mnt drive that has not past through the Win/Linux file share boundary:
This is a common frustration when a Windows Recovery or Boot tool "claims" a drive—it creates a 32GB partition and leaves the rest as unallocated space, often making the drive look like it has "shrunk" at the hardware level.
In WSL2, USB drives do not automatically appear in /mnt/ because that directory is for mounted file systems, not raw hardware. To use cfdisk or gparted, you first have to "attach" the physical hardware to the Linux kernel.
- Why it isn't in /mnt/
WSL2 is a utility-VM. While it can see your local C: and D: drives via a plan9 network share, it cannot see raw USB devices unless you "pass them through."
- The "Windows Way" (Easiest Fix)
Before jumping into Linux tools, try the Windows DiskPart tool. It is often more powerful than the "Format" right-click menu for fixing "shrunk" USB sticks.
- Open Command Prompt (Admin).
- Type diskpart.
- Type list disk (Identify your USB stick—usually Disk 1 or 2).
- Type select disk X (Replace X with your USB disk number).
- WARNING: Type clean (This wipes the partition table and the "32GB limit" entirely).
- Type create partition primary.
- Type format fs=ntfs quick.
...............................
Unblock the WinExp Preview warning;
Get-ChildItem -Path "C:\Users\stevee\Desktop\RecentDocs" -Recurse | Unblock-File
A Reminder Page for Future Study/Reference Links
Clicking "Save Changes" on the Permalinks page (even if you haven't made any changes) forces WordPress to re-write the .htaccess file based on its current siteurl, home, and permalink structure settings. This should create a clean .htaccess file for HPLAPTOP/NEO
WP White screen of death:
/var/www/DebianAdmin/wp-content is write-able. When finished installing the plugin, change the permissions back to the default: chmod 755 /var/www/DebianAdmin/wp-content. Permissions are currently 775
OR disable plugins
-------------------------------------------
rm -vr /var/www/DebianAdmin/wp-content/cache/object/ --interactive=never
------------------------------
Some VIM in Putty Commands:
For deleting lines:
For instance, if you wanted to remove lines 4, 5, 6, and 7, you would use the command:
:4,7d
:u undo
For changing bits of code in html files - RISKY!!! Be Careful!
find . -type f -name '*.html' -exec sed -i 's/page1.html/CV.html/g' {}
vim ggVG (delete)
Vim Select All in linux window: Check in normal mode with Esc.
Move cursor to top of text. gg.
Go in visual mode; v
Highlight all text except last line, Shift G
Move cursor to end of last line to include highlighted. >
D to delete all highlighted text. U to Undo delete.
OR
then you can copy from this (Shift Y = yank) to copy to another doc or (Ctrl-C) text from another doc to then Rclick Paste into window to replace the highlighted text.
--------------------------
so far as I know, there is no means of copying a selected area from the putty window to the Windows clipboard without using the mouse. there is a feature request on the putty site specifically for this functionality.
https://www.chiark.greenend.org.uk/~sgtatham/putty/wishlist/keyboard-copy.html
the only way to copy information from the putty window to the Windows clipboard with a keyboard shortcut is to use the app system menu "copy all to clipboard" (which you can invoke from alt-space, provided you set the "Window > Behavior > System menu appears on ALT-Space" option configured in putty.
Pasting from the Windows clipboard into putty can be done with Shift-Insert.
If you need to copy and paste only within the terminal window itself, refer to either the man page for the shell you're using or consider using the unix "screen" app ('man screen' for more info), which allows text selection for copy / paste within the terminal window (similar to how vi's copy / paste works). an excerpt from the man pages:
C-a esc (copy) Enter copy/scrollback mode.
C-a ] (paste .) Write the contents of the paste buffer to the
stdin queue of the current window.
C-a {
C-a } (history) Copy and paste a previous (command) line.
C-a > (writebuf) Write paste buffer to a file.
C-a < (readbuf) Reads the screen-exchange file into the paste
buffer.
C-a = (removebuf) Removes the file used by C-a < and C-a >.
---------------------------------------------------------------------------------------------
Win11 repairs: see the Powershell Commands page in top menu.
sfc /scannow
DISM /Online /Cleanup-Image /RestoreHealth
-------------------------------------
for files with annoying " ' " in filename example. Those files not changed are listed:
touch annoying´file´name.txt
ls annoying´file´name.txt
stevee@hplaptop:~$ for i in *; do mv "$i" "$(echo "$i" | tr -d "´")"; done;
mv: 'PShellCommands.txt' and 'PShellCommands.txt' are the same file
mv: 'SSHTestFile.txt' and 'SSHTestFile.txt' are the same file
mv: 'ciónPalabras.txt' and 'ciónPalabras.txt' are the same file
ls annoyingfilename.txt
annoyingfilename.txt
-------------
To rename multi files in same dir with same prefix, eg:
from
Asterisk_PBX_Info_html_1234.jpg to 1234.jpg
find -name "Asterisk_PBX_Info_html_*" -exec rename 's/Asterisk_PBX_Info_html_//' {} +;
-----------
VIM Select all in Putty window on win11 to Linux via SSH:
For changing bits of code in html files -RISKY!!! Be Careful!
find . -type f -name '*.html' -exec sed -i 's/<table>/<p>/g' {} +
find . -type f -name '*.html' -exec sed -i 's/<\/table>/<p>/g' {} +
The alternative, less usual line end, + , makes Find continue to bulk file search within the current directory "."
Vim Select All in putty window:
ggVG (delete) then you can copy from other doc normally (Ctrl-C) then Rclick into window to replace.
------------
so far as I know, there is no means of copying a selected area from the putty window to the Windows clipboard without using the mouse. there is a feature request on the putty site specifically for this functionality.
https://www.chiark.greenend.org.uk/~sgtatham/putty/wishlist/keyboard-copy.html
the only way to copy information from the putty window to the Windows clipboard with a keyboard shortcut is to use the app system menu "copy all to clipboard" (which you can invoke from alt-space, provided you set the "Window > Behavior > System menu appears on ALT-Space" option configured in putty.
Pasting from the Windows clipboard into putty can be done with Shift-Insert.
If you need to copy and paste only within the terminal window itself, refer to either the man page for the shell you're using or consider using the unix "screen" app ('man screen' for more info), which allows text selection for copy / paste within the terminal window (similar to how vi's copy / paste works). an excerpt from the man pages:
C-a esc (copy) Enter copy/scrollback mode.
C-a ] (paste .) Write the contents of the paste buffer to the
stdin queue of the current window.
C-a {
C-a } (history) Copy and paste a previous (command) line.
C-a > (writebuf) Write paste buffer to a file.
C-a < (readbuf) Reads the screen-exchange file into the paste
buffer.
C-a = (removebuf) Removes the file used by C-a < and C-a >.
---------
TO check rsync is deleting what you want before you commit, use grep with a DRY-RUN (-n):
rsync /var/www/* /media/stevee/Data/BackUp/www/ --delete-excluded -vahn | grep deleting
deleting DebianAdmin/wp-content/uploads.zip
du -sh /var/www/
12G /var/www/
To clone one drive (sdc) to another (sdb):
stevee@localhost:~$ sudo dd if=/dev/sdc of=/dev/sdb conv=sync,noerror status=progress
For Pis with saved images, use USB Image Writer then boot flag in Gparted before it will boot in a new Pi!
Pi with HDMI TV small fonts:
sudo dpkg-reconfigure console-setup
choose; let system decide/larger font size
------
lspci -nn
07:00.0 VGA compatible controller [0300]: NVIDIA Corporation GF106 [GeForce GTS 450] [10de:0dc4] (rev a1)
lspci -d 10de:0dc4 -vvv
Kernel driver in use: nvidia
https://digitcodes.com/adding-viewport-meta-tag-to-make-your-website-ready-for-mobile/
add
<meta name=viewport content="width=device-width, initial-scale=1">
to top of WP header.php file
Adding another apache server for your PiCams? - copy your current server's index.html to the current PC without shh:
wget dellmint:80; cat index.html | sudo tee /var/www/index.html
cat /var/www/index.html
<iframe src="https://192.168.1.3:8081" scrolling=no width=960 height=720 frameborder=no></iframe>....
If you re-install a PC, your ssh keys complain of threats etc. so remove and re-install them quickly:
ssh-keygen -R AMDA8
/home/stevee/.ssh/known_hosts updated.
Original contents retained as /home/stevee/.ssh/known_hosts.old
Get your external ip
dig +short myip.opendns.com @resolver1.opendns.com
add it to an alias:
alias myip='dig +short myip.opendns.com @resolver1.opendns.com'
add it permanently to .bash_aliases, and make sure your rsync includes .bash_aliases to other PCs for BU..
The sourceforge random corporate bullshit generator one liner:
sudo apt-get install curl
curl -s https://cbsg.sourceforge.net/cgi-bin/live | grep -Eo '^<li>.*</li>' | sed s,\</\\?li\>,,g | shuf -n 1
The point is not merely to deploy an impetus. The point is to integrate promising client needs. The key people proactively promote under-the-radar dotted lines. Controlling should formulate a next-level emotional intelligence as a consequence of a robust cost reduction. The sales manager influences a present-day, profit-maximizing and impactful empowerment, while a fact-based value revolutionises requests / solutions.
Daft Script..
sudo apt-get install sysvbanner figlet
x=4; while expr $x>=2; do x=$(($x-1)); echo $x; echo "SYSFAULT X0:1 ScreenFault Pending..." ;sleep 1; done; banner SYSFAULT! | figlet
good metachar link:
https://www.zytrax.com/tech/web/regex.htm, https://www.cheatography.com/davechild/cheat-sheets/regular-expressions/
at 0125 today warning: commands will be executed using /bin/sh at> date at> xmessage -display :0.0 "You are late" at> <EOT> job 2 at Fri Aug 5 01:25:00 2016 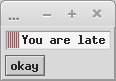
perl script to show PC name and top load avg in console window, when run:

perl bin/tl &
python -c 'import os;print os.getloadavg()[0]; print os.getloadavg()[1]; print os.getloadavg()[2];'
1.04
0.41
0.36
Do this really quick with the up arrows:
stevee@AMDA8 ~ $ uptime
18:49:21 up 1:38, 4 users, load average: 2.29, 1.58, 1.21
stevee@AMDA8 ~ $ python -c 'import os;print os.getloadavg()[0]; print os.getloadavg()[1]; print os.getloadavg()[2];' | paste -s
2.29 1.58 1.21
--------
!user/bin/perl -w
use Sys::Hostname;
use strict;
$|++;
my $host = hostname;
chomp $host;
while(1)
{
open(LOAD,"/proc/loadavg") || die "Could not open /proc/loadavg: $!\n";
my @load=split(/ /,<LOAD>);
close (LOAD);
print "\033]0;";
print "$host: $load[0] $load[1] $load[2] at ", scalar(localtime);
print "\007";
sleep 2;
}
It shows this in the Tab:
hplaptop: 0.02 0.04 0.00 at Fri May 30 23:15:27 2025
make a perm alias in your home dir of those below:
alias budellmint='rsync -e ssh --progress /home/stevee/* stevee@dellmint:/home/stevee/ --exclude='.' --exclude=Videos --delete-excluded -vrah'
by creating, and adding it to what you have already e.g.:
vi .bash_aliases
alias BIGducks='du -cBG * | sort -nr | head -11'
alias duse='for i in G M K; do du -hsx * | grep "[0-9]$i\b" | sort -nr; done'
alias ducks='du -cks * | sort -rn | head -11'
alias bulocalhost='rsync -e ssh --progress /home/stevee/* stevee@localhost:/home/stevee/ --exclude='.' --exclude='Videos' -vrah'
alias buhpmint='rsync -e ssh --progress /home/stevee/* stevee@hpmint:/home/stevee/ --exclude='.' --exclude='Videos' -vrah'
alias budellmint='rsync -e ssh --progress /home/stevee/* stevee@dellmint:/home/stevee/ --exclude='.' --exclude='Videos' -vrah'
A good addition for du on dirs with very varied sizes:
alias duse='for i in G M K; do du -hsx * | grep "[0-9]$i\b" | sort -nr; done'
stevee@T3400 ~ $ duse
54G Pictures
43G Videos
22G VirtualBox VMs
21G Downloads
5.0G Music
56M Documents
14M Desktop
9.2M ID
80K Contacts
16K Templates
4.0K Public
4.0K index.html
remote rsync/ssh BUp without pword:
This should initially ask you for the password of your account on the remote server. The dot is so your setup files don't get sent also and possibly mess up the remote PC.
stevee@AMD ~ $ rsync -e ssh --progress /home/stevee/* stevee@dellmint:/home/stevee/ --exclude='.' --delete-excluded -vahn
WITHOUT PASSWORD:
2. ssh-keygen generates keys.
Now setup ssh so that it doesn,t ask for password when you perform ssh. Use ssh-keygen on local server to generate public and private keys.
$ ssh-keygen
Enter passphrase (empty for no passphrase):
Enter same passphrase again:
Note: When it asks you to enter the passphrase just press enter key, and do not give any password here.
3. ssh-copy-id copies public key to remote host
Use ssh-copy-id, to copy the public key to the remote host.
ssh-copy-id -i ~/.ssh/id_rsa.pub dellmint
Note: The above will ask the password for your account on the remote host, and copy the public key automatically to the appropriate location. If ssh-copy-id doesn,t work for you, use the method we discussed earlier to setup ssh password less login.
4. Perform rsync over ssh without password
Now, you should be able to ssh to remote host without entering the password.
ssh dellmint
Perform the rsync again, it should not ask you to enter any password this time.
rsync -e ssh --progress /home/stevee/* stevee@dellmint:/home/stevee/ --exclude='Videos/' --delete-excluded -vahn
If you want to schedule an rsync backup job automatically, use crontab to set it up.
crontab -e
00 16 * * * rsync -e ssh /1500/* stevee@dellmint:/Quadra/ -a
Setup an alias for home dir backups - this one leaves files ALREADY on the remote PC intact when budellmint is run:
alias budellmint='rsync -e ssh --progress /home/stevee/* stevee@dellmint:/home/stevee/ --exclude=. -vrah'
tar -czvf <archive_name>.tar.gz <files_or_directories_to_compress>
view compressed contents without decomp:
sudo zcat <archive_name>.tar.gz | tar -xO
Fix no locale UTF8 prob:
sudo locale-gen --purge --no-archive
Fastest DD speed for the localhost core, 2GB/s?
stevee@MintMem ~ $ dd if=/dev/zero of=/dev/null bs=1M count=10
10+0 records in
10+0 records out
10485760 bytes (10 MB) copied, 0.00518111 s, 2.0 GB/s
Approx time taken to dd a 160GB SATA disk to a USB2 disk:
$ sudo dd if=/dev/sdc of=/dev/sdh
[sudo] password for stevee:
312581808+0 records in
312581808+0 records out
160041885696 bytes (160 GB) copied, 30962.4 s, 5.2 MB/s
30962/60*60 = 8.6 hrs
Use imagemagik to reduce multi pics size to 1/4 orig:
mogrify -resize 25% *.jpg
Using phpmyadmin to string replace - choose the DB, then SQL tab, then paste:
update wp_posts set post_content = replace(
post_content, 'Ashton',
'Aston');
Export a mysql DB:
sudo mysqldump -vu root -p DebianAdmin > /var/www/DA.sql
Mount a Win8 UEFI locked partition read only:
sudo mount -ro ntfs /dev/sda4 mymount/
Table 9-1. Run level numbers
| 0 | Halt the system. |
| 1 | Single-user mode (for special administration). |
| 2 | Local Multiuser with Networking but without network service (like NFS) |
| 3 | Full Multiuser with Networking |
| 4 | Not Used |
| 5 | Full Multiuser with Networking and X Windows(GUI) |
| 6 | Reboot. |
Broken install? Try: dpkg-reconfigure -a
Random Number Gen - read man rand. Format = openssl rand [-out file] [-base64 | -hex] seed number e.g:
stevee@hplaptop:~$ openssl rand -hex 16
55d232c74ae52d6c3bac8d8615229956
should give a diff hex number each time
man hexdump
NUL \0
<alert character> \a
<backspace> \b
<form-feed> \f
<newline> \n
<carriage return> \r
<tab> \t
<vertical tab> \v
update grub in Mint:
vi /etc/default/grub
GRUB_CMDLINE_LINUX_DEFAULT="quiet splash" - I want to see the loading output, so remove these entries to ""
run:
update-grub
Generating grub configuration file ...
Found linux image: /boot/vmlinuz-3.16.0-38-generic
Found initrd image: /boot/initrd.img-3.16.0-38-generic
Found memtest86+ image: /boot/memtest86+.elf
Found memtest86+ image: /boot/memtest86+.bin
No volume groups found
Found Windows Recovery Environment (loader) on /dev/sda5
done
Quick summary of BadPorts Post to strip the columns and dupe ports for nmap -p use, after copy/paste of the ports from:
vi BadPortsBig.txt
awk '{print $2}' BadPortsBig.txt
awk '{print $2}' BadPortsBig.txt > BadPortsOnlyBig.txt
uniq BadPortsOnlyBig.txt > BadPortsOnlyBigNoDupes.txt
cat BadPortsBig.txt | wc -l
869
cat BadPortsOnlyBigNoDupes.txt | wc -l
791
tr '\n' ',' < BadPortsOnlyBigNoDupes.txt
65422,65432,65530,65535,AMDA8 Documents #
tr '\n' ',' < BadPortsOnlyBigNoDupes.txt > BadPortsCommas.txt
Or just reduced to:
cut -d " " -f2 BadPortsBig.txt | uniq | sed ':a;N;$!ba;s/\n/,/g'> BadPortsCommas.txt
nmap 127.0.0.1 -p $(cat BadPortsCommas.txt)
Not shown: 788 closed ports
PORT STATE SERVICE
22/tcp open ssh
139/tcp open netbios-ssn
445/tcp open microsoft-ds
-----------
apt-cache pkgnames | sort > pkgs.txt
apt-cache pkgnames | wc -l
82502
whois 131.188.3.223
Remove duplicate lines with uniq. This leaves the original file unchanged, so you need to pipe the fix to another file e.g.
cat /aabbcc.txt
a
a
b
b
c
c
d
d
uniq /aabbcc.txt
a
b
c
d
uniq /aabbcc.txt > /abcd.txt
Find words in the Linux dictionary file:
grep '\<c...h\>' /usr/share/dict/words
cloth
cloth's
coach
coach's
conch
conch's
couch
couch's
cough
cough's
crash
crash's
crush
crush's
Post on Older Fundamental Admin commands? incl:
TIME
set your timezone:
sudo dpkg-reconfigure tzdata
man cal
cal -j 2015
August 2015
Su Mo Tu We Th Fr Sa
213
214 215 216 217 218 219 220
221 222 223 224 225 226 227
228 229 230 231 232 233 234
235 236 237 238 239 240 241
242 243
man date
-s, --set=STRING
set time described by STRING
date -s="Sun, 29 Feb 2016 16:21:42 -0800"
date: invalid date ˜=Sun, 29 Feb 2016 16:21:42 -0800
cal -j 2025
stevee@hplaptop:~$ date --date="+30 days"
Mon Jun 30 00:22:29 -05 2025
linux command for a specific date +x days
date --date="YYYY-MM-DD +X days"
Unix Start time
date --date='@0'
set month, day, time (hr:mm), year:
date 1103231401
Fri Nov 3 23:14:00 GMT 2001
date 110323141964
date: cannot set date: Invalid argument (but works!)
Tue Nov 3 23:14:00 GMT 1964
Another method would be to use either hwclock -w or hwclock --systohc to sync the hardware clock to the software clock. If you want to sync your software clock to your hardware clock then you would use hwclock -s or hwclock --hwtosys.
date is also used to set the kernel's software clock:
# date 07142157
Tue Jul 14 21:57:00 BST 2015
date -R output date and time in RFC 2822 format
Sun, 30 Aug 2015 22:23:35 +0100
stevee@hplaptop:~$ date -R
Sat, 31 May 2025 00:23:50 -0500
ntpdate-debian
2 Sep 22:37:16 ntpdate[4559]: adjust time server 91.189.94.4 offset -0.007021 sec
vi /etc/default/ntpdate
NTPSERVERS="ntp.ubuntu.com"
ping ntp.ubuntu.com
PING ntp.ubuntu.com (91.189.94.4) 56(84) bytes of data.
64 bytes from juniperberry.canonical.com (91.189.94.4): icmp_seq=1 ttl=50 time=28.5 ms
This will contact an NTP server and determine the time difference but not change your system's time.
ntpdate -d ntp.ubuntu.com
3 Sep 11:58:00 ntpdate[11913]: adjust time server 91.189.89.199 offset 0.001958 sec
cat alphas.txt
abcdefghijklmnopqrstuvwxyz
ABCDEFGHIJKLMNOPQRSTUVWXYZ?
od -bc alphas.txt
0000000 141 142 143 144 145 146 147 150 151 152 153 154 155 156 157 160
a b c d e f g h i j k l m n o p
0000020 161 162 163 164 165 166 167 170 171 172 012 101 102 103 104 105
q r s t u v w x y z \n A B C D E
0000040 106 107 110 111 112 113 114 115 116 117 120 121 122 123 124 125
F G H I J K L M N O P Q R S T U
0000060 126 127 130 131 132 077 012
V W X Y Z ? \n
Compare two files byte by byte.
-l, --verbose
output byte numbers and differing byte values
cat alphas2.txt
abcdefghijklmnopqrstuvwxyz
ABCDEFGHIJKLMNOPQRSTUVWXYZ
Mint5630 stevee # cat alphas.txt
abcdefghijklmnopqrstuvwxyz
ABCDEFGHIJKLMNOPQRSTUVWXYZ?
Mint5630 stevee # cmp alphas.txt alphas2.txt
alphas.txt alphas2.txt differ: byte 54, line 2
cmp -l alphas.txt alphas2.txt
54 77 12 (line no, 2 differing file bytes)
od -bc alphas.txt
0000060 126 127 130 131 132 077 012
? \n
diff alphas2.txt alphas.txt
2c2
< ABCDEFGHIJKLMNOPQRSTUVWXYZ
---
> ABCDEFGHIJKLMNOPQRSTUVWXYZ?
Running Processes
ps ua
USER PID %CPU %MEM VSZ RSS TTY STAT START TIME COMMAND
root 785 0.0 0.0 15824 2048 tty4 Ss+ 12:41 0:00 /sbin/getty
root 789 0.0 0.0 15824 2004 tty5 Ss+ 12:41 0:00 /sbin/getty
root 804 0.0 0.0 15824 1996 tty2 Ss+ 12:41 0:00 /sbin/getty
root 805 0.0 0.0 15824 1992 tty3 Ss+ 12:41 0:00 /sbin/getty
root 808 0.0 0.0 15824 1992 tty6 Ss+ 12:41 0:00 /sbin/getty
root 1214 1.3 0.9 378880 64704 tty8 Ssl+ 12:41 8:14 /usr/bin/X :
root 1821 0.0 0.0 15824 2072 tty1 Ss+ 12:41 0:00 /sbin/getty
stevee 3160 0.0 0.0 22636 5144 pts/0 Ss 12:48 0:00 bash
root 3177 0.0 0.0 89148 4324 pts/0 S 12:48 0:00 su -
root 3185 0.0 0.0 23108 5824 pts/0 S 12:48 0:01 -su
stevee 4126 0.0 0.0 22728 5328 pts/3 Ss 14:00 0:00 -bash
root 4144 0.0 0.0 89152 4388 pts/3 S 14:00 0:00 su root
root 4151 0.0 0.0 22736 5464 pts/3 S+ 14:00 0:00 bash
root 4341 69.3 1.1 101908 76808 pts/0 R+ 14:34 357:16 rsync /Store
root 4342 0.0 0.4 73576 32240 pts/0 S+ 14:34 0:03 rsync /Store
root 4343 12.8 2.9 263768 195304 pts/0 S+ 14:34 66:12 rsync /Store
stevee 5859 0.0 0.0 22728 5332 pts/4 Ss 21:34 0:00 -bash
stevee 6210 0.0 0.0 18460 2552 pts/4 R+ 23:09 0:00 ps ua
ps auf (tree) or pstree
USER PID %CPU %MEM VSZ RSS TTY STAT START TIME COMMAND
stevee 7373 0.0 0.1 7048 4676 pts/3 Ss 13:05 0:00 bash
root 7392 0.0 0.1 8404 4076 pts/3 S 13:05 0:00 \_ su root
root 7400 0.0 0.1 7140 4876 pts/3 S+ 13:05 0:00 \_ bash
stevee 3245 0.0 0.1 6992 4676 pts/1 Ss 11:29 0:00 bash
root 3304 0.0 0.1 8404 4060 pts/1 S 11:29 0:00 \_ su root
root 3317 0.0 0.1 7192 4992 pts/1 S 11:29 0:00 \_ bash
root 7874 0.0 0.0 5232 2368 pts/1 R+ 13:45 0:00 \_ ps auf
root 1491 2.1 1.3 186784 43224 tty8 Ssl+ 11:28 2:59 /usr/bin/X :0 -audit 0 -auth /va
https://debian-handbook.info/browse/stable/sect.task-scheduling-cron-atd.html
man mkfs - build a Linux filesystem
password checks:
cracklib-check - Check passwords using libcrack2, FascistCheck
echo "MyPassword" | cracklib-check
MyPassword: it is based on a dictionary word
Redirection
The file descriptors for stdin, stdout, and stderr are 0, 1, and 2, respectively.
https://www.tldp.org/LDP/abs/html/io-redirection.html
https://wiki.bash-hackers.org/howto/redirection_tutorial
SETUID PERM - non exe and exe
locate passwd | grep /usr/bin
/usr/bin/gpasswd
/usr/bin/grub-mkpasswd-pbkdf2
/usr/bin/lppasswd
/usr/bin/passwd
/usr/bin/smbpasswd
/usr/bin/tightvncpasswd
/usr/bin/vino-passwd
/usr/bin/vncpasswd
PASSWORDS
https://security.sdsc.edu/index.php/Configuring_PAM_with_libcrack
Preventing compromise of user accounts relies on all accounts having passwords that are not easily guessable.
Attackers on the Internet regularly use automated tools, often called "ssh scanners," which attempt to log in to systems using a wide selection of commonly known usernames and a set of passwords, mostly dictionary words. The scanner additionally tries using the username as the password (e.g. username "john" and password "john"). SDSC systems networks undergo these attacks daily; choosing a weak password for an account will result in a compromise of that account.
Additionally, when an attacker gains access to a system, he/she will often steal encrypted passwords from the /etc/shadow file and attempt to determine passwords to accounts by running a program such as [Crack, which takes a large dictionary of words, encrypts them, and matches the result against what is stored in the shadow file. Crack also tries common variations of words, such as substituting 1 (one) for l (ell), $ for S, etc.
Many security tutorials suggest rules for password creation, such as including punctuation, etc. But fending of ssh scans and crack attempts can be fended off simply by preventing users from choosing passwords from the dictionary that attackers use.
The legacy UNIX System encryption method is based on the NBS DES algorithm. More
recent methods are now recommended (see ENCRYPT_METHOD).
Use the crypt(3) function. On glibc, the method used depends on the salt, if it starts with:
$1$: it uses MD5.
$5$: it uses SHA-256.
$6$: it uses SHA-512. (See stevee below)
$2a$: it uses blowfish, not supported everywhere.
Otherwise it uses DES.
In /etc/shadow:
stevee:$6$
Or from the length of Field2 itself:
stevee:$6$wDWXf**********8***************vdP***6yZTErv52xP.nO*************b.:
MD5     | 22 characters
SHA-256 | 43 characters
SHA-512 | 86 characters

The characters in "salt" and "encrypted" are drawn from the set [a-zA-Z0-9./]. In the MD5 and SHA implementations the entire key is significant (instead of only the first 8 bytes in DES).
NAME
des_crypt, ecb_crypt, cbc_crypt, des_setparity, DES_FAILED - fast
DES encryption
passwd uses PAM to authenticate users and to change their passwords.
Most Unicies (and Linux is no exception) primarily use a one-way encryption algorithm, called DES (Data Encryption Standard) to encrypt your passwords. This encrypted password is then stored in (typically) /etc/passwd (or less commonly) /etc/shadow. When you attempt to login, the password you type in is encrypted again and compared with the entry in the file that stores your passwords. If they match, it must be the same password, and you are allowed access. Although DES is a two-way encryption algorithm (you can code and then decode a message, given the right keys), the variant that most Unixes use is one-way. This means that it should not be possible to reverse the encryption to get the password from the contents of /etc/passwd (or /etc/shadow).
Brute force attacks, such as "Crack" or "John the Ripper" (see section Section 6.9) can often guess passwords unless your password is sufficiently random. PAM modules (see below) allow you to use a different encryption routine with your passwords (MD5 or the like). You can use Crack to your advantage, as well. Consider periodically running Crack against your own password database, to find insecure passwords. Then contact the offending user, and instruct him to change his password.
ls -als /usr/bin/passwd
48 -rwsr-xr-x 1 root root 45420 Jul 15 20:31 /usr/bin/passwd
passwd is owned by root, yet users can use it to change their pword - why..? Setbits!
Regardless of who runs this program, run it as the user who owns it, not the user that executes it.
https://danielmiessler.com/study/unixlinux_permissions/
Mint5630 stevee # touch /script.txt
Mint5630 stevee # chmod 4644 /script.txt
Mint5630 stevee # ls -als /script.txt
0 -rwSr--r-- 1 root root 0 Aug 31 09:56 /script.txt
Mint5630 stevee # chmod 2644 /script.txt
Mint5630 stevee # ls -als /script.txt
0 -rw-r-Sr-- 1 root root 0 Aug 31 09:56 /script.txt
Mint5630 stevee # ls -als /script.txt
0 -rw-r-sr-- 1 root root 0 Aug 31 09:56 /script.txt
Sticky Bit - non exe and exe
Mint5630 stevee # ls -als /script.txt
0 -rw-r--r-T 1 root root 0 Aug 31 09:56 /script.txt
Mint5630 stevee # ls -als /script.txt
0 -rw-r--r-t 1 root root 0 Aug 31 09:56 /script.txt
Password Files Fields Meanings
stevee@Mint5630 ~ $ sudo cat /etc/shadow | grep stevee
[sudo] password for stevee:
stevee:$6$****etc:16661:0:99999:7:::
note; same username, same pw on 2 diff PCs renders different hashes:
stevee:$6$PWcj1...
stevee:$6$drgCB...
F1 Name; F2 pw enc (98 chars); F3 days since Jan1, 1970 (16661 days = 45 yrs); F4 min days pw retained (0 = can never change); F5 max days until pword must change (99999 days = 273 yrs); F6 days before expiry warning (7); F7 (null); F8 null); F9 unused
In Ubuntu/Mint, the enc method (used with a SALT) is found in:
vi /etc/pam.d/common-password
# here are the per-package modules (the "Primary" block)
password [success=1 default=ignore] pam_unix.so obscure sha512
The passwd file shows x - enc not held here - the home dir and the shell the user will boot into:
stevee:x:1000:1000:stevee,,,:/home/stevee:/bin/bash
Counting Line Bytes (-c) or Chars (-m), removing columns and chars
Take the /etc/shadow field 2 as an example, put in /file.txt where vi shows the visible characters as numbering 98:
$6$wDWXf**********8***************vdP***6yZTErv52xP.nO*************b.
1,98 All
but, with a hidden newline char (\n = 012) shown by:
wc -m < /file.txt
99
shown by od:
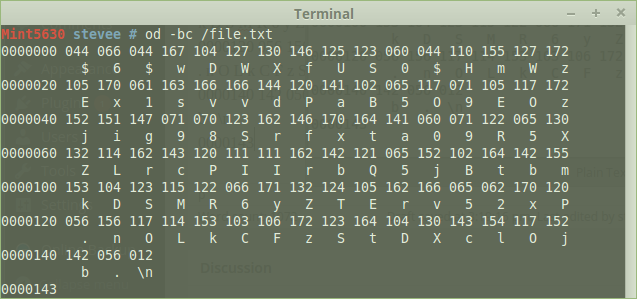
or better, just -c; ASCII character or backslash escape:
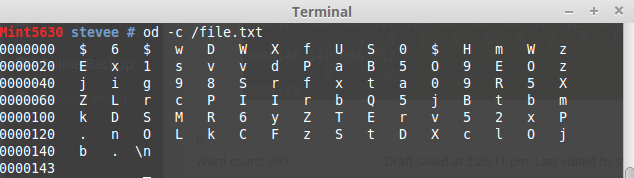
This shows the passwd hash letters in a grid of 16 x 6 + 3 = 99.
Using awk to show all but column $1:
od -c /file.txt | awk '{print $2,$3,$4,$5,$6,$7,$8,$9,$10,$11,$12,$13,$14,$15,$16}'
$ 6 $ w D W X f U S 0 $ H m W
E x 1 s v v d P a B 5 O 9 E O
j i g 9 8 S r f x t a 0 9 R 5
Z L r c P I I r b Q 5 j B t b
k D S M R 6 y Z T E r v 5 2 x
. n O L k C F z S t D X c l O
b . \n
or more elegantly;
od -c /file.txt | awk '{$1=""; print $0}'
$ 6 $ w D W X f U S 0 $ H m W z
E x 1 s v v d P a B 5 O 9 E O z
j i g 9 8 S r f x t a 0 9 R 5 X
Z L r c P I I r b Q 5 j B t b m
k D S M R 6 y Z T E r v 5 2 x P
. n O L k C F z S t D X c l O j
b . \n
Remove the final \n:
od -c /file.txt | awk '{$1=""; print $0}' | sed 's/\\n//'
$ 6 $ w D W X f U S 0 $ H m W z
E x 1 s v v d P a B 5 O 9 E O z
j i g 9 8 S r f x t a 0 9 R 5 X
Z L r c P I I r b Q 5 j B t b m
k D S M R 6 y Z T E r v 5 2 x P
. n O L k C F z S t D X c l O j
b .
or even more elegantly using cut, where each char is counted from left, so from char 11 onwards:
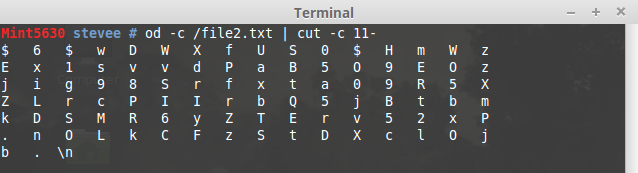
You can still pipe that into sed to remove the final \n also.
od -c /file2.txt | cut -c 11- | sed 's/\\n//'
$ 6 $ w D W X f U S 0 $ H m W z
E x 1 s v v d P a B 5 O 9 E O z
j i g 9 8 S r f x t a 0 9 R 5 X
Z L r c P I I r b Q 5 j B t b m
k D S M R 6 y Z T E r v 5 2 x P
. n O L k C F z S t D X c l O j
b .
Note that vi counts only visible characters - 98 total, but wc -m will count the \n:

cat /file2.txt | wc -m
99
BEWARE! You can get some bizarre and unexpected results in streamed combos:

212 chars counted but only 98 shown, which is the original correct amount on one line plus \n!
cat /file2.txt | wc -m
99
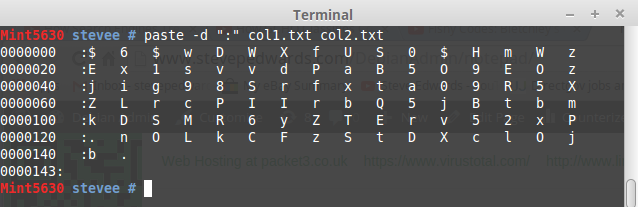
To finish, use paste to glue back the 2 sections again with a delimiter of choice, once the 2 files are prepared e.g.:
FSCK mounted FS
fsck -n
fsck from util-linux 2.20.1
e2fsck 1.42.9 (4-Feb-2014)
Warning! /dev/sda1 is mounted.
Warning: skipping journal recovery because doing a read-only filesystem check.
/dev/sda1: clean, 196568/2313808 files, 5561526/9243392 blocks
badblocks -vv /dev/sda1
Checking blocks 0 to 36973567
Checking for bad blocks (read-only test): 0.00% done, 0:00 elapsed. (0/0/0 errdone
Pass completed, 0 bad blocks found. (0/0/0 errors)
BACKUPS - old, redundant, but interesting
Mint5630 Downloads # ls | cpio -ov > /dev/sdb
20140122143951478.rar
20150206145713250.rar
H264_WEBUI
lexmark-inkjet-08-driver-1.0-1.i386.deb.sh
lexmark-inkjet-08-driver-1.0-1.i386.deb.sh.zip
openprinting-ppds-postscript-lexmark_20140829-1lsb3.2_all.deb
P2PCam
166115 blocks
ls | cpio -ivm < /dev/sdb
cpio: 20140122143951478.rar not created: newer or same age version exists
20140122143951478.rar
cpio: 20150206145713250.rar not created: newer or same age version exists
20150206145713250.rar
H264_WEBUI
cpio: lexmark-inkjet-08-driver-1.0-1.i386.deb.sh not created: newer or same age version exists
lexmark-inkjet-08-driver-1.0-1.i386.deb.sh
cpio: lexmark-inkjet-08-driver-1.0-1.i386.deb.sh.zip not created: newer or same age version exists
lexmark-inkjet-08-driver-1.0-1.i386.deb.sh.zip
cpio: openprinting-ppds-postscript-lexmark_20140829-1lsb3.2_all.deb not created: newer or same age version exists
openprinting-ppds-postscript-lexmark_20140829-1lsb3.2_all.deb
P2PCam
166115 blocks
System HW info:
sudo lshw -html > hardware_info.html
firefox hardware_info.html
FIND
find / -size +3G 2> /dev/null
/tftpboot/Win7/Win7_64.iso
find / -name *.iso
/tftpboot/Win7/Win7_64.iso
/tftpboot/Win7/KB3AIK_EN.iso
$ sudo find / -name *.img -size +3G 2> /dev/null
/500GB/PiImgs/Pinoir.img
/500GB/PiImgs/2015-05-05-raspbian-wheezy.img
/500GB/PiImgs/Piblanc.img
/500GB/stevee/StevesITStuff/PiImg/Pinoir.img
/500GB/stevee/StevesITStuff/PiImg/2015-05-05-raspbian-wheezy.img
/500GB/stevee/Downloads/AMDA8Stellar.img
/home/stevee/Downloads/AMDA8Stellar.img
Modification time (days)
find . -mtime +365
./Downloads/MyEye800.jpg
find /Share/ \( -user stevee -a -size +2G \)
/Share/Stevee/StevesITStuff/Drivers/AcerDrivers/AcerRecISO1.iso
/Share/Stevee/StevesITStuff/Win7Home/Win7Home.iso
There must be a space between the last curly and the backslash!
find /home/ \( -mtime +65 -a -atime +65 \) -exec cp -vt /Share/ {} +;
˜/home/stevee/Downloads/Vigor2860FWare/STD/v2860_3783.rst, -> ˜/Share/v2860_3783.rst,
˜/home/stevee/Downloads/Vigor2860FWare/STD/v2860_3783.all, -> ˜/Share/v2860_3783.all,
Backup a day's files:
find /home/stevee/Documents/ -mtime +1 -exec cp -vt /Share/ {} +;
cp: omitting directory ˜/home/stevee/Documents/,
˜/home/stevee/Documents/Webcam.odt, -> ˜/Share/Webcam.odt,
˜/home/stevee/Documents/Fix Double Minus Sign Problem in WordPress in Theme Functions php.odt, -> ˜/Share/Fix Double Minus Sign Problem in WordPress in Theme Functions php.odt,
˜/home/stevee/Documents/Vista 32 bit PC: Alex, -> ˜/Share/Vista 32 bit PC: Alex,
TAR - tape archive - note the tar file name/creation comes before the files to go in it!
Examples:
tar -cf archive.tar foo bar # Create archive.tar from files foo and bar.
tar -tvf archive.tar # List all files in archive.tar verbosely.
tar -xvf archive.tar # Extract all files from archive.tar.
-d; creates dirs
-c; write header info in ASCII
-r; interactive renaming
-t; list archive files
-u; overwrite newer file with older
-v; verbose
-m; retain mod time
-f exp; copy all except those in exp
If you use full relative pathnames then files are restored back where they came from, but tar may not read "*" for replacement though it used them for backup. Tar copies subdirs by default, and creates them on restore if req.
Create a tar in /Share of all files in pwd
MintServer Documents # tar cvf /Share/Docs.tar *
Fix Double Minus Sign Problem in WordPress in Theme Functions php.odt
Vista 32 bit PC: Alex
Webcam.odt
List contents
MintServer Documents # tar tvf /Share/Docs.tar
-rw-r--r-- stevee/stevee 405667840 2015-09-01 16:19 Fix Double Minus Sign Problem in WordPress in Theme Functions php.odt
-rw-r--r-- stevee/stevee 1198 2015-08-28 10:21 Vista 32 bit PC: Alex
-rw-r--r-- stevee/stevee 24579 2015-08-07 14:45 Webcam.odt
Restore
tar -xvf /Share/Docs.tar
Fix Double Minus Sign Problem in WordPress in Theme Functions php.odt
Vista 32 bit PC: Alex
Webcam.odt
TAR options - check against current man page
-r; appends to archive end
-x; extract recursively
-t; list files, long format
- u; as -r but for newer files than present
-c; new archive an a device
-w; confirm
-m; change mod time to extract time
-o; change owner to extractor
***********
Ytalk
apt-get install ytalk
= YTalk version 3.3.0 =-
oi
jrgkojdfg;'pskdfg
p;oskdfg
= stevee@192.168.1.24 =-
i
kjhf
AT command and redirecting the result (as AT sends a mail by default - no MTA installed, no msg)
"The user will be mailed standard error and standard output from his commands, if any...by sendmail"
at now + number period. The period can be minutes, hours, days, or weeks. The number simply indicates the number of said units that must elapse before execution of the command.
at 09:00 27.07.14 <<END>echo "Don't forget to wish a Happy Birthday to Raphaël!" \>| mail lolando@debian.org>END
at 1445 << END
> date > /dev/pts/5
> END
warning: commands will be executed using /bin/sh
job 13 at Wed Sep 2 14:45:00 2015
The output shows secs after 14:45 in term pts/5:
Wed Sep 2 14:45:00 BST 2015
Show the At queue:
atq
9 Thu Sep 3 14:34:00 2015 a root
delete job 9:
atrm 9
or queue:
at -l
17 Wed Sep 2 15:18:00 2015 a root
at 1458 << END
> rsync Downloads/Vigor2860FWare /media/stevee/A8B8-81C3/ --progress -vrazhn > /dev/pts/5
> END
warning: commands will be executed using /bin/sh
job 14 at Wed Sep 2 14:58:00 2015
In pts/5:
/dev/pts/5
MintServer stevee # sending incremental file list
Vigor2860FWare/
Vigor2860FWare/STD/
Vigor2860FWare/STD/v2860_3783.all
Vigor2860FWare/STD/v2860_3783.rst
sent 159 bytes received 30 bytes 378.00 bytes/sec
total size is 26.09M speedup is 138,032.87 (DRY RUN)
Generate PC Hardware Report
lshw -html > /hwreport.html
| id: |
minte4264
|
||||||
| description: | Desktop Computer | ||||||
| product: | E4264 () | ||||||
| vendor: | Gateway | ||||||
| version: | 500 | ||||||
| serial: | GCJ7950000093 | ||||||
| width: | 64 bits | ||||||
| capabilities: | smbios-2.4 dmi-2.4 vsyscall32 | ||||||
| configuration: |
|
STAT command - formatted file info output - from Will Shot's site
https://lcorg.blogspot.co.uk/search/label/Commands
Using the -f option, we can examine file systems as well:
bshotts@twin7:~$ stat -f /
File: "/"
ID: 9e38fe0b56e0096d Namelen: 255 Type: ext2/ext3
Block size: 4096 Fundamental block size: 4096
Blocks: Total: 18429754 Free: 10441154 Available: 9504962
Inodes: Total: 4685824 Free: 4401092
Clearly stat delivers the goods when it comes to file information, but what about that output format? I can't think of anything worse to deal with from a script writer's point-of-view (actually I can, but let's not go there!).
Here's where the beauty of stat starts to shine through. The output is completely customizable. stat supports printf-like format specifiers. Here is an example extracting just the name, size, and octal file permissions:
bshotts@twin7:~$ stat -c "%n %s %a" .bashrc
.bashrc 3800 644
The -c option provides basic formatting capabilities, while the --printf option can do even more by interpreting backslash escape sequences:
bshotts@twin7:~$ stat --printf="%n\t%s\t%a\n" .bashrc
.bashrc 3800 644
Using this format, we can produce tab-delimited output, perfect for processing by the cut command. Each of the fields in the stat output is available for formatting. See the stat man page for the complete list.
DUMP/RESTORE - see cpio also
a level 0 dump is a full filesys backup - e.g. first used before later incremental BUs
blkid
/dev/sda1: UUID="436a55a9-f610-45f6-866d-a72bfe10ff74" TYPE="ext4"
/dev/sda5: UUID="185ec76d-f2a0-49fd-a3b5-bd5ee859a18b" TYPE="swap"
/dev/sdb1: UUID="5C90-48F8" TYPE="vfat"
Mint5630 Pictures # dump -0 -f /dev/sdb1 /home/stevee/Pictures
DUMP: Date of this level 0 dump: Wed Sep 2 23:33:21 2015
DUMP: Dumping /dev/sda1 (/ (dir home/stevee/Pictures)) to /dev/sdb1
DUMP: Label: none
DUMP: Writing 10 Kilobyte records
DUMP: mapping (Pass I) [regular files]
DUMP: mapping (Pass II) [directories]
DUMP: estimated 897 blocks.
DUMP: Volume 1 started with block 1 at: Wed Sep 2 23:33:21 2015
DUMP: dumping (Pass III) [directories]
DUMP: dumping (Pass IV) [regular files]
DUMP: Closing /dev/sdb1
DUMP: Volume 1 completed at: Wed Sep 2 23:33:23 2015
DUMP: Volume 1 880 blocks (0.86MB)
DUMP: Volume 1 took 0:00:02
DUMP: Volume 1 transfer rate: 440 kB/s
DUMP: 880 blocks (0.86MB) on 1 volume(s)
DUMP: finished in 1 seconds, throughput 880 kBytes/sec
DUMP: Date of this level 0 dump: Wed Sep 2 23:33:21 2015
DUMP: Date this dump completed: Wed Sep 2 23:33:23 2015
DUMP: Average transfer rate: 440 kB/s
DUMP: DUMP IS DONE
RESTORE is a prob with pen drive...
fdisk -l /dev/sda
Disk /dev/sda: 40.0 GB, 40007761920 bytes
255 heads, 63 sectors/track, 4864 cylinders, total 78140160 sectors
Units = sectors of 1 * 512 = 512 bytes
Sector size (logical/physical): 512 bytes / 512 bytes
I/O size (minimum/optimal): 512 bytes / 512 bytes
Disk identifier: 0x000d2419
Device Boot Start End Blocks Id System
/dev/sda1 * 2048 73949183 36973568 83 Linux
/dev/sda2 73951230 78139391 2094081 5 Extended
/dev/sda5 73951232 78139391 2094080 82 Linux swap / Solaris
fdisk /dev/sda
Command (m for help): m
Command action
a toggle a bootable flag
b edit bsd disklabel
c toggle the DOS compatibility flag
d delete a partition
l list known partition types
m print this menu
n add a new partition
o create a new empty DOS partition table
p print the partition table
q quit without saving changes
s create a new empty Sun disklabel
t change a partition's system id
u change display/entry units
v verify the partition table
w write table to disk and exit
x extra functionality (experts only)
Command (m for help): l
0 Empty 24 NEC DOS 81 Minix / old Lin bf Solaris
1 FAT12 27 Hidden NTFS Win 82 Linux swap / So c1 DRDOS/sec (FAT-
2 XENIX root 39 Plan 9 83 Linux c4 DRDOS/sec (FAT-
3 XENIX usr 3c PartitionMagic 84 OS/2 hidden C: c6 DRDOS/sec (FAT-
4 FAT16 <32M 40 Venix 80286 85 Linux extended c7 Syrinx
5 Extended 41 PPC PReP Boot 86 NTFS volume set da Non-FS data
6 FAT16 42 SFS 87 NTFS volume set db CP/M / CTOS / .
7 HPFS/NTFS/exFAT 4d QNX4.x 88 Linux plaintext de Dell Utility
8 AIX 4e QNX4.x 2nd part 8e Linux LVM df BootIt
9 AIX bootable 4f QNX4.x 3rd part 93 Amoeba e1 DOS access
a OS/2 Boot Manag 50 OnTrack DM 94 Amoeba BBT e3 DOS R/O
b W95 FAT32 51 OnTrack DM6 Aux 9f BSD/OS e4 SpeedStor
c W95 FAT32 (LBA) 52 CP/M a0 IBM Thinkpad hi eb BeOS fs
e W95 FAT16 (LBA) 53 OnTrack DM6 Aux a5 FreeBSD ee GPT
f W95 Ext'd (LBA) 54 OnTrackDM6 a6 OpenBSD ef EFI (FAT-12/16/
10 OPUS 55 EZ-Drive a7 NeXTSTEP f0 Linux/PA-RISC b
11 Hidden FAT12 56 Golden Bow a8 Darwin UFS f1 SpeedStor
12 Compaq diagnost 5c Priam Edisk a9 NetBSD f4 SpeedStor
14 Hidden FAT16 <3 61 SpeedStor ab Darwin boot f2 DOS secondary
16 Hidden FAT16 63 GNU HURD or Sys af HFS / HFS+ fb VMware VMFS
17 Hidden HPFS/NTF 64 Novell Netware b7 BSDI fs fc VMware VMKCORE
18 AST SmartSleep 65 Novell Netware b8 BSDI swap fd Linux RAID auto
1b Hidden W95 FAT3 70 DiskSecure Mult bb Boot Wizard hid fe LANstep
1c Hidden W95 FAT3 75 PC/IX be Solaris boot ff BBT
1e Hidden W95 FAT1 80 Old Minix
"Modern Linux filesystem keep fragmentation at a minimum by keeping all blocks in a file close together, even if they can't be stored in consecutive sectors. Some filesystems, like ext3, effectively allocate the free block that is nearest to other blocks in a file. Therefore it is not necessary to worry about fragmentation in a Linux system."
HOWEVER...good to know how...
apropos defrag
e4defrag (8) - online defragmenter for ext4 filesystem
man e4defrag
e4defrag - online defragmenter for ext4 filesystem
SYNOPSIS
e4defrag [ -c ] [ -v ] target ...
DESCRIPTION
e4defrag reduces fragmentation of extent based file. The file tar
geted by e4defrag is created on ext4 filesystem made with "-O
extent" option (see mke2fs(8)). The targeted file gets more con
tiguous blocks and improves the file access speed.
target is a regular file, a directory, or a device that is mounted
as ext4 filesystem. If target is a directory, e4defrag reduces
fragmentation of all files in it. If target is a device, e4defrag
gets the mount point of it and reduces fragmentation of all files in
this mount point.
OPTIONS
-c Get a current fragmentation count and an ideal fragmentation
count, and calculate fragmentation score based on them. By
seeing this score, we can determine whether we should execute
e4defrag to target. When used with -v option, the current
fragmentation count and the ideal fragmentation count are
printed for each file.
Also this option outputs the average data size in one extent.
If you see it, you'll find the file has ideal extents or not.
Note that the maximum extent size is 131072KB in ext4
filesystem (if block size is 4KB).
If this option is specified, target is never defragmented.
-v Print error messages and the fragmentation count before and
after defrag for each file.
e4defrag /home/stevee/
[4344/4344]/home/stevee/.macromedia/Flash_Player/#SharedObjects/ZN9NYCUV/sysimages.tq.cn/js/vip/shareObject.swf/info.sol: 100% [ OK ]
Success: [ 3405/4344 ]
Failure: [ 939/4344 ]
e4defrag -vc /dev/sda1
[197662/197662] "/MINTSERVER"
File is not regular file
<Fragmented files> now/best size/ext
1. /var/log/ConsoleKit/history.1 11/1 4 KB
2. /var/log/pm-powersave.log.1 6/1 4 KB
3. /var/log/auth.log.1 6/1 4 KB
4. /var/log/ConsoleKit/history 5/1 4 KB
5. /var/log/wtmp.1 17/1 4 KB
Total/best extents 139974/139341
Average size per extent 149 KB
Fragmentation score 0
[0-30 no problem: 31-55 a little bit fragmented: 56- needs defrag]
This device (/dev/sda1) does not need defragmentation.
Done.
DISK USE
du -sh /
du: cannot access ˜/run/user/1000/gvfs,: Permission denied
du: cannot access ˜/proc/7954/task/7954/fd/4,: No such file or directory
du: cannot access ˜/proc/7954/task/7954/fdinfo/4,: No such file or directory
du: cannot access ˜/proc/7954/fd/4,: No such file or directory
du: cannot access ˜/proc/7954/fdinfo/4,: No such file or directory
93G /
du -sh /home/stevee/
13G /home/stevee/
df -h
Filesystem Size Used Avail Use% Mounted on
/dev/sda1 146G 93G 46G 68% /
none 4.0K 0 4.0K 0% /sys/fs/cgroup
udev 1.5G 8.0K 1.5G 1% /dev
tmpfs 304M 2.3M 302M 1% /run
none 5.0M 0 5.0M 0% /run/lock
none 1.5G 59M 1.5G 4% /run/shm
none 100M 32K 100M 1% /run/user
df -h /
Filesystem Size Used Avail Use% Mounted on
/dev/sda1 146G 93G 46G 68% /
Mint5630 stevee # w
17:10:57 up 8:11, 3 users, load average: 2.14, 2.22, 2.44
USER TTY FROM LOGIN@ IDLE JCPU PCPU WHAT
stevee tty8 :0 09:01 8:11m 20:46 0.79s cinnamon-session --session cinnamon2d
stevee pts/1 :0 09:12 1:02m 2:50 8:45 gnome-terminal
Keys info:
dpkg-reconfigure keyboard-configuration
vi /etc/default/keyboard
apt-get install console-data
dpkg-reconfigure console-data