![]()
Server2022 Hyper V Setup:
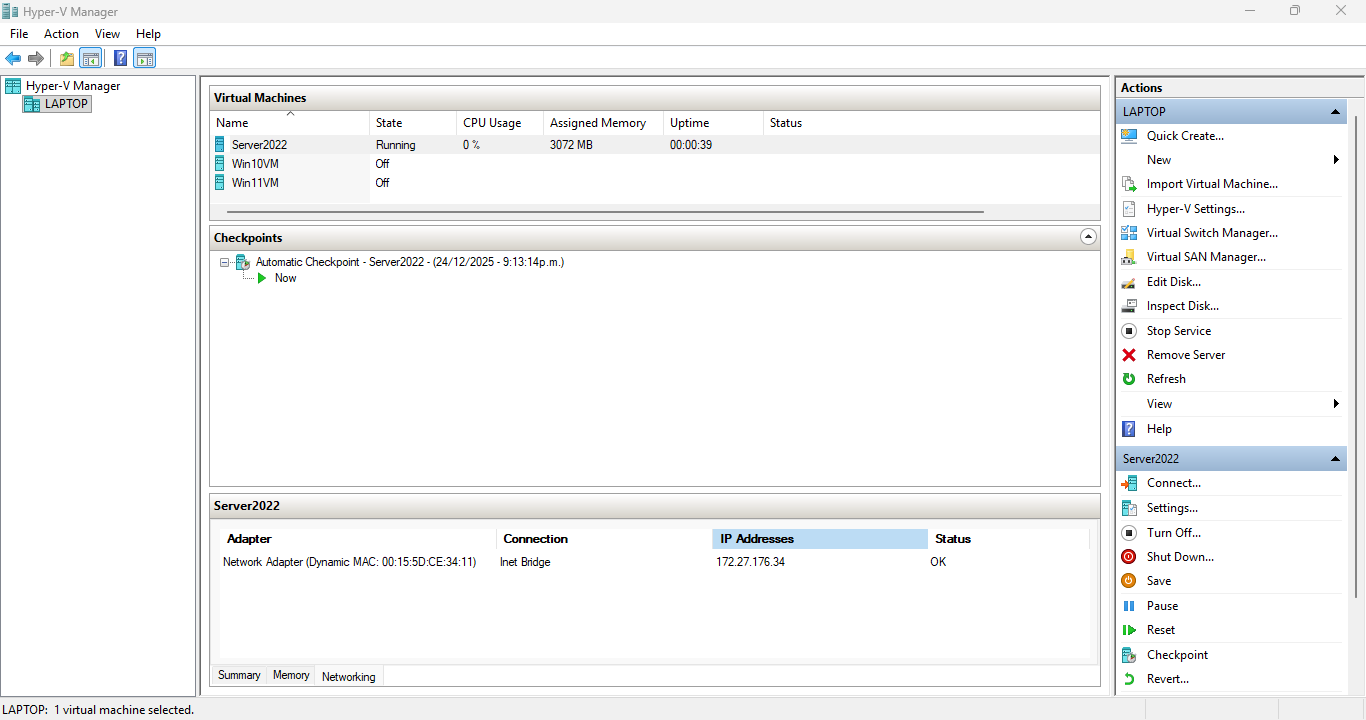
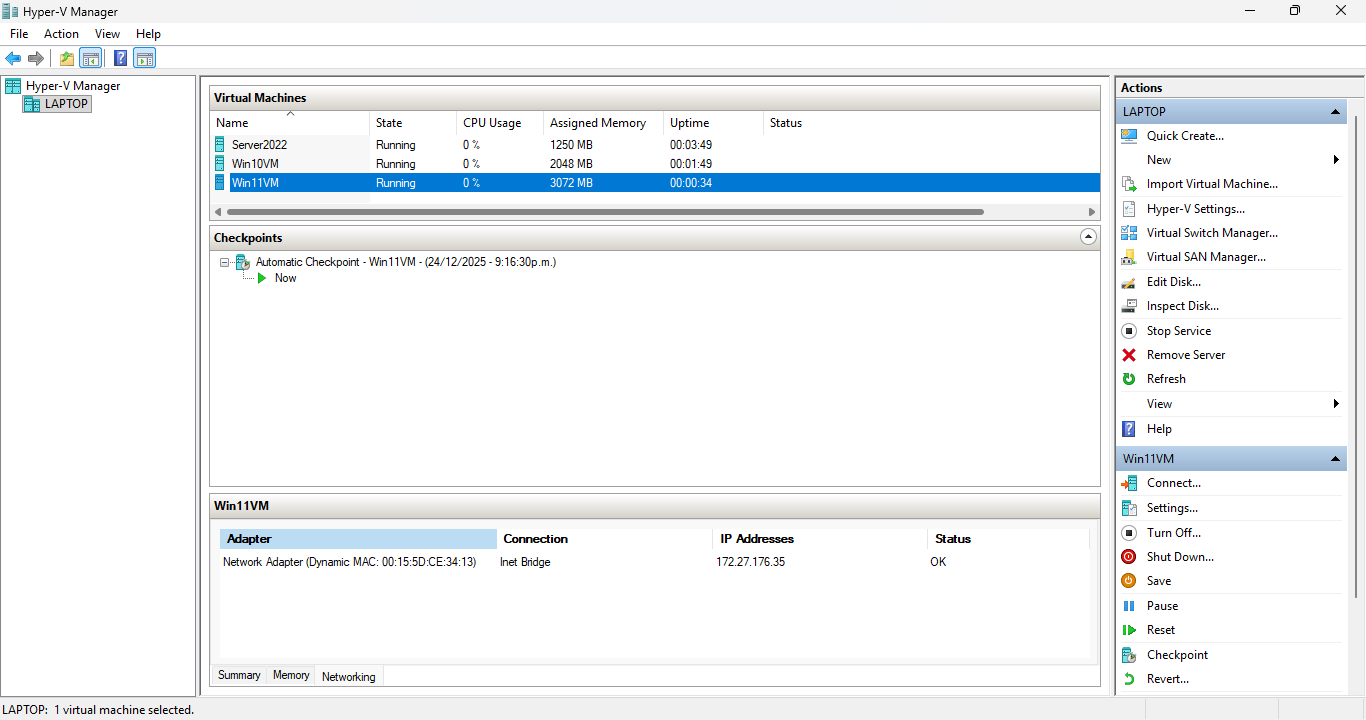
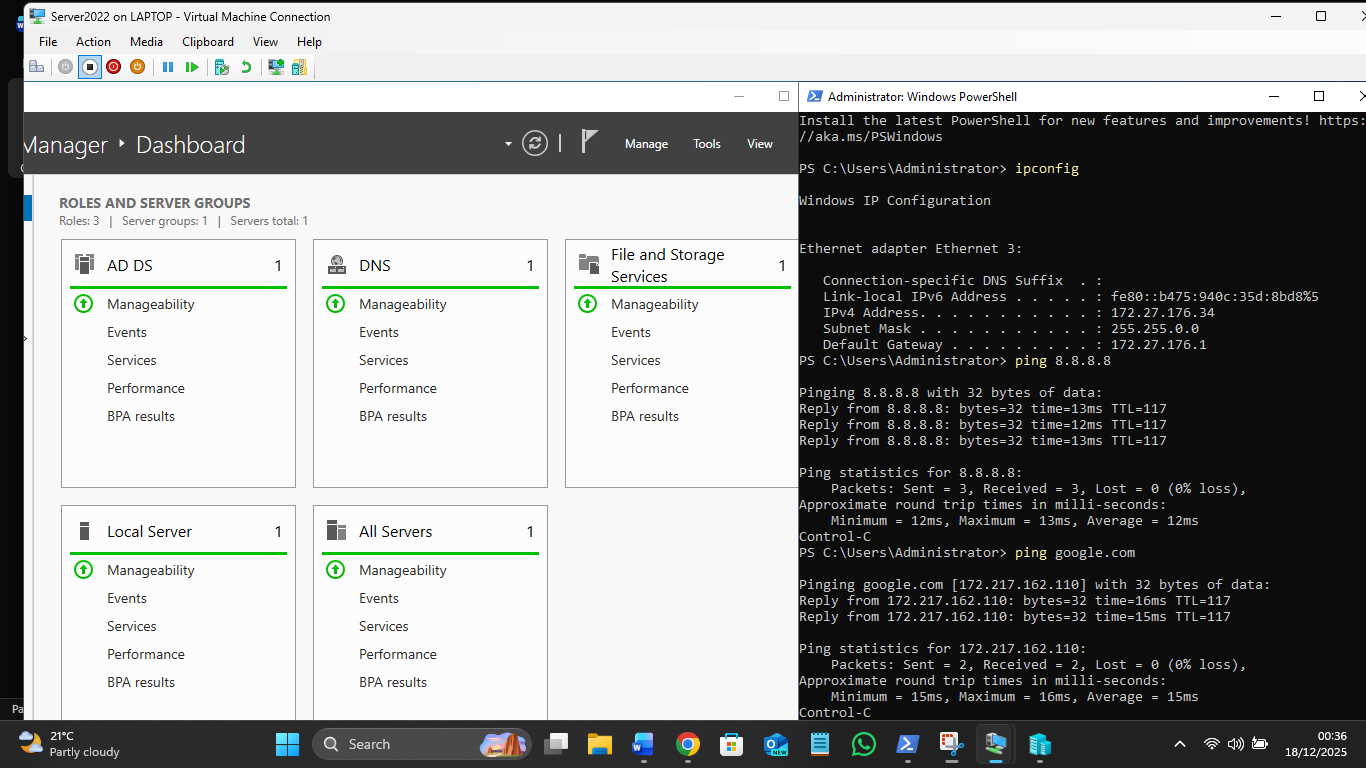
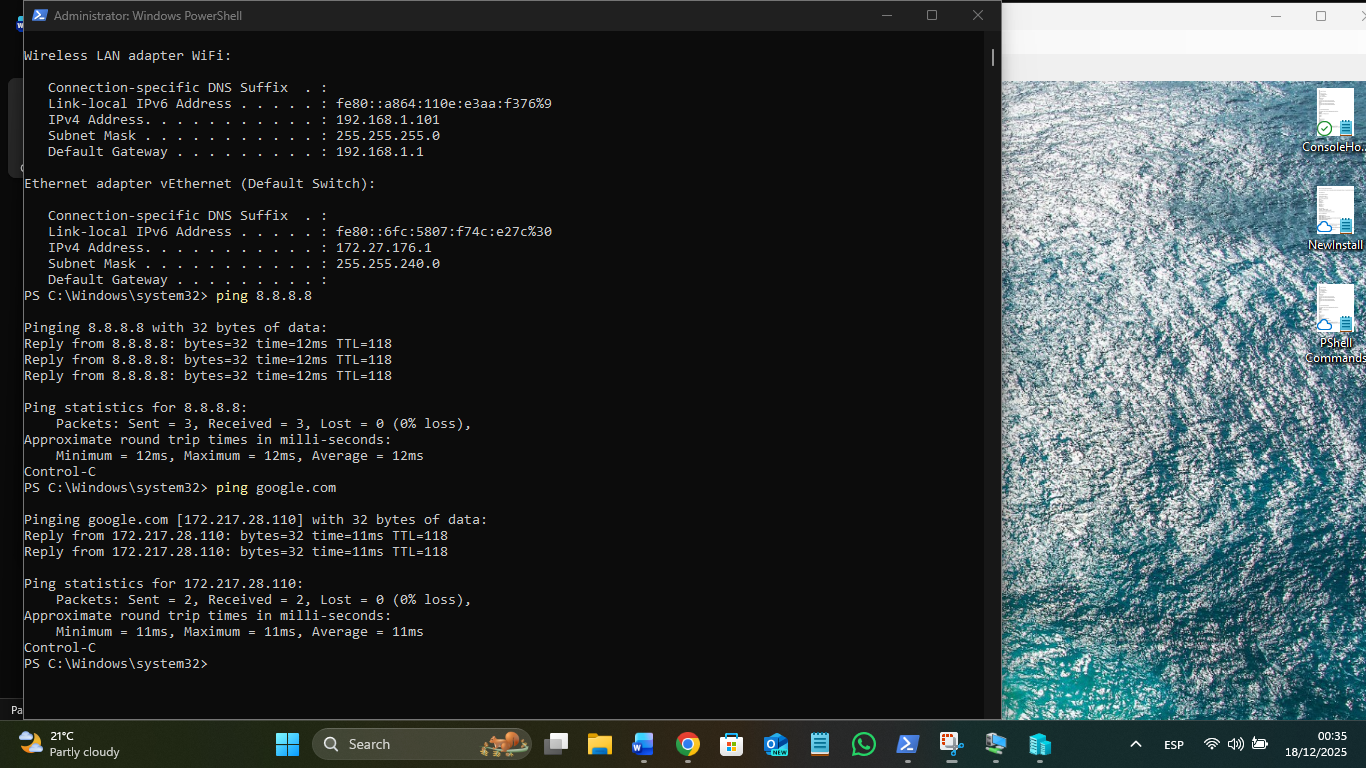
You can easily see the IP Addresses of each VM at the screen bottom of Hyper V:
net start vmms
You can turn on all VMs from the Host with:
Get-VM | Where-Object {$_.State -eq 'Off'} | Start-VM
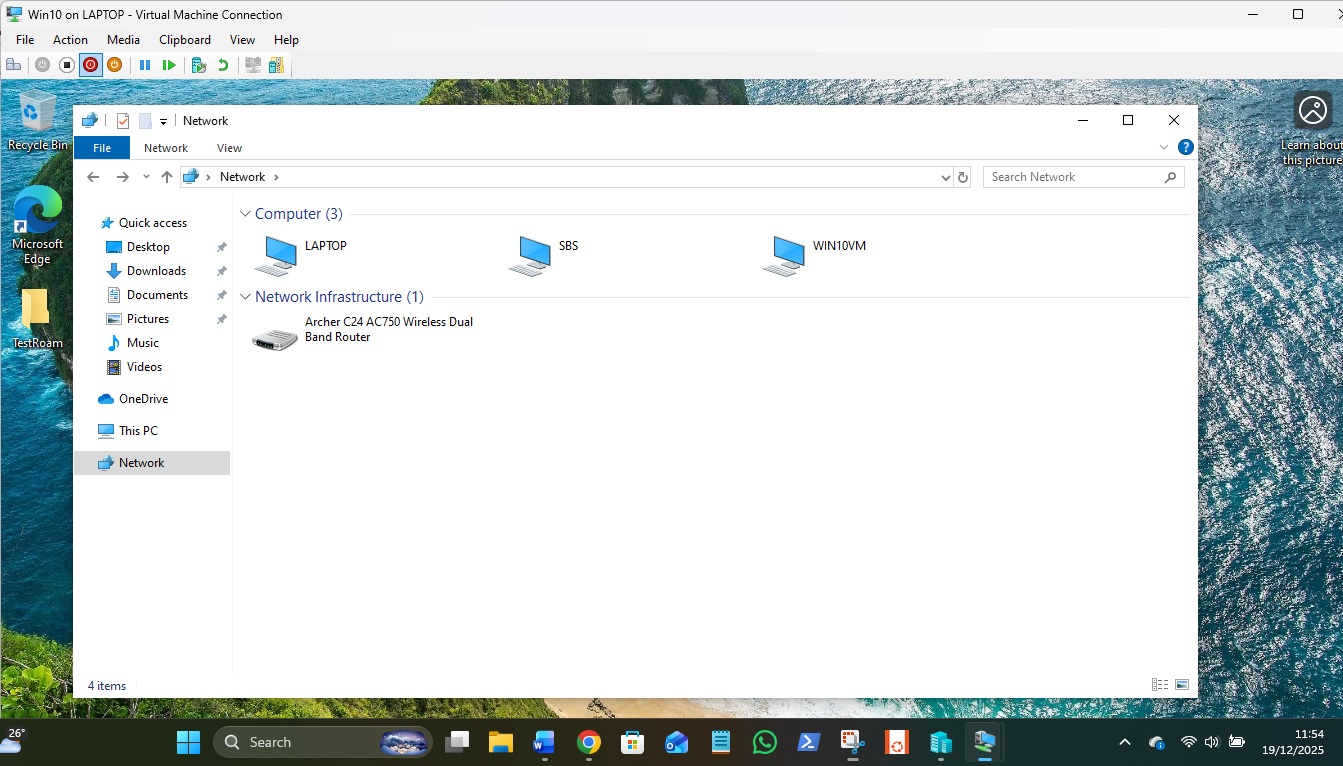
3 x VMs IP addresses

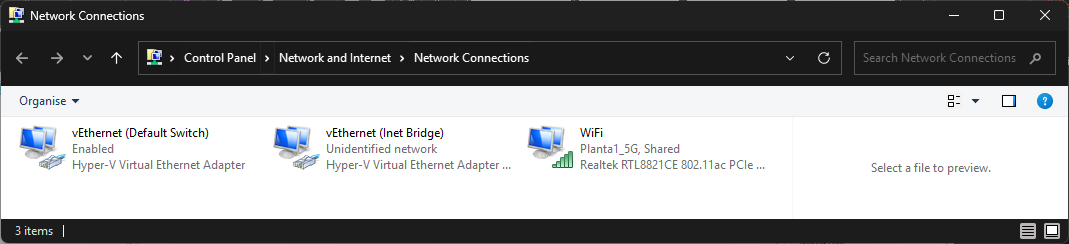
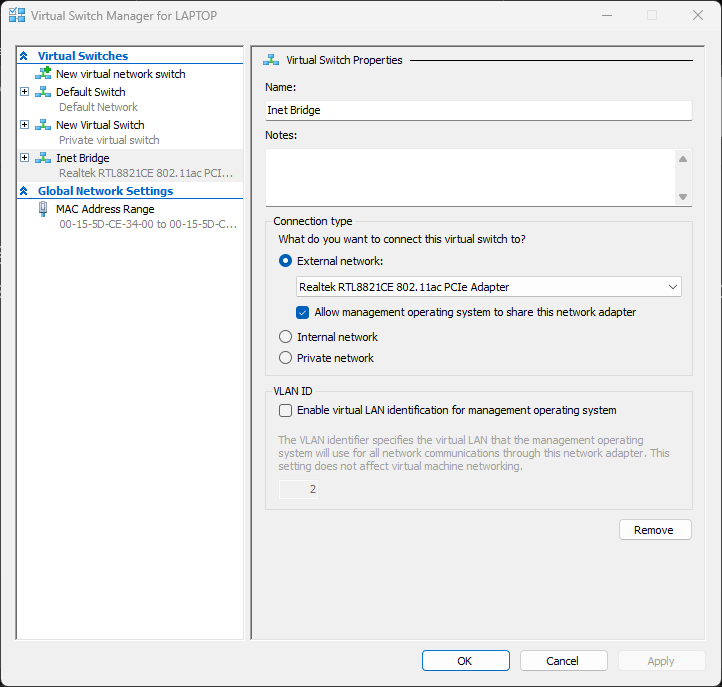
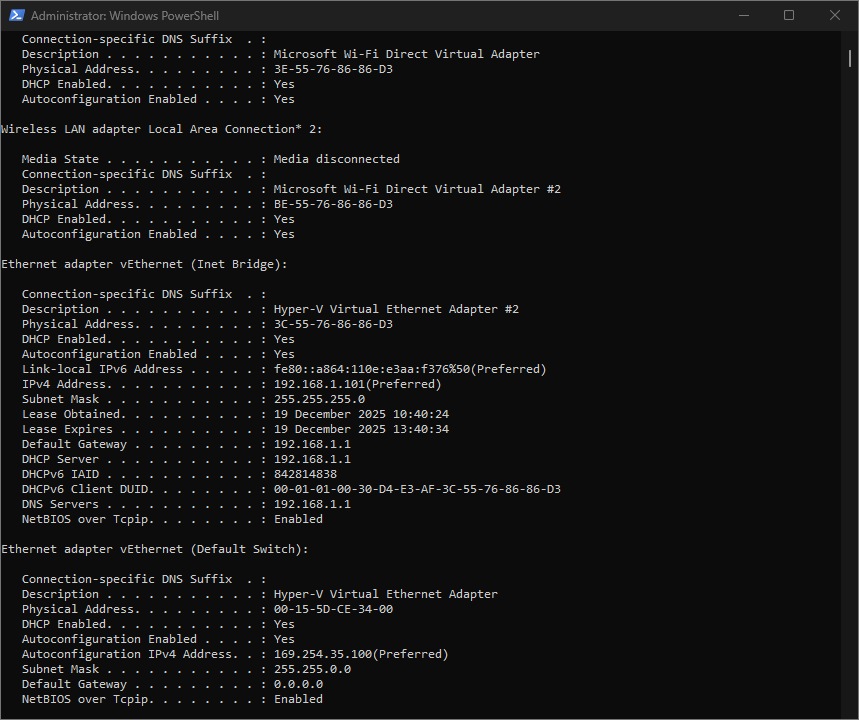
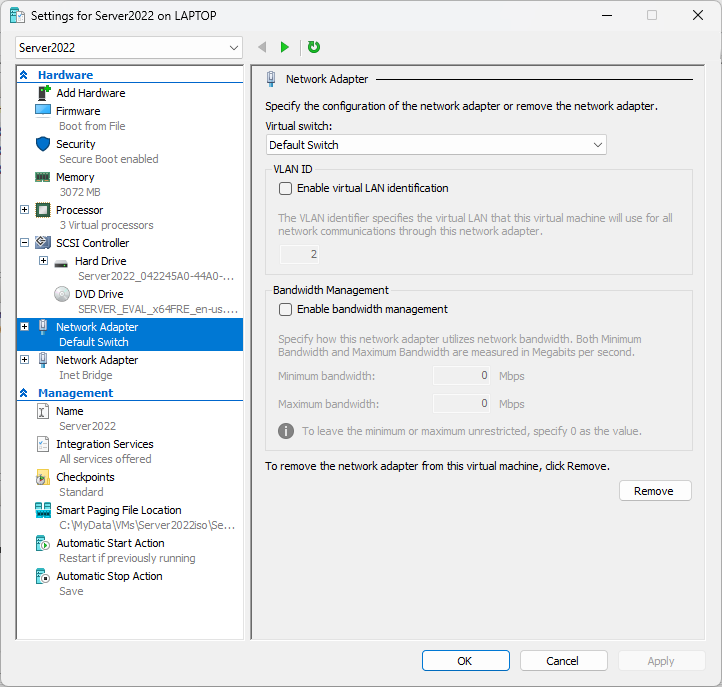
Host laptop settings to enable VMs internal LAN and Shared Laptop WiFi for Inet
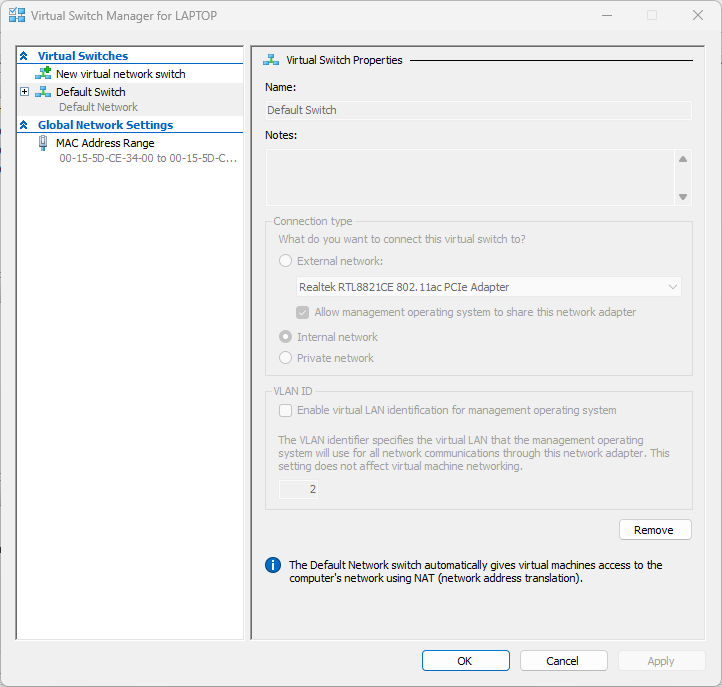
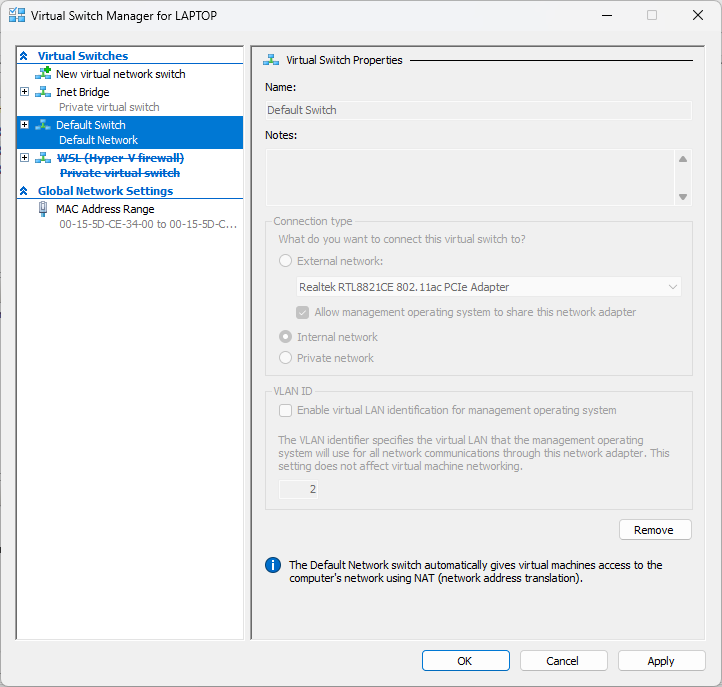
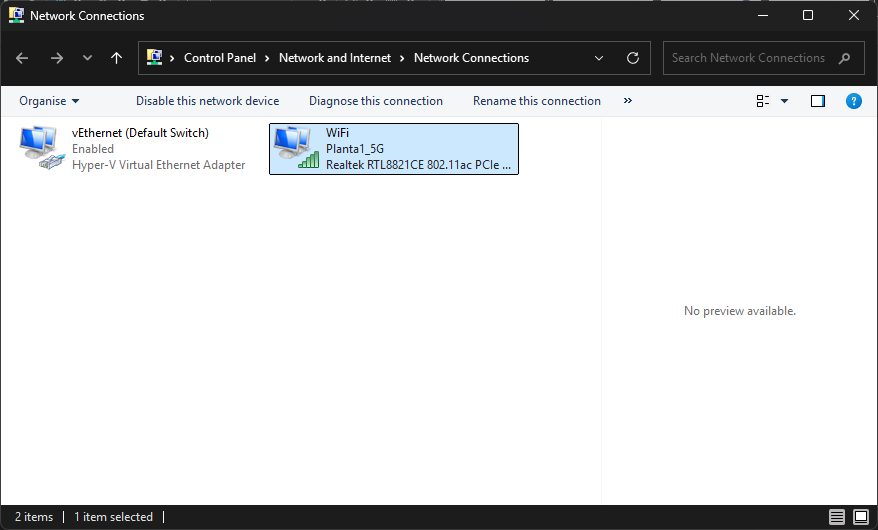
The Default Switch needs to be auto to get a useless APIPA address, as it cannot be disabled or deleted from the host, or used as it generates a different IP address on reboots of set static due to win internal NAT functions.
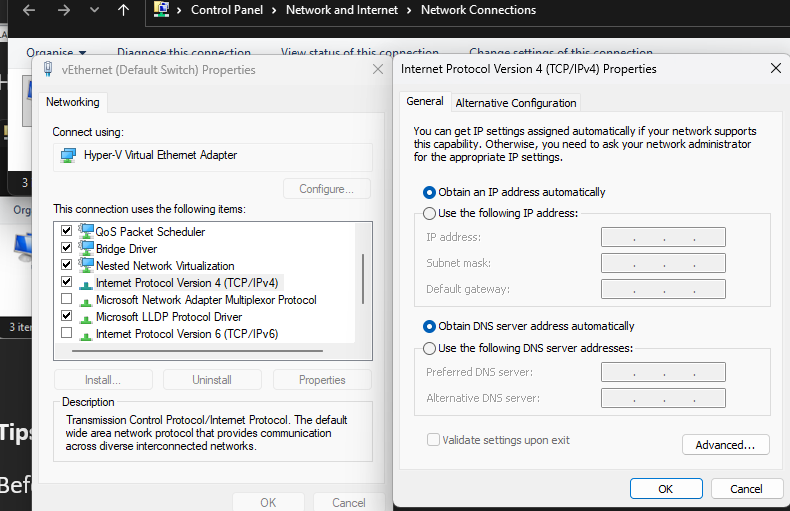
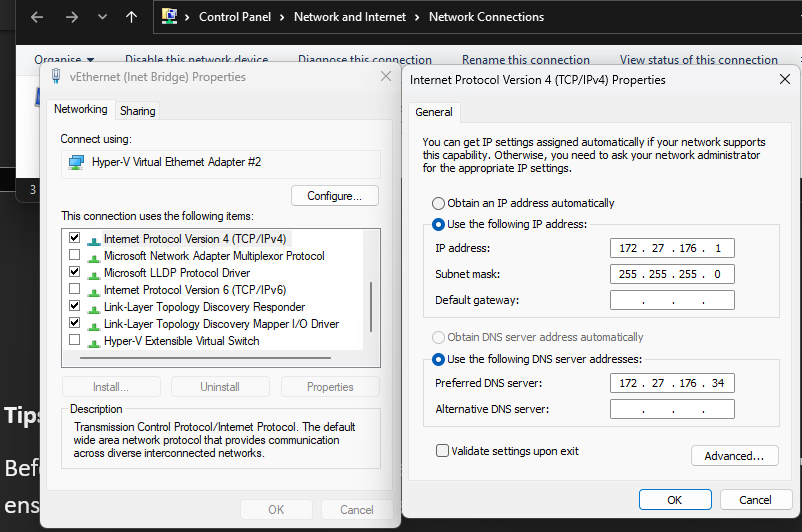
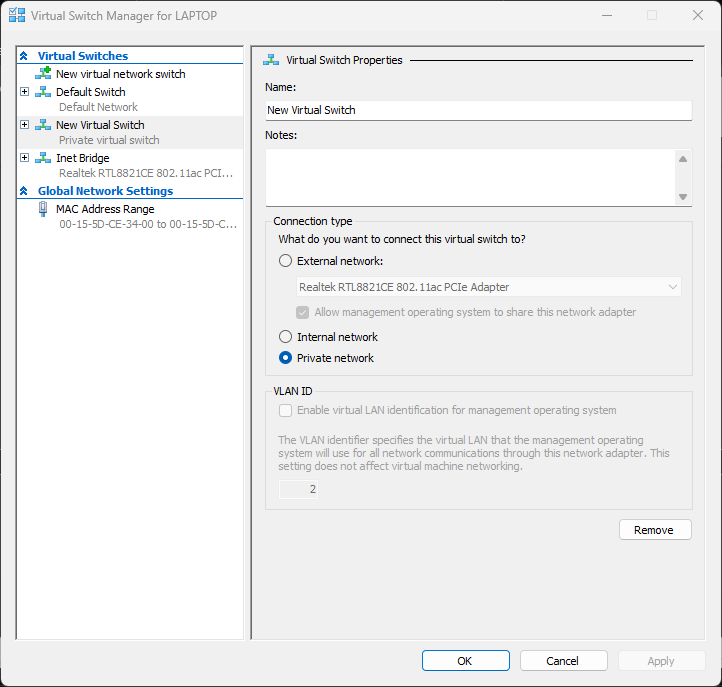
The HyperV New Default Switch does not have NAT functions so will retain static Ips on reboot. X.x.x.34 is the server2022 IP for DNS from the server.
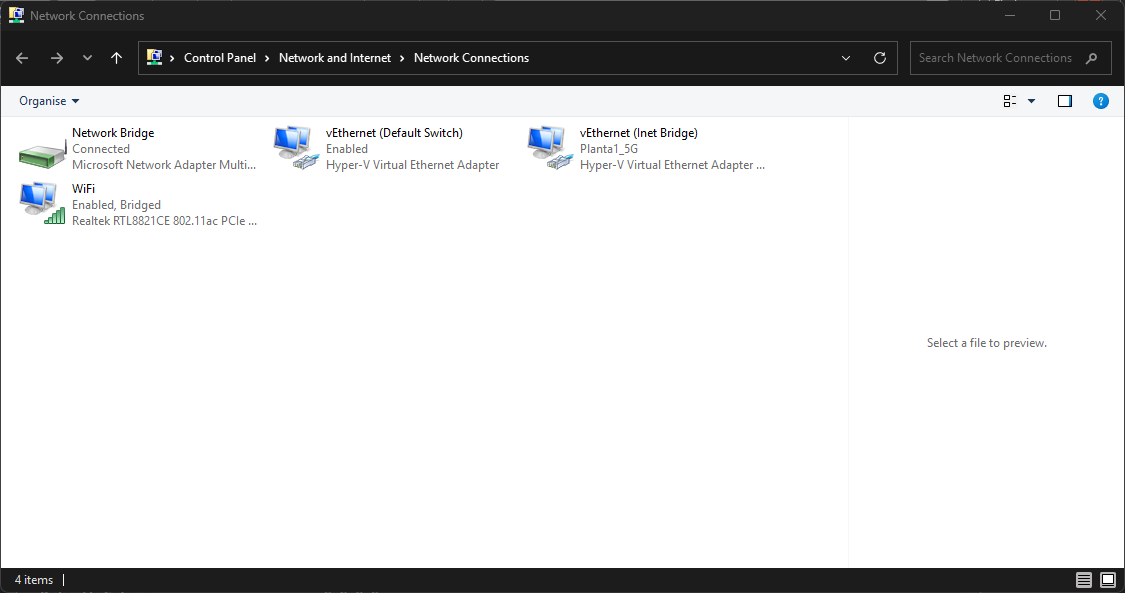
The laptop WiFi is gets DHCP from the router and is shared with the Inet Bridge:
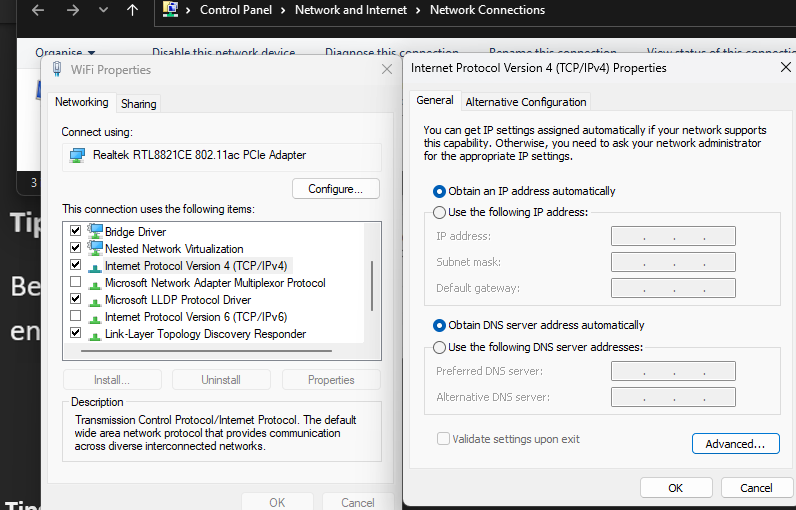
This shared adaptor allows the Internal VM LAN to access the Internet.
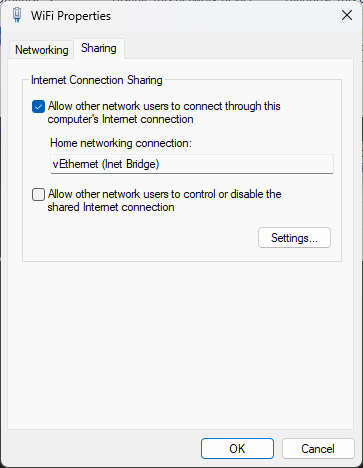
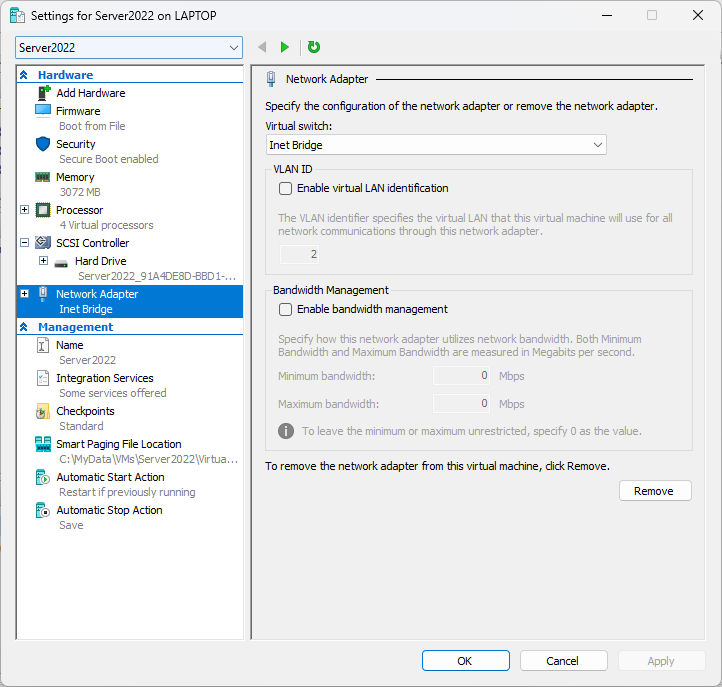
Each VM has the Default Switch (NAT) replaced with an adaptor renamed Inet Bridge to allow all the VMs to connect.
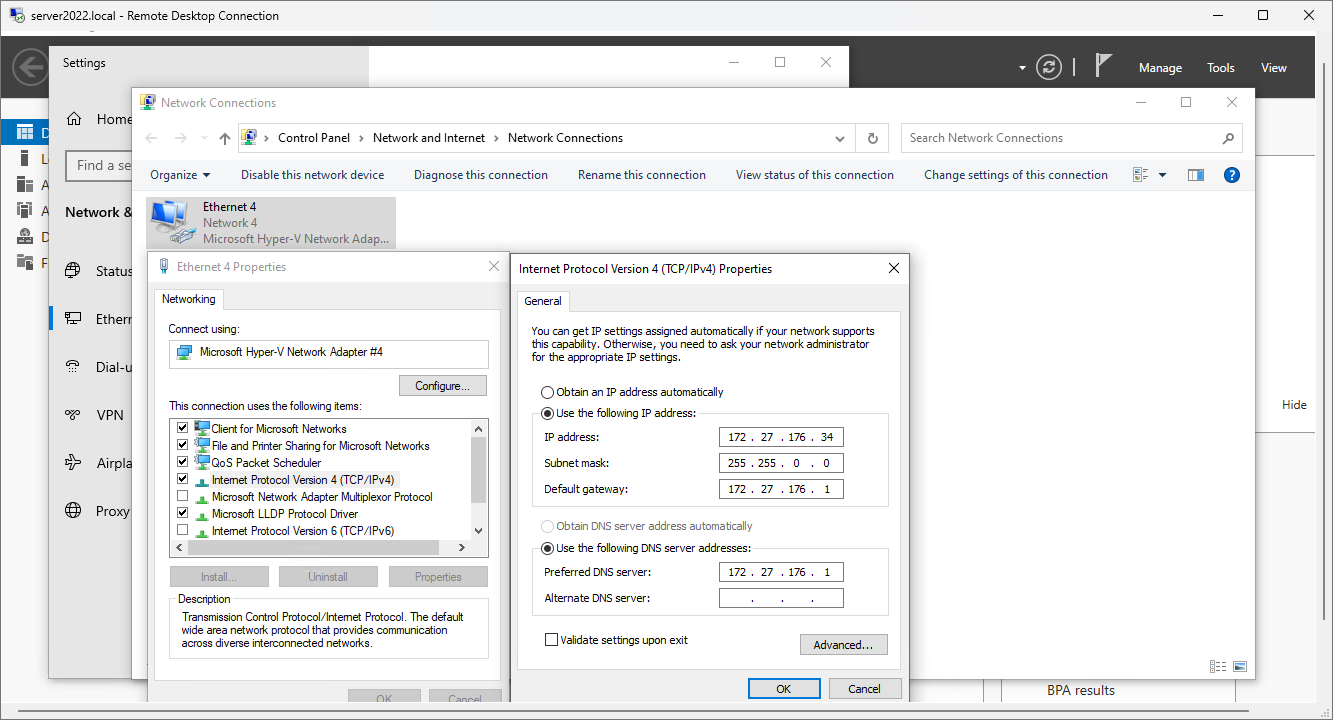
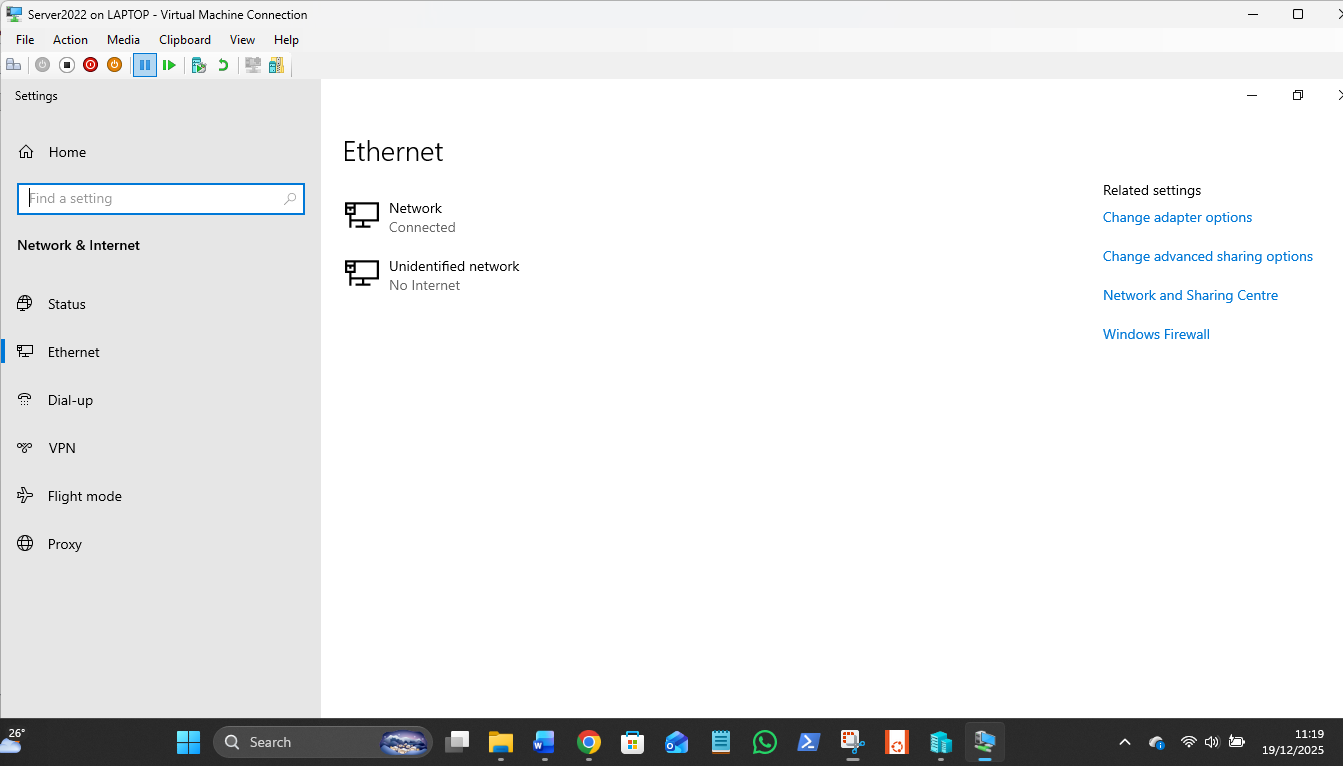
Server settings:
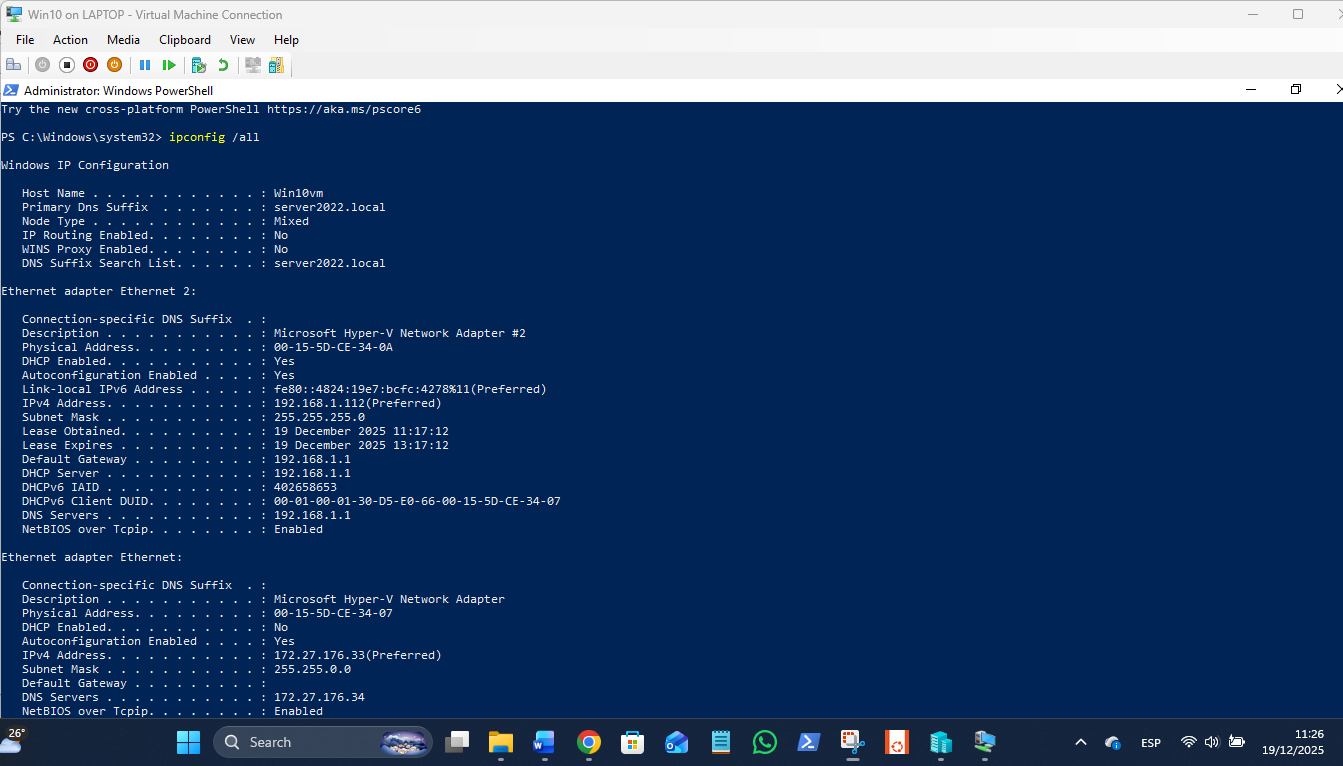
Win10 Ips:

Tips for your "Gold Master" Backup
Before you zip up those VHDX files or export them, here is a quick "pre-flight" check to ensure your backups are as small and stable as possible:
- Empty the Trash: Empty the Recycle Bin on all three VMs.
- Check DNS one last time: Make sure Win10VM and Win11VM still have their Host (A) records in the SBS DNS Manager after the reboot.
- The "Export" Method: Instead of just copying the .vhdx files, consider using the Export function in Hyper-V. This packages the VM configuration (RAM, CPU, and Virtual Switch settings) along with the disk, making it much easier to "Import" if you ever have to move to a new host laptop BUT it can disrupt the VM folders by creating nests of double drives as it doesn’t seem to merge with the folders already there?
- Just save the VMs folder in a backup drive. Easier. If the Default Switch is used, with static Ips set, Windows usually resets these back to internal DHCP values to suit the NAT function. If you want to retain static setting you need to add a New Default Switch, which does not use NAT to save settings and leave the Default Switch set auto for DCHP which will give it an APIPA neutral address so be useless.
PS> shutdown /s /t 0
Using this command via CMD actually bypasses the Shutdown Tracker window entirely.
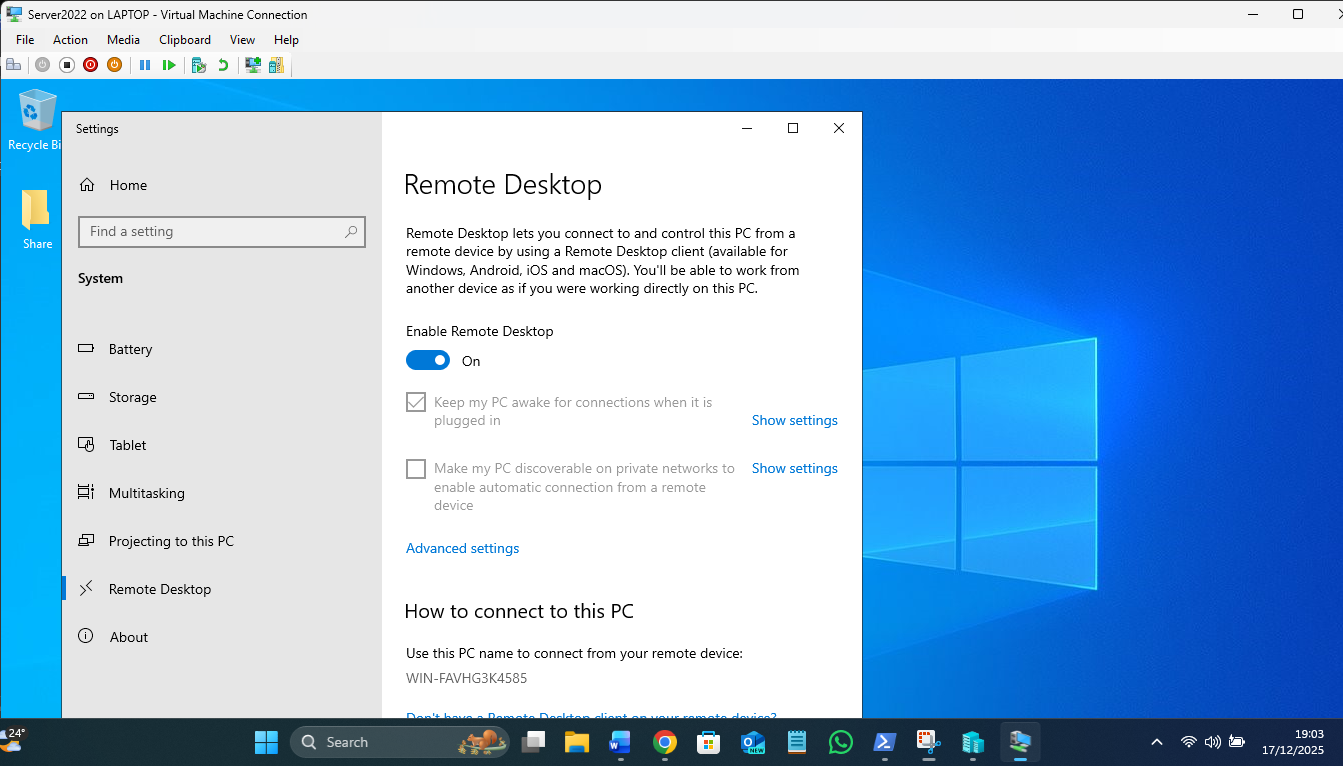
Server 2022: The L1 "First Login" Workflow
When you first land on the desktop, Server Manager will launch automatically. Here is your L1 checklist to get the lab "production-ready":
Local Server Configuration (The L1 Basics)
Click Local Server on the left. This is your "Dashboard" for the physical (or virtual) box.
- Time Zone: Ensure this is correct. If the server time is more than 5 minutes off from the workstations, Active Directory login will fail due to Kerberos security requirements.
- Remote Desktop: By default, it's Disabled. An L1 task is often "Enable RDP so the admins can get in." Click "Disabled" and toggle it to "Allow remote connections."
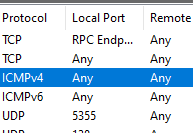
Note Protocol (not a port! = Any, as it is an App level connection, not OSI 3)
I set a Share so it is visible on the network. Noticeable difference in GUI ops speed over Win11 VM! 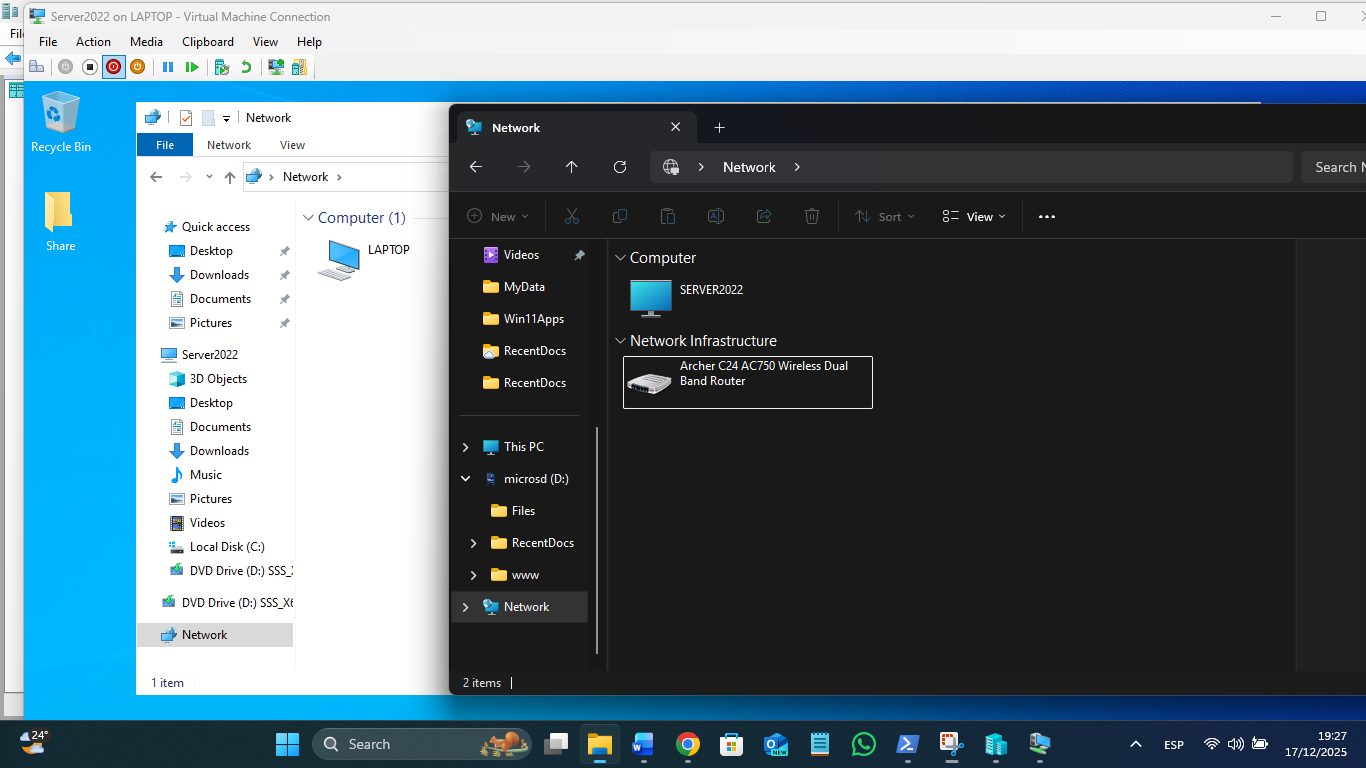
Set a static IP – server has to have one to have green boxes – no incorrect configs.
?? L1 Scenario: "I can't ping the new server!"
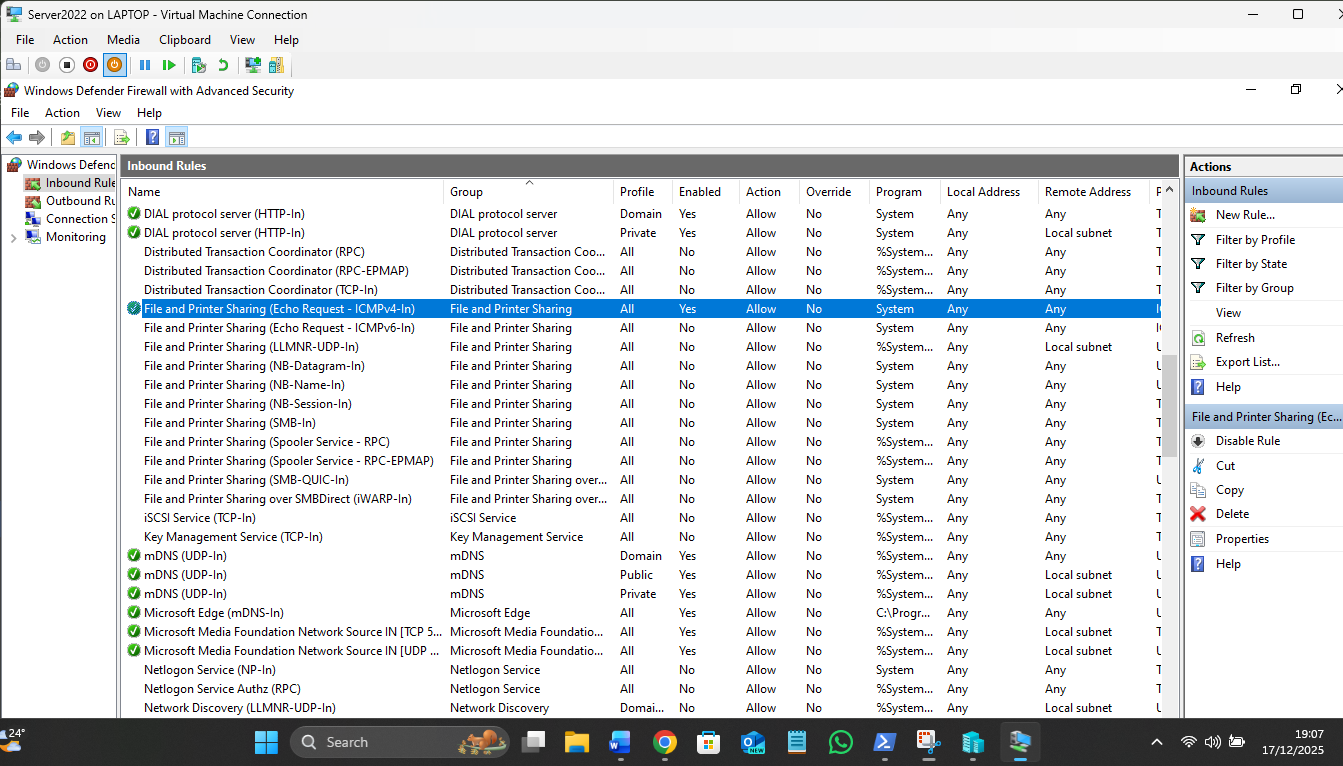
This is a classic ticket. By default, Windows Server 2022 has the Advanced Firewall locked down tight. It won't even respond to a PING (ICMP).
- The L1 Fix: 1. Go to Server Manager > Tools > Windows Firewall with Advanced Security.
2. In Inbound Rules, find File and Printer Sharing (Echo Request - ICMPv4-In).
3. Right-click and Enable Rule.
-
- Now your host machine should be able to "see" the VM on the network.
Visible in Network, but can’t share yet without Users/Computers etc added:
Server 2022 looks and feels very much like Windows 10/11, so you won't feel lost. The main difference is that everything is "Role-Based." You don't just "install an app"; you "Add a Role."
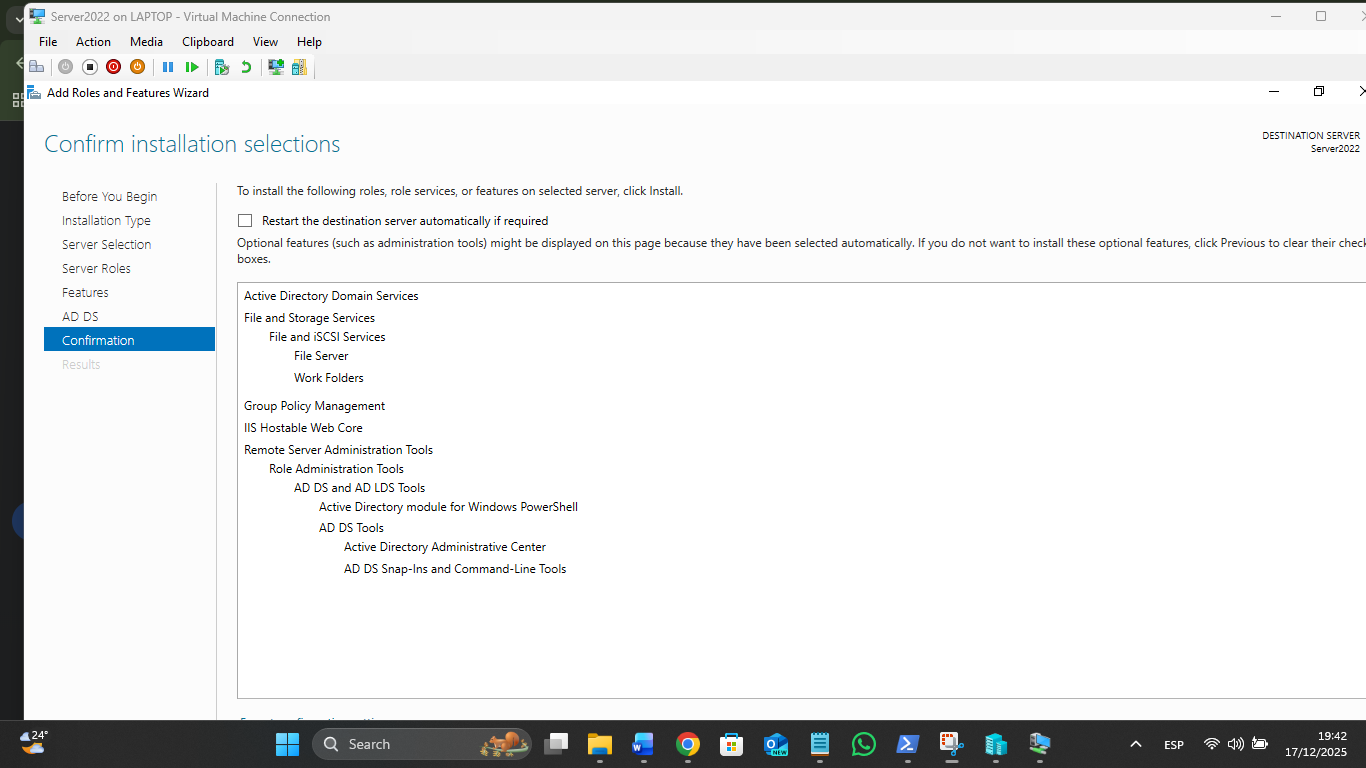
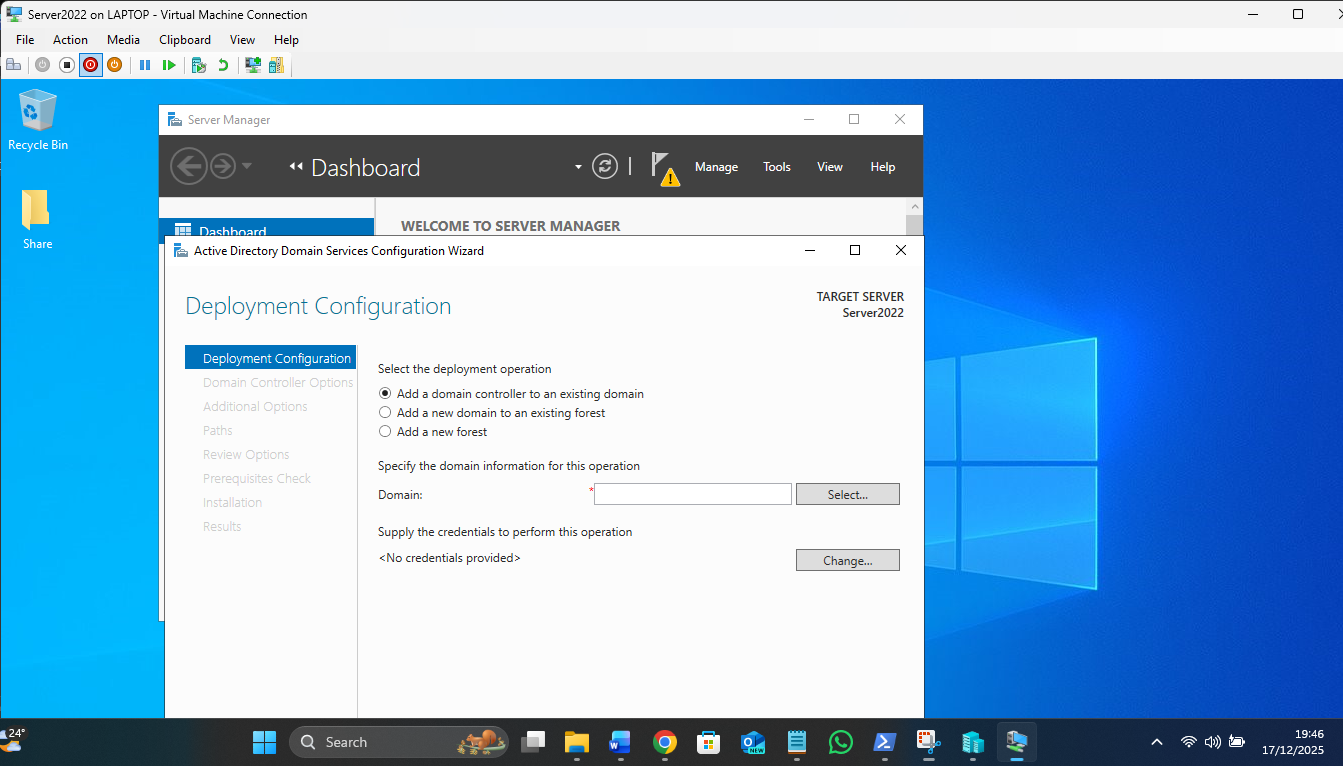
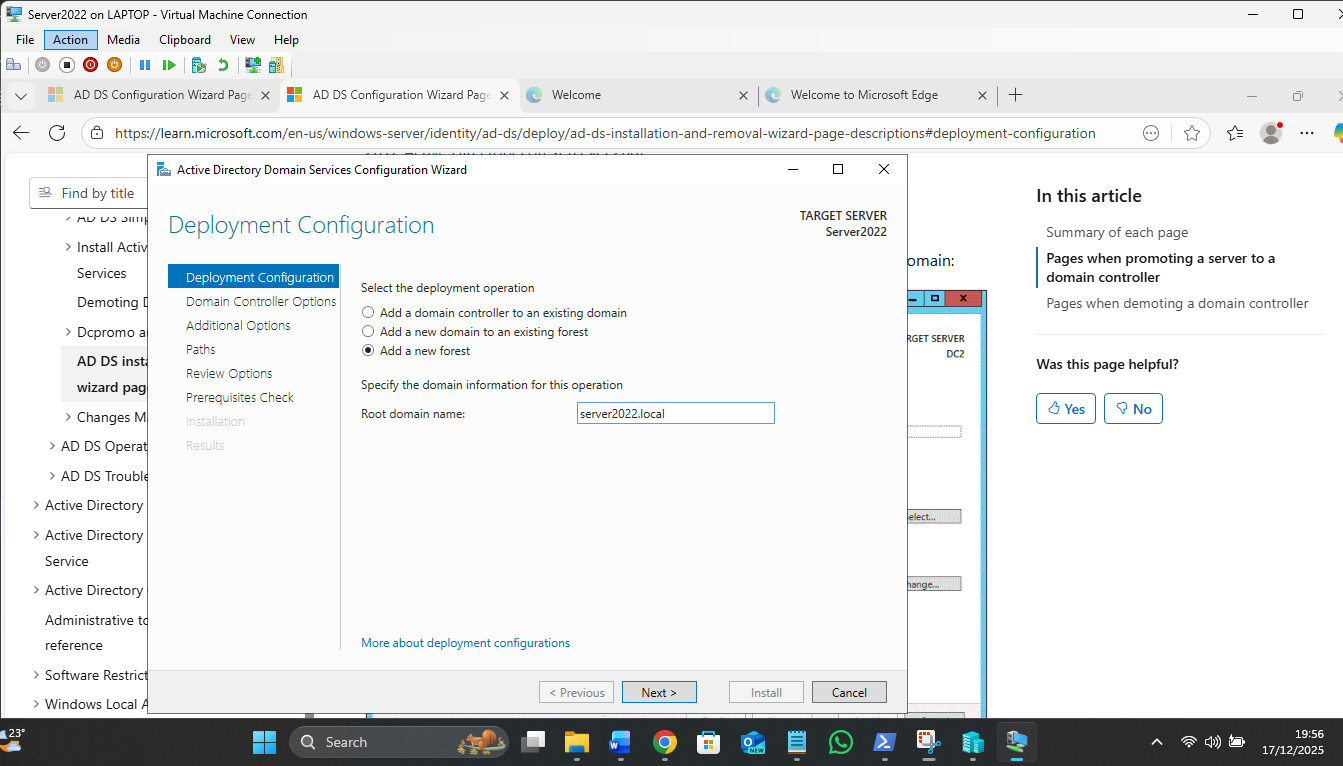
Promotion to a Domain Controller: For the first in a new domain, 3rd option – Add new forest!


? The "Nested" Network Flow
- The VM Level (172.27.176.x): Both your Server (.34) and Win11 VM (.35) live in this internal "NAT Bubble". For this to happen there needs to be 1 HyperV switch set to Internal;
Explain the NATd LAN for the VMs…it complicated as a Default Switch in HyperV uses NAT, bound to the Host Lan Adaptor, but a New Virtual Switch does not use NAT, apparent later…
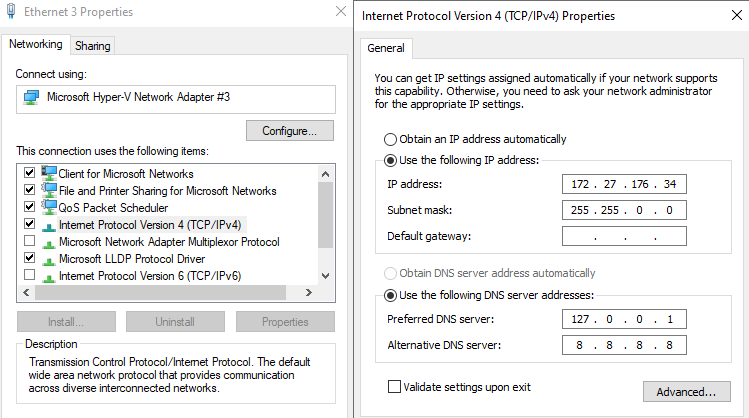
Each Net adaptor for each VM is also a default switch, set to the same static IP values that the Ghost DHCP gives it at first boot with IP6 unclicked to see IP4 addresses in IPCONFIG, so that it´s default gateway is the Hyper V 172.x.x.x network, DNS set to the server IP with 8.8.8.8 secondary. It should be able to ping the 192.168.1.1 wifi router due to NAT across the host Win11 net adaptor.
BUT this all changes later to get around not being able to change or disable the default switch in the host by adding 2 adaptors to each VM – one a New Default Switch to enable the internal LAN bubble, the other as a gateway through the host, using metric weighting and unusual IP4 static settings…its complicated!
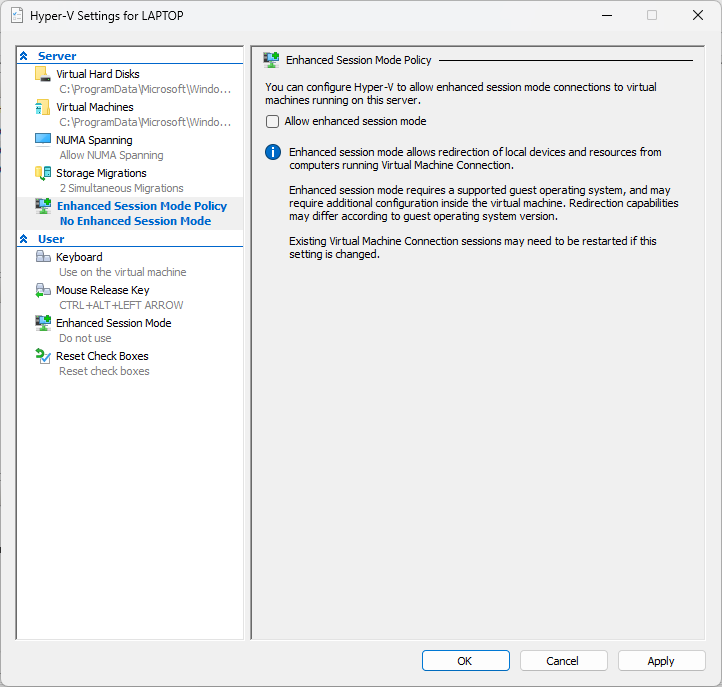
Enhanced session bug in my host needs to be Basic, else cant login. This means no text copy between host and VMs. Duh.

- The Virtual Gateway (172.27.176.1): This is the internal side of your laptop's Default Switch. It acts as the "door" out of the VM world.
- The Virtualized Host NAT: Your laptop takes that 172.x traffic and "translates" (NAT) it into your laptop's physical IP address.
- The Physical Level (192.168.1.x): Your laptop sends the request out via its WiFi adapter to your building's router.
- The Gateway (192.168.1.1): The building router sends it to the ISP and out to the Internet.
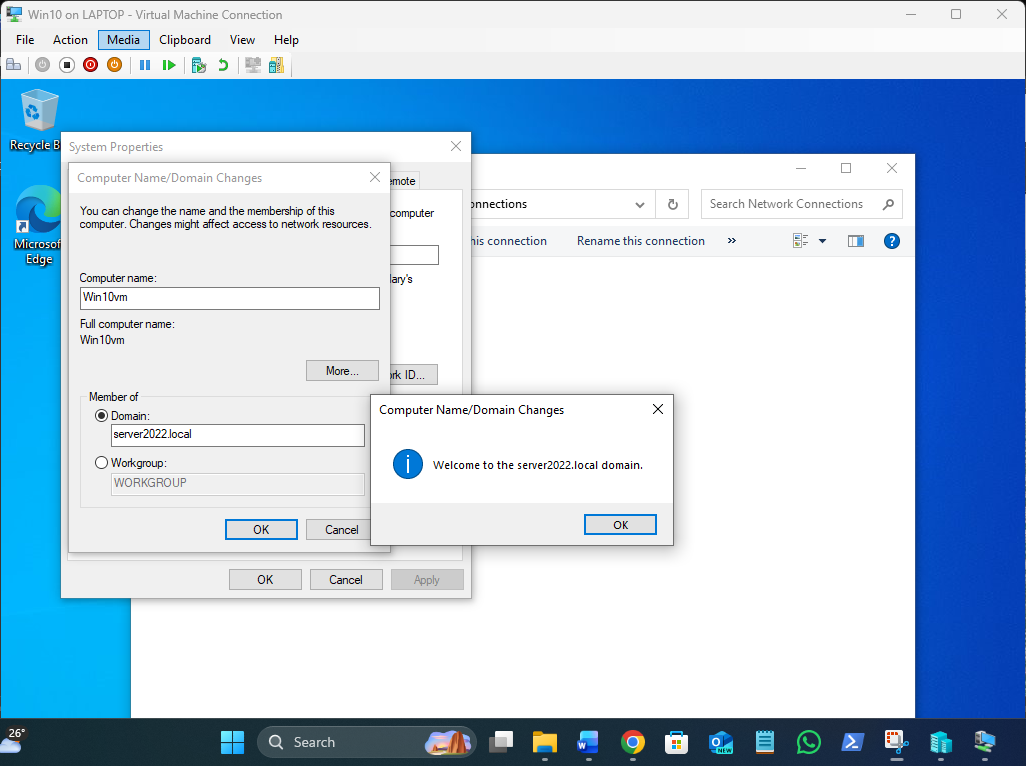
Adding win10:
Open CMD as Administrator on the Server.
Add the New Name as an Alias: Type: netdom computername Server2022.server2022.local /add:sbs.server2022.local (This tells AD: "I am still Server2022, but I am also going to be known as sbs.")
Make the New Name Primary: Type: netdom computername Server2022.server2022.local /makeprimary:sbs.server2022.local
Reboot the Server:
Shutdown /r /t 0
The server will now reboot and swap its identity to sbs without breaking the trust relationship.
Remove the Old Name (Optional): Once you log back in as sbs, you can clean up the old name:
netdom computername sbs.server2022.local /remove:Server2022.server2022.local
C:\Users\Administrator>netdom computername sbs.server2022.local /remove:Server2022.server2022.local
Successfully removed Server2022.server2022.local as an alternate name for the computer.
The command completed successfully.
C:\Users\Administrator>hostname
sbs
wont that name change affect the win 10 vm login?
Yes, it absolutely will. Because you changed the "Boss" of the domain's name from Server2022 to sbs, your Windows 10 VM is currently holding a "membership card" for a server that technically doesn't exist by that name anymore.
Here is exactly what will happen and how to fix it for your Sunday project:
?? The Problem: The "Broken Trust"
The Win10 VM looks for the Domain Controller using DNS and Kerberos.
- DNS: This is likely okay because the DC (sbs) updated its own record.
- Kerberos: This is the problem. The Win10 VM has a "Secure Channel" established with Server2022. Now that the server is sbs, the Win10 machine might give you an error saying: "The trust relationship between this workstation and the primary domain failed."
?? How to Fix the Win10 VM
You don't need to unjoin and rejoin the domain (which is a hassle). You can usually refresh the trust relationship using PowerShell on the Windows 10 VM:
- Log in to the Win10 VM (If domain login fails, use the local admin: .\LocalAdminName).
- Open PowerShell as Administrator.
- Run this command: Test-ComputerSecureChannel -Repair -Credential (Get-Credential)
- Enter your credentials: Type LABSERVER2022\Administrator and the password.
- Restart the Win10 VM.
Renaming the Primary Domain Controller from Server2022 to SBS did not disrupt client workstation connectivity, as the Active Directory Forest name (server2022.local) remained constant. Client authentication and trust were maintained via existing DNS resolution within the forest.
server2022.local - does not show up in my Network icon though has a standard share set, but if I type \\sbs it connects to netlogin snd sysvol foders, but not with \\server2022.local ?
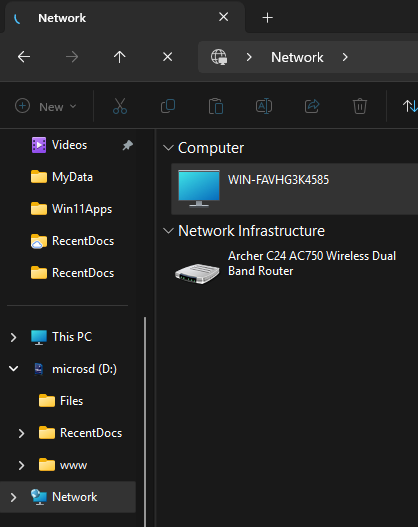
Why it's missing from the "Network" Icon
Windows Server 2022 disables Network Discovery by default for security. To make it show up in that "Network" folder:
- Open Services.msc (The list of background tools).
- Find these two services and set them to Automatic (Started):
- Function Discovery Provider Host
- Function Discovery Resource Publication
- Once those are running, the server "announces" itself to the network.
roaming profile working for Steve, you need to set up the "landing zone" on the server first.
Here is the exact order of operations on your sbs server:
?? Step 1: Create and Share the Folder
You need a central location where the server will store the profile data.
- Create a folder on your data drive (e.g., E:\Profiles).
- Share the folder:
- Right-click Profiles > Properties > Sharing > Advanced Sharing.
- Check Share this folder.
- Name the share Profiles$ (Adding the $ makes it hidden from casual browsing, which is a pro move).
- Permissions: Click Permissions and give Everyone - Full Control.
- Note: Don't worry, the security is actually handled in the next step (NTFS).
? Step 2: Set the NTFS Security (The "Gotcha" Step)
This is where most people get the "Temporary Profile" error. You must set these specifically so Windows can create Steve's folder for him.
- In the same Properties window, go to the Security tab > Advanced.
- Disable Inheritance and "Convert inherited permissions into explicit permissions."
- Ensure the following are set:
- CREATOR OWNER: Full Control (Subfolders and files only).
- System & Administrators: Full Control (This folder, subfolders, and files).
- Authenticated Users: List folder/Read data, Create folders/Append data (This folder only).
? Step 3: Link the Path to Steve’s User Object
Now you tell Active Directory to use that folder for Steve.
- Open Active Directory Users and Computers.
- Find Steve (the domain user, not the local/Hotmail one).
- Right-click Steve > Properties > Profile tab.
- In the Profile path field, type: \\sbs\Profiles$\%username%
- Click Apply. (You will see %username% automatically change to steve).
? What to do next in Win10
Once the server is ready, the "magic" happens when Steve logs in:
- Go to your Win10 VM.
- Sign out of your current account.
- Log in as LABSERVER2022\steve.
- Windows will see that path on sbs, create a folder called steve.V6 (for Windows 10), and start syncing.
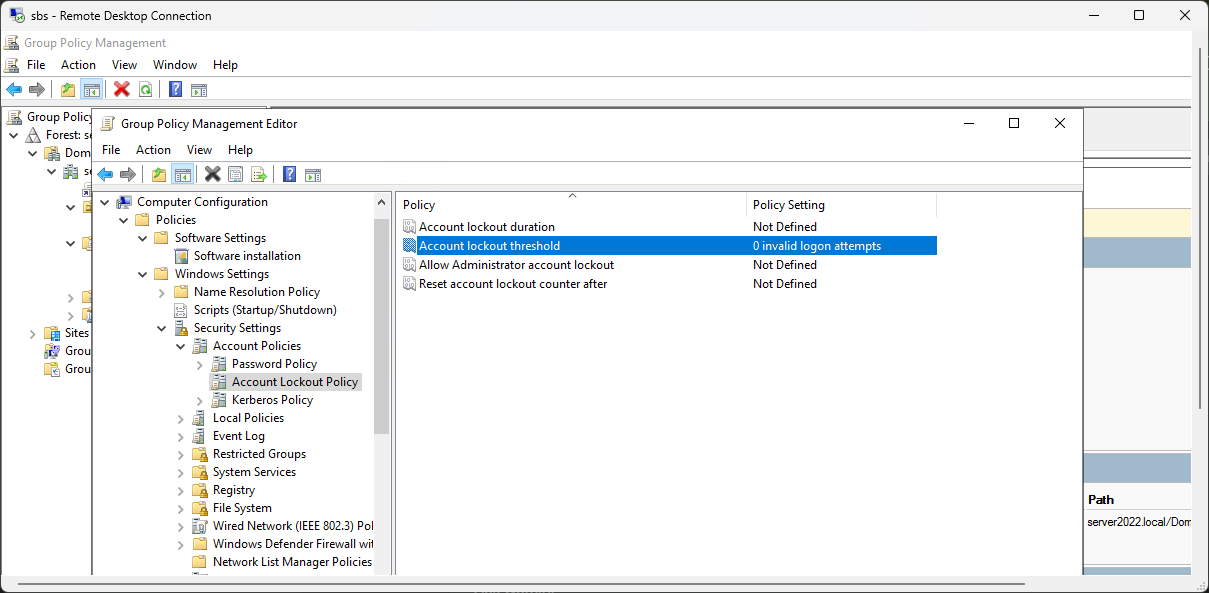
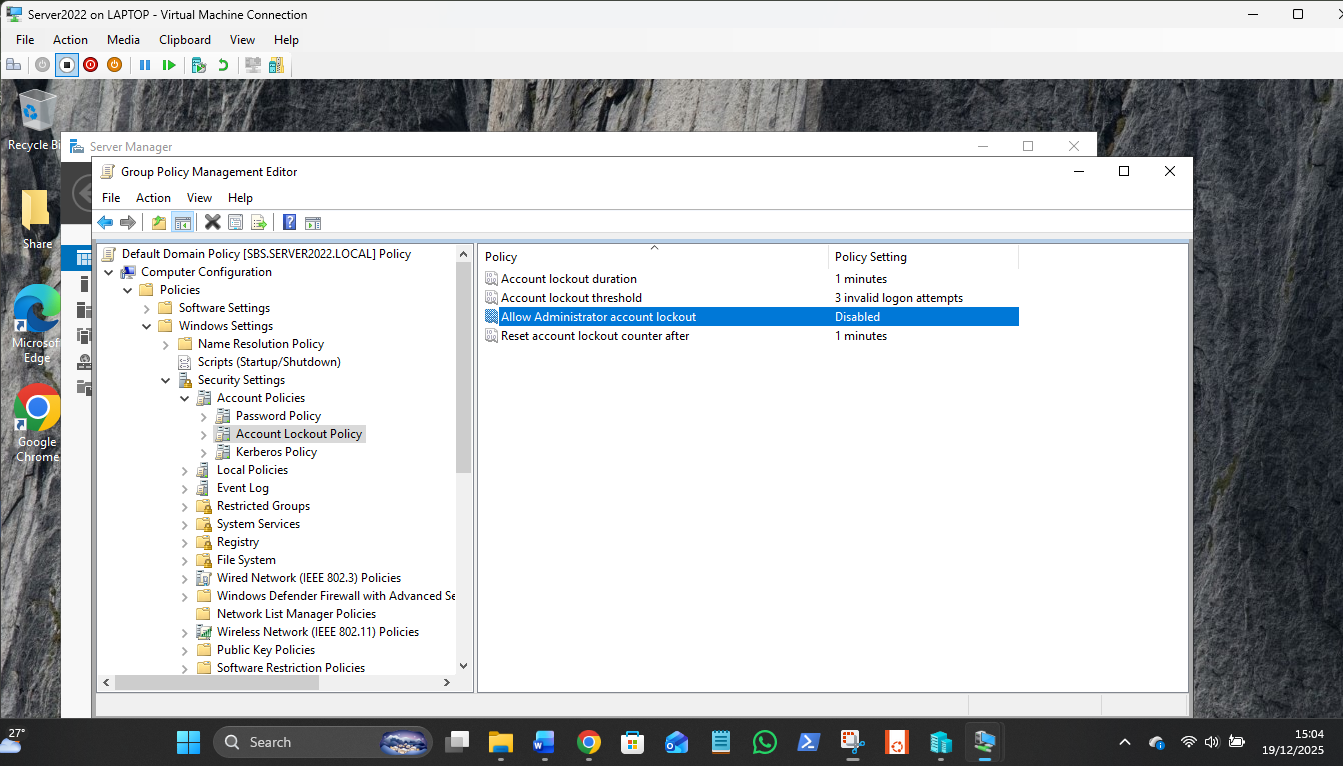
Account Lockout Policy:
How to set the "Trap" for Steve
To make the lockout happen on your Win10 VM, you need to change this in the Domain policy, not the local one:
- Close that window and open Group Policy Management (gpmc.msc).
- Navigate to Domains > server2022.local.
- Right-click Default Domain Policy and select Edit.
- Go to the same path: Computer Configuration > Policies > Windows Settings > Security Settings > Account Policies > Account Lockout Policy.
- Double-click Account lockout threshold and change it to 5.
- Windows will likely pop up a box suggesting you also set the duration and reset timer to 30 minutes. Just click OK to accept those defaults.
? The "Secret Sauce" for L1
Policies don't apply instantly. To make the Win10 VM respect the new "5 attempts" rule immediately:
- Go to your Win10 VM.
- Open Command Prompt and run: gpupdate /force
Now, when you try those bad passwords again, it won't just keep "thinking"—it will slam the door shut after the 5th try.
The L1 Password Reset Procedure
- Open Active Directory Users and Computers on the sbs server.
- Find Steve Edwards in the Users list.
- Right-click Steve and select Reset Password....
- Set the Temporary Password: Type something like Spring2025!.
- The "L1 Golden Rule": Check the box "User must change password at next logon."
- Why? This ensures that only Steve knows his actual password once he logs in, protecting you from liability.
- Click OK.
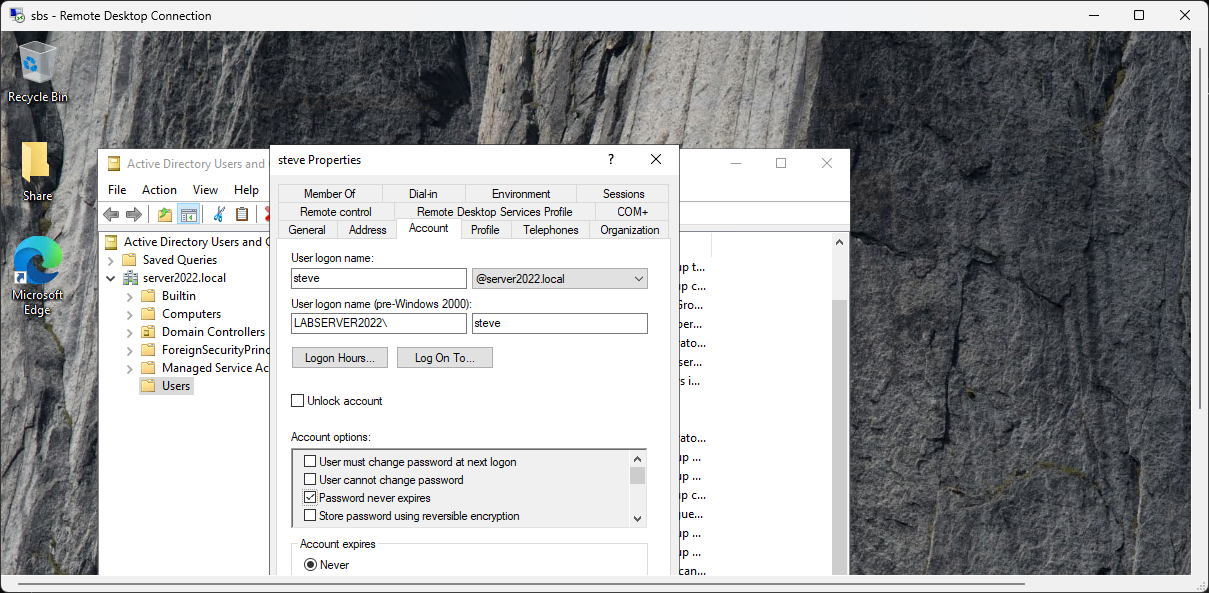
the "change pword next login box is greyed out"
That is a classic "caught ya" moment in Active Directory! When that box is greyed out, it’s usually because of a conflicting setting on the Account tab.
?? Why it's Greyed Out
You cannot force a user to change their password if the account is set so that the password never changes or cannot be changed.
Check these two boxes on Steve's Account tab:
- "User cannot change password": If this is checked, the "change at next logon" box will be greyed out because those two rules contradict each other.
- "Password never expires": Sometimes, depending on the Windows Server version, having this checked will prevent you from enforcing a "next logon" change until you uncheck it.
? The L1 Fix
To get control back:
- Uncheck "User cannot change password".
- Uncheck "Password never expires" (at least temporarily).
- Hit Apply.
- Now, the "User must change password at next logon" box should be clickable again.
This network gets broken on reboots as the default switch is tied to the host net card, so the static Ips I set to get the VMs working is fucked by the Default switch getting a new random set of addresses – MS lunacy!
THIS IS WHERE you have to create a new virtual switch set as Internal, then set all the VMs to use THAT switch, making the Default Switch, that cannot be removed, redundant on reboots.
NOTE you leave the default gateway blank as that is already configured in the Host’s netcard (wifi).
The only way to get a working VM subnet domain that has Inet access also is add 2 adaptors to each VM and share the host NIC with the VMs/Default switches, 1 set to bridged for each VM so each has a gateway out of the internal network via the host nic.
This dual switch per VM gives the VM 2 networks on the 172.27.172.34 static for the Internal network and the other from the Host WIFI router on 192.168.1.x:

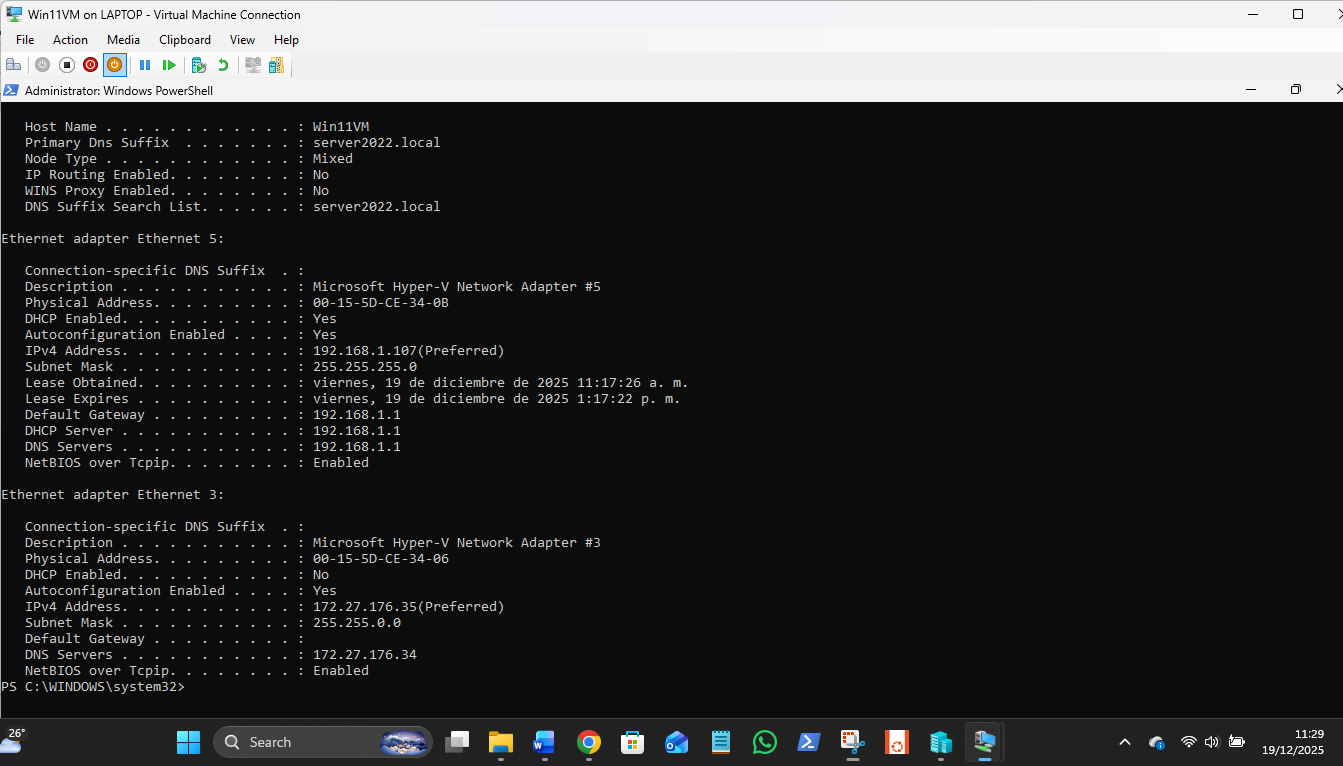
The 172 LAN is static Ips, the 192 LAN is auto. As usual, Win nets next quite work, with the Win11 VM missing from view but available via \\Win11VM in Explorer:
The default switch had to be made irrelevant on the host, as it cannot be deleted or disabled, so the metrics set for it are 10 to make it a bad option for traffic for the domain LAN VMs. This needs to be done on all 3 VMs, and the New Virtual Switch given metrics of 500 on each VM – complicated nonsense due to MS randomising the Default switch static settings every reboot, twats!:
The host shows a confusing mess, but it works to get the VMs and host connected to each other by Shares and ping and all have Internet paths:
Never consistency with MS! PC own address gets shown in IP6 despite being unclicked in all adaptor! FFS…
So I have a working VM LAN on 172.27.176.x, and a gateway for the VMs via 192.168.1.1. Via Network icon the VMs can see the host "laptop" but cannot login as a password field is required when the login to my host is an online MS account that uses a PIN, not a password.
Why this matters for the job
In an L1 role, you will get calls from users saying: "I can't get into the shared drive!" 90% of the time, it's because they are trying to use their laptop's PIN instead of their Domain/Network password. Teaching them that "A PIN is for the device; a Password is for the network" is a standard L1 troubleshooting script.
Account Lockout Policy:
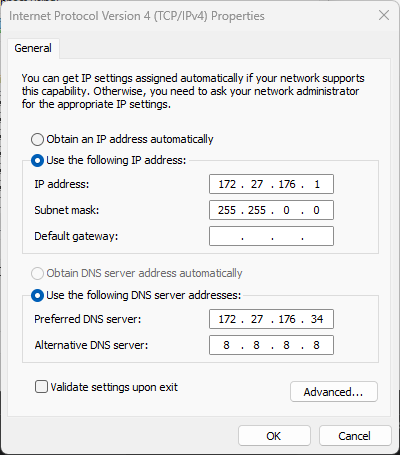
The 1st Net Adaptor Settings for Server2022:
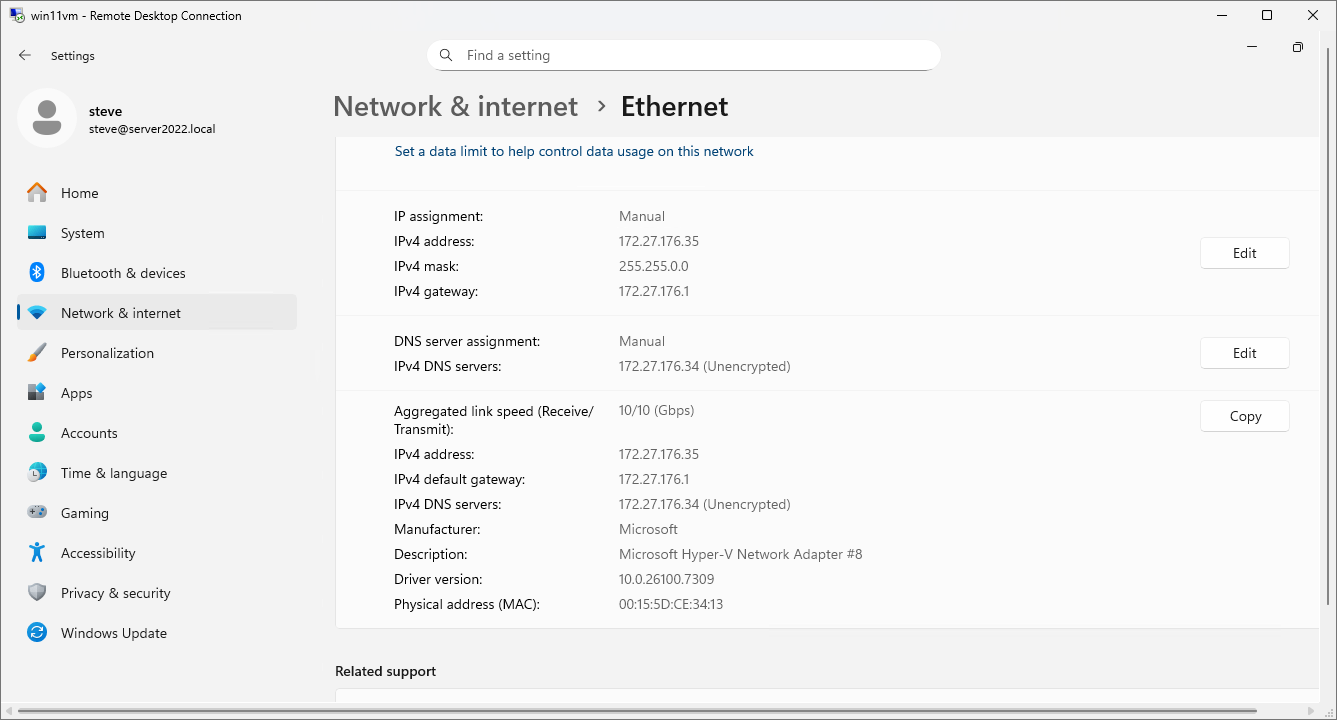
The 1st Net Adaptor Settings for Win10:
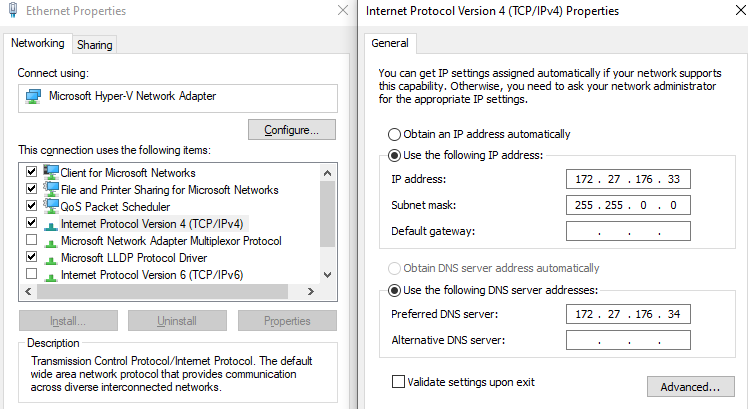
The Inet Bridge adaptor is set to automatic (DCHP, DNS, Gateway etc)
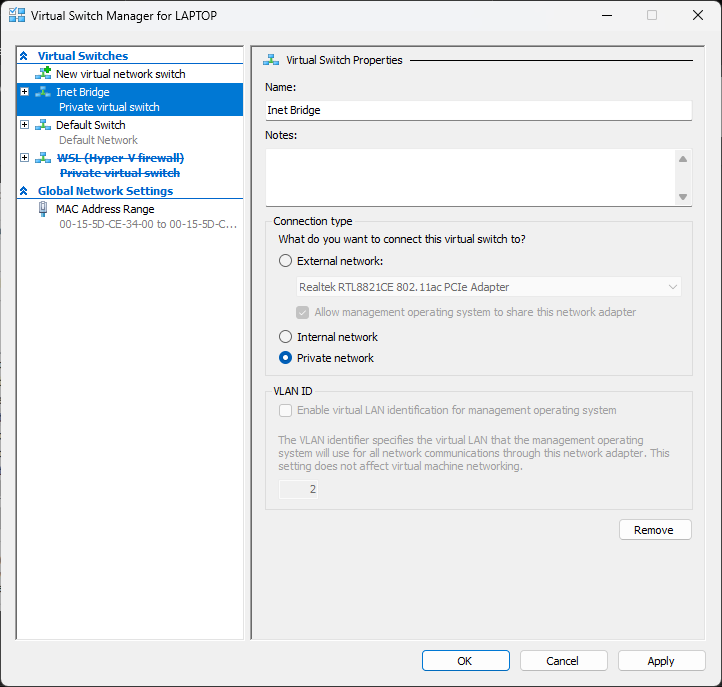
The VM host adaptor for the Default Switch (Inet Bridge)

Metrics were set so the net data paths between the two adaptors are widely attractive for one and unattractive for the other…metrics 500 (lo priority) for the static adaptor and 10 (hi priority) for the auto.
| Device | IP Address | Role |
|---|---|---|
| Host Inet Bridge | 172.27.176.1 | The "Gateway" for the VMs to talk to your laptop. |
| SBS Server | 172.27.176.34 | The Domain Controller / DNS Provider. |
| Win10VM | 172.27.176.33 | Static Workstation |
| Win11VM | 172.27.176.35 | The Static Workstation you just restored. |
Joining a Windows 11 VM to an older SBS domain (which likely uses a .local extension) is often a "clash of generations." Windows 11 has much stricter security defaults than previous versions.
Since your pings to .1 and 8.8.8.8 are working, the "pipe" is open, but the Domain Handshake is likely being blocked by one of three things.
?? Step 1: The "DNS Search" Test
Windows 11 is very stubborn—if it can't find the _ldap records for the domain, it won't even try to join.
In the Win11 VM, open Command Prompt and run:
nslookup yourdomain.local
- If it fails: Your Win11 VM is likely using the Host (.1) or Google (8.8.8.8) as its primary DNS.
- The Fix: Go to IPv4 settings and ensure 172.27.176.34 (SBS) is the ONLY DNS server listed. Remove the others temporarily.
?? Step 2: Disable IPv6
Windows 11 often tries to find the Domain Controller via IPv6 first. If your SBS server isn't configured for IPv6 (which it probably isn't), the join request will time out.
- Go to Network Connections in the Win11 VM.
- Right-click your adapter -> Properties.
- Uncheck "Internet Protocol Version 6 (TCP/IPv6)".
- Try the join again.
?? Step 3: SMB 1.0 / Legacy Compatibility
SBS (depending on the version) might be trying to communicate using older protocols that Windows 11 has disabled by default for security.
- Search for "Turn Windows features on or off".
- Look for SMB 1.0/CIFS File Sharing Support.
- Ensure the SMB 1.0/CIFS Client is checked.
- Restart the VM.
?? The "NetID" Shortcut
If the GUI "Join Domain" button is spinning forever, try the old-school way. It often gives a more specific error message:
- Right-click the Start button -> System.
- Click Advanced system settings -> Computer Name tab.
- Click Network ID... and follow the wizard.
? Error Message Decoder
If it fails again, what is the exact error message?
- "An Active Directory Domain Controller (AD DC) ... could not be contacted": This is 100% a DNS issue.
- "The specified network name is no longer available": This is an SMB/Firewall issue.
- "Access Denied": You are communicating, but your Administrator credentials or permissions are being rejected.
When you ran nslookup, did it return the correct IP address for your SBS server?
| Checkpoint | Command / Action | Why? |
|---|---|---|
| Connectivity | ping [DC-IP] | Confirms a basic path exists. |
| DNS | nslookup [DomainName] | Confirms the PC can "find" the DC. |
| Time | w32tm /query /status | Confirms Kerberos won't reject the login. |
| Edition | winver | Confirms it's not "Home Edition." |
| Firewall4 | wf.msc5 | Ensures RPC/NetBIOS traffic isn't blocked.6 |
Back to L1 Support theory. Assume you have no knowledge of my current VM domain issues. What are the L1 support expectation possible causes for a Win11 PC not being able to join a Domain?
In an L1 Support interview or scenario, the expectation is that you follow a logical, "bottom-up" troubleshooting methodology (OSI Model layers 1 through 3).
If a Windows 11 machine can't join a domain, an L1 tech is expected to rule out the "low-hanging fruit" before escalating to Tier 2 (Server/Network Admins).
1. Physical & Basic Connectivity (Layer 1 & 2)
The most common mistake is assuming the "pipe" is open when it isn't.
- Network Profile: Is the connection set to "Public"? Windows 11 aggressively blocks discovery on Public profiles. It must be Private.
- Media State: Is the cable plugged in / is the Virtual Switch connected?
- IP Conflicts: Does the PC have a valid IP in the same subnet as the Domain Controller (DC), or is it stuck with an APIPA address (169.254.x.x)?
2. DNS: The "Universal" Domain Killer (Layer 3)
In 90% of domain join failures, DNS is the culprit.
- Wrong DNS Server: The client is using the Router (192.168.1.1) or Google (8.8.8.8) instead of the DC's internal IP.
- The L1 Test: Run nslookup [domain.local]. If it doesn't return the DC's IP address, the join will always fail.
- IPv6 Interference: Sometimes Windows 11 tries to resolve the domain via IPv6. L1 techs often disable IPv6 temporarily to force the join over IPv4.
3. Time Synchronization (Clock Skew)
Active Directory relies on Kerberos, which is extremely sensitive to time.
- The 5-Minute Rule: If the workstation's clock is more than 5 minutes off from the Domain Controller's clock, the security handshake will fail.
- The L1 Fix: Check the BIOS time or use net time \\DC-NAME /set /y.
4. Windows Edition & Credentials
- Windows Home vs. Pro: You cannot join Windows 11 Home to a domain. L1 must verify the user has Pro, Enterprise, or Education.
- Account Permissions: Does the user (or the tech) have the "Add Workstations to Domain" right? By default, any authenticated user can join 10 machines, but this is often restricted.
- Existing Computer Object: If a computer with the same name already exists in Active Directory, and the tech doesn't have "Reset Password" rights on that object, the join will fail with "Access Denied."
5. Summary Table for L1 Quick-Check
| Checkpoint | Command / Action | Why? |
|---|---|---|
| Connectivity | ping [DC-IP] | Confirms a basic path exists. |
| DNS | nslookup [DomainName] | Confirms the PC can "find" the DC. |
| Time | w32tm /query /status | Confirms Kerberos won't reject the login. |
| Edition | winver | Confirms it's not "Home Edition." |
| Firewall | wf.msc | Ensures RPC/NetBIOS traffic isn't blocked. |
? The "Golden Answer" for an Interview
If asked this in a test, say: "I would start by verifying the DNS settings, as the machine must be able to resolve the domain's SRV records. Then, I'd check the system time for clock skew and ensure the machine is running a Pro or Enterprise edition of Windows."
Since we know your Win11 VM is having this exact issue, would you like to run the nslookup and winver checks to see which of these L1 hurdles is stopping you?
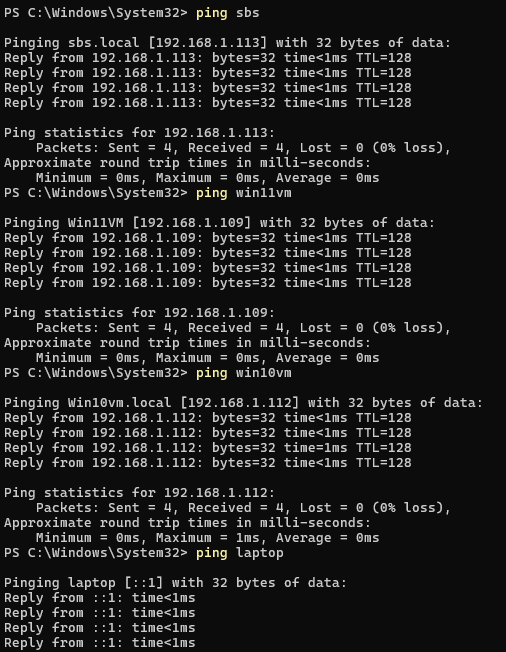
PS C:\WINDOWS\system32> ping sbs
Pinging sbs.local [172.27.176.34] with 32 bytes of data:
Reply from 172.27.176.34: bytes=32 time<1ms TTL=128
Reply from 172.27.176.34: bytes=32 time=1ms TTL=128
Reply from 172.27.176.34: bytes=32 time<1ms TTL=128
Reply from 172.27.176.34: bytes=32 time=1ms TTL=128
Ping statistics for 172.27.176.34:
Packets: Sent = 4, Received = 4, Lost = 0 (0% loss),
Approximate round trip times in milli-seconds:
Minimum = 0ms, Maximum = 1ms, Average = 0ms
PS C:\WINDOWS\system32>
PS C:\WINDOWS\system32> nslookup sbs.server2022.local
DNS request timed out.
timeout was 2 seconds.
Server: UnKnown
Address: 172.27.176.34
Name: sbs.server2022.local
Address: 172.27.176.34
PS C:\WINDOWS\system32> w32tm /query /status
The following error occurred: The service has not been started. (0x80070426)
PS C:\WINDOWS\system32> w32tm /query /status
Leap Indicator: 3(not synchronized)
Stratum: 0 (unspecified)
Precision: -23 (119.209ns per tick)
Root Delay: 0.0000000s
Root Dispersion: 0.0000000s
ReferenceId: 0x00000000 (unspecified)
Last Successful Sync Time: unspecified
Source: Local CMOS Clock
Poll Interval: 10 (1024s)
PS C:\WINDOWS\system32> Test-NetConnection -ComputerName 172.27.176.34 -Port 445
ComputerName : 172.27.176.34
RemoteAddress : 172.27.176.34
RemotePort : 445
InterfaceAlias : Ethernet 6
SourceAddress : 172.27.176.35
TcpTestSucceeded : True
PS C:\WINDOWS\system32> Get-NetFirewallProfile | select Name, Enabled
Name Enabled
---- -------
Domain True
Private True
Public True
The Next Steps (L1 Troubleshooting Logic)
Before we try to join again, we must resolve these two blocks.
Step 1: Disable Firewall (Standard L1 "Rule Out" Procedure) On the Win11 VM, run: Set-NetFirewallProfile -Profile Domain,Private,Public -Enabled False
Step 2: Start/Sync Time (Ensuring the clock is identical to SBS) On the Win11 VM, run: w32tm /resync /force
PS C:\WINDOWS\system32> Set-NetFirewallProfile -Profile Domain,Private,Public -Enabled False
PS C:\WINDOWS\system32>
PS C:\WINDOWS\system32> w32tm /resync /force
>>
Sending resync command to local computer
The command completed successfully.
PS C:\WINDOWS\system32> nslookup sbs.server2022.local
Server: UnKnown
Address: 172.27.176.34
Name: sbs.server2022.local
Address: 172.27.176.34
The Server: UnKnown persists because there is no Reverse Lookup Zone or PTR Record for the SBS server. In a professional environment, this is an L1 "Fix it before proceeding" item.
However, since the name still resolves to the correct IP, we can attempt the join. If it fails, we know exactly what to fix in the SBS DNS Manager.
The Join Attempt
Run this command in PowerShell:
Add-Computer -DomainName "server2022.local" -Restart
One Final L1 "Best Practice"
Now that you are in, Turn the Firewall back on but do it the right way.
Since the VM now knows it's on a Domain, it will use the "Domain Profile" for its firewall. Most of the ports needed for the domain to function are opened automatically once the machine realizes it's "Home" on the DC.
Run this to bring the walls back up: Set-NetFirewallProfile -Profile Domain,Private,Public -Enabled True
? The Lesson Learned
In an interview, if they ask: "What's the hardest part of a domain join?" You can now answer from experience: "Ensuring DNS, Time Sync, and Security Profiles are aligned before even touching the 'Join' button."
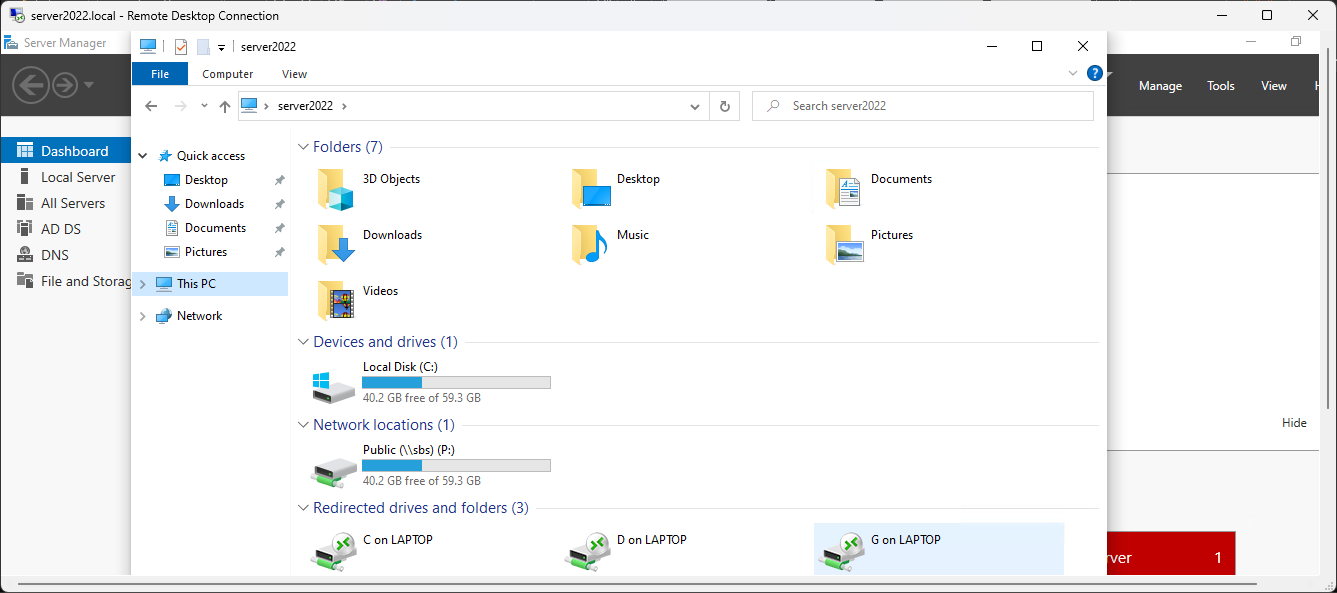
Login Script Example:
_______________________________________________________________
@echo off
net use P: /delete /y
net use P: \\sbs\Public
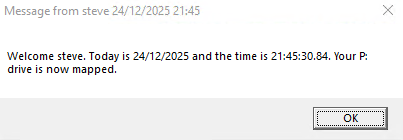
:: This is the line that creates the pop-up box with your original info
msg * "Welcome %USERNAME%. Today is %DATE% and the time is %TIME%. Your P: drive is now mapped."
pause
________________________________________________________________
The P: drive folder has to be already created and shared on the server c: drive for the script to map it.
Shutting Down fully before backup; Shut down each vm, server LAST! Then; net stop vmms