Many devices (0-127) can use the 2 pin I2C bus (OLED, NEO7GPS, BMP180), but you have to connect them in parallel to pins SCL-A4 and SDA-A5 of a Nano so they share the bus. (SDA and SCL are marked on an Uno). The Wire.h library is required as an #include.
They need to be able to pull voltages low (from 5v to 0V) to communicate:
so the bus needs 2 x 4.7k "pull up" resistors from the Nano 5V supply pin to A4 and A5 resp. to give a bus voltage of 5V.
(The resistor value technically depends on many factors like bus speed and capacitance, but in reality for a few devices on short wires, 4.7k resistors works fine). See Texas Inst. PDF link: https://www.ti.com/lit/an/slva689/slva689.pdf )
"A simple analogy for open drain is a bus, and the rope / harness you use for signalling- the driver for a stop. Everyone on the bus can yank on it and pull it down, but tension in that line will pull it back up after you release it. The strength of the pull up + the capacitance in the line will determine how fast you can run."
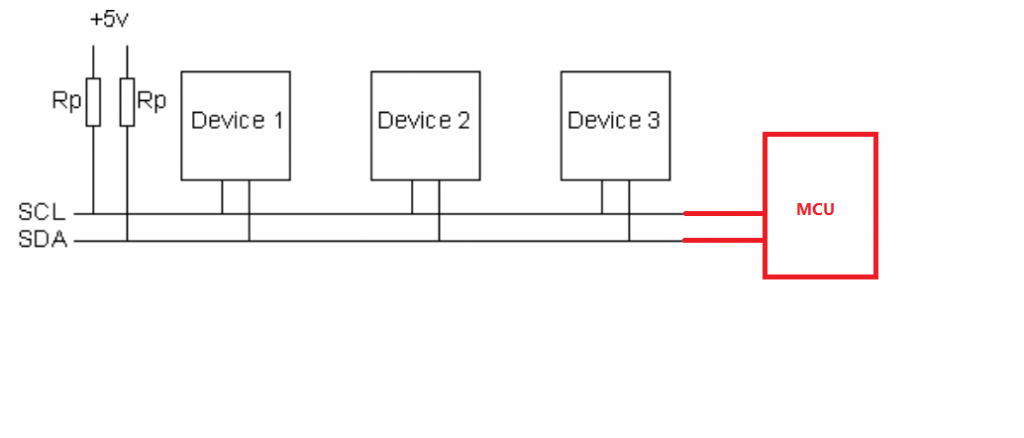
Note that a common reset pin in the event of comms corruption maybe used (e.g. for the OLED); on the Uno/Nano it's pin 4 stated in the OLED code comment line: #define OLED_RESET 4 // Reset pin
Once all devices are connected, run the I2C address scanner here to check each device is seen:
// --------------------------------------
// i2c_scanner
//my oled I2C device found at address 0x3C
// Version 1
//    This program (or code that looks like it)
//    can be found in many places.
//    For example on the Arduino.cc forum.
//    The original author is not know.
// Version 2, Juni 2012, Using Arduino 1.0.1
//     Adapted to be as simple as possible by Arduino.cc user Krodal
// Version 3, Feb 26  2013
//    V3 by louarnold
// Version 4, March 3, 2013, Using Arduino 1.0.3
//    by Arduino.cc user Krodal.
//    Changes by louarnold removed.
//    Scanning addresses changed from 0...127 to 1...119,
//    according to the i2c scanner by Nick Gammon
//    https://www.gammon.com.au/forum/?id=10896
// Version 5, March 28, 2013
//    As version 4, but address scans now to 127.
//    A sensor seems to use address 120.
// Version 6, November 27, 2015.
//    Added waiting for the Leonardo serial communication.
//
//
// This sketch tests the standard 7-bit addresses
// Devices with higher bit address might not be seen properly.
//

#include <Wire.h>


void setup()
{
  Wire.begin();

  Serial.begin(9600);
  while (!Serial);             // Leonardo: wait for serial monitor
  Serial.println("\nI2C Scanner");
}


void loop()
{
  byte error, address;
  int nDevices;

  Serial.println("Scanning...");

  nDevices = 0;
  for(address = 1; address < 127; address++ )
  {
    // The i2c_scanner uses the return value of
    // the Write.endTransmisstion to see if
    // a device did acknowledge to the address.
    Wire.beginTransmission(address);
    error = Wire.endTransmission();

    if (error == 0)
    {
      Serial.print("I2C device found at address 0x");
      if (address<16)
        Serial.print("0");
      Serial.print(address,HEX);
      Serial.println("  !");

      nDevices++;
    }
    else if (error==4)
    {
      Serial.print("Unknown error at address 0x");
      if (address<16)
        Serial.print("0");
      Serial.println(address,HEX);
    }
  }
  if (nDevices == 0)
    Serial.println("No I2C devices found\n");
  else
    Serial.println("done\n");

  delay(5000);           // wait 5 seconds for next scan
}
With the OLED and BMP180 connected, SerialMon shows me:
22:00:28.641 -> Scanning...
22:00:28.641 -> I2C device found at address 0x3C !
22:00:28.674 -> I2C device found at address 0x77 !
22:00:28.707 -> done
Now I need to combine code from all the prior Posts for each device to function and display; OLED, BMP180, DHT11 and Neo7 GPS.
I could add the GPS to the bus also, but for now I'll leave it on Nano pins 8,9 due to code. I'll play with that another time.
Power should be possible from the Nano due to the lower power requirements of the OLED over an LCD...?- We'll see...
I learned it's possible to overload the Nano to lock up with many tasks (and bad coding no doubt!), trying printing data to both serial and OLED screens with the same data.
Also, I realised the benefits of calling modular functions from within loop() once written, as you can comment them in or out to fault find. That's how I found the data overload issue when code was ok!
For now, I have tidy code, part serial code removed, with GPS and BMP data on the OLED screen:
/******************************************************************************
  Steve_GPS_DHT_BMP_OLED.ino based on:
  TinyGPSPlus_GPS_Shield.ino
  TinyGPS++ Library Example for the SparkFun GPS Logger Shield
  By Jim Lindblom @ SparkFun Electronics
  February 9, 2016
  https://stevepedwards.today/github.com/sparkfun/GPS_Shield

  This example uses SoftwareSerial to communicate with the GPS module on
  pins 8 and 9. It uses the TinyGPS++ library to parse the NMEA strings sent
  by the GPS module, and prints interesting GPS information to the serial
  monitor.

  After uploading the code, open your serial monitor, set it to 9600 baud, and
  watch for latitude, longitude, altitude, course, speed, date, time, and the
  number of visible satellites.

  Resources:
  TinyGPS++ Library  - https://stevepedwards.today/github.com/mikalhart/TinyGPSPlus/releases
  SoftwareSerial Library

  Development/hardware environment specifics:
  Arduino IDE 1.6.7
  GPS Logger Shield v2.0 - Make sure the UART switch is set to SW-UART
  Arduino Uno, RedBoard, Pro, etc.
******************************************************************************/
//steve_station.ino - uses 84m elevation and daily pressure from https://www.sueandalan.plus.com/weewx/index.html
#include <TinyGPS++.h> // Include the TinyGPS++ library
TinyGPSPlus tinyGPS; // Create a TinyGPSPlus object
#include <Adafruit_GFX.h>
#include <Adafruit_SSD1306.h>
#include <SFE_BMP180.h>
#include <Wire.h>   // I2C bus
//#include "dht.h"
// If you're using an Arduino Uno, RedBoard, or any board that uses the
// 0/1 UART for programming/Serial monitor-ing, use SoftwareSerial:
#include <SoftwareSerial.h>

#define ARDUINO_GPS_RX 9 // GPS TX, Arduino RX pin
#define ARDUINO_GPS_TX 8 // GPS RX, Arduino TX pin
SoftwareSerial ssGPS(ARDUINO_GPS_TX, ARDUINO_GPS_RX); // Create a SoftwareSerial

// Set gpsPort to either ssGPS if using SoftwareSerial or Serial1 if using an
// Arduino with a dedicated hardware serial port
#define gpsPort ssGPS  // Alternatively, use Serial1 on the Leonardo

// Define the serial monitor port. On the Uno, and Leonardo this is 'Serial'
//  on other boards this may be 'SerialUSB'
#define SerialMonitor Serial
#define GPS_BAUD 9600 // GPS module baud rate. GP3906 defaults to 9600.
//#define dht_apin A0 // Analog Pin sensor is connected to
//dht DHT;
#define ALTITUDE 84.0 // Altitude of sensor in meters
// OLED screen type parameters
#define SCREEN_WIDTH 128 // OLED display width, in pixels
#define SCREEN_HEIGHT 32 // OLED display height, in pixels
// Declaration for an SSD1306 display connected to I2C (SDA, SCL pins)
#define OLED_RESET     4 // Reset pin # (or -1 if sharing Arduino reset pin)
// NOTE: This define has to be placed below the Adafruit library it comes from as page is read top down!
Adafruit_SSD1306 display(SCREEN_WIDTH, SCREEN_HEIGHT, &Wire, OLED_RESET);

// You will need to create an SFE_BMP180 object, here called "pressure":
SFE_BMP180 pressure;

// This custom version of delay() ensures that the tinyGPS object
// is being "fed". From the TinyGPS++ examples.
static void smartDelay(unsigned long ms)
{
  unsigned long start = millis();
  do
  {
    // If data has come in from the GPS module
    while (gpsPort.available())
      tinyGPS.encode(gpsPort.read()); // Send it to the encode function
    // tinyGPS.encode(char) continues to "load" the tinyGPS object with new
    // data coming in from the GPS module. As full NMEA strings begin to come in
    // the tinyGPS library will be able to start parsing them for pertinent info
  } while (millis() - start < ms);
}  // end static void smartDelay

void setup()  {
    // OLED SSD1306_SWITCHCAPVCC = generate display voltage from 3.3V internally
    if(!display.begin(SSD1306_SWITCHCAPVCC, 0x3C)) { // Address 0x3C for 128x32
    Serial.println(F("SSD1306 allocation failed"));
    // Address 0x3C for 128x32 OLED
    for(;;); // Don't proceed, loop forever
    }
  Serial.begin(9600);
  delay(1000);//Delay to let system boot
  //Serial.println("DHT11 Humidity & temperature Sensor\n\n");
  delay(1000);//Wait before accessing Sensor
  //DHT.read11(dht_apin);
  Serial.println("REBOOT");

  // Initialize the BMP180 (it is important to get calibration values stored on the device).
    if (pressure.begin())
      Serial.println("BMP180 init success");
    else
    {
    // Oops, something went wrong, this is usually a connection problem,
    // see the comments at the top of this sketch for the proper connections.

  Serial.println("BMP180 init fail\n\n");
     while(1); // Pause forever.
    }

  SerialMonitor.begin(9600);
  gpsPort.begin(GPS_BAUD);

} // end setup


void printGPSInfo()
{
  // Print latitude, longitude, altitude in feet, course, speed, date, time,
  // and the number of visible satellites.
  SerialMonitor.println();
  SerialMonitor.print("Lat: "); SerialMonitor.println(tinyGPS.location.lat(), 6);
  SerialMonitor.print("Long: "); SerialMonitor.println(tinyGPS.location.lng(), 6);
  SerialMonitor.print("Alt: "); SerialMonitor.print(tinyGPS.altitude.feet(), 0);SerialMonitor.println("ft");

  //convert feet to meters
  int m = (tinyGPS.altitude.feet())/ 3.28084;
  SerialMonitor.print("Alt: "); SerialMonitor.print(m); SerialMonitor.println("m");
  SerialMonitor.print("Date: "); printDate();
  SerialMonitor.print("Time: "); printTime();
  SerialMonitor.print("Sats: "); SerialMonitor.println(tinyGPS.satellites.value());
  SerialMonitor.println();
} // end void printGPSInfo


void printGPS_OLED()  {
  // OLED screen page 1
  // Print latitude, longitude, altitude in feet, course, speed, date, time,
  // and the number of visible satellites.
  display.clearDisplay();
  display.setTextSize(1);      // Normal 1:1 pixel scale
  display.setTextColor(WHITE); // Draw white text
  display.setCursor(0, 0);     // Start at top-left corner
  display.cp437(true);         // Use full 256 char 'Code Page 437' font
  display.print("Lat: "); display.println(tinyGPS.location.lat(), 6);
  display.print("Long: "); display.println(tinyGPS.location.lng(), 6);
  display.print("Alt: "); display.print(tinyGPS.altitude.feet()); display.println(" feet");
  int m = (tinyGPS.altitude.feet()) / 3.28084;
  display.print("Alt: "); display.print(m); display.println(" meters");
  display.display();
  delay(3000);
  // OLED screen page 2
  display.clearDisplay();
  display.setTextSize(1);      // Normal 1:1 pixel scale
  display.setTextColor(WHITE); // Draw white text
  display.setCursor(0, 0);     // Start at top-left corner
  display.cp437(true);         // Use full 256 char 'Code Page 437' font
  display.print("Date: "); display.print(tinyGPS.date.day());
  display.print("/");
  display.print(tinyGPS.date.month());
  display.print("/");
  display.println(tinyGPS.date.year());
  display.print("Time: "); display.print(tinyGPS.time.hour());
  display.print(":");
  if (tinyGPS.time.minute() < 10) display.print('0');
  display.print(tinyGPS.time.minute());
  display.print(":");
  if (tinyGPS.time.second() < 10) display.print('0');
  display.println(tinyGPS.time.second());
  display.print("Sats: "); display.println(tinyGPS.satellites.value());
  display.println();
  display.display();
  delay(3000);
} // end printGPS_OLED()


// printDate() formats the date into dd/mm/yy.
void printDate()  {
  SerialMonitor.print(tinyGPS.date.day());
  SerialMonitor.print("/");
  SerialMonitor.print(tinyGPS.date.month());
  SerialMonitor.print("/");
  SerialMonitor.println(tinyGPS.date.year());
} // end void printDate()

// printTime() formats the time into "hh:mm:ss", and prints leading 0's
// where they're called for.
void printTime()  {

  SerialMonitor.print(tinyGPS.time.hour());
  SerialMonitor.print(":");
  if (tinyGPS.time.minute() < 10) SerialMonitor.print('0');
  SerialMonitor.print(tinyGPS.time.minute());
  SerialMonitor.print(":");
  if (tinyGPS.time.second() < 10) SerialMonitor.print('0');
  SerialMonitor.println(tinyGPS.time.second());
} // end void printTime()

//void printDHT_OLED()  {
  // DHT11 temp/humidity display section
    // OLED screen page 1
  // Print latitude, longitude, altitude in feet, course, speed, date, time,
  // and the number of visible satellites.
  //display.clearDisplay();
  //display.setTextSize(1);      // Normal 1:1 pixel scale
  //display.setTextColor(WHITE); // Draw white text
  //display.setCursor(0, 0);     // Start at top-left corner
  //display.cp437(true);         // Use full 256 char 'Code Page 437' font
  //  display.clearDisplay();
  //  display.print("DHT hum = ");
  //  display.print(DHT.humidity,1);
  //  display.println("%  ");
  //  display.display();
  //  display.print("DHT tmp = ");
  //  display.print(DHT.temperature,1);
  //  display.println("C  ");
  //  delay(3000);// See the data on OLED
  //} // end printDHT_OLED()

void printBMP_Pressure_OLED() {
  // If you want sea-level-compensated pressure, as used in weather reports,
  // you will need to know the altitude at which your measurements are taken.
  // We're using a constant called ALTITUDE in this sketch -:
  char status;
  double T,P,p0,a;
  // OLED pressure screen 1
  display.clearDisplay();
  display.setTextSize(1);      // Normal 1:1 pixel scale
  display.setTextColor(WHITE); // Draw white text
  display.setCursor(0, 0);     // Start at top-left corner
  display.cp437(true);         // Use full 256 char 'Code Page 437' font
  display.print("Local Alt: ");
  display.print(ALTITUDE,0);
  display.println(" m");
  display.print("Local Alt: ");
  display.print(ALTITUDE*3.28084,0); //dec place for feet
  display.println(" feet");
  display.display();
  delay(3000);
  // If you want to measure altitude, and not pressure, you will instead need
  // to provide a known baseline pressure. This is shown at the end of the sketch.

  // You must first get a temperature measurement to perform a pressure reading.
  // Start a temperature measurement:
  // If request is successful, the number of ms to wait is returned.
  // If request is unsuccessful, 0 is returned.

  status = pressure.startTemperature();
  if (status != 0)  {
    // Wait for the measurement to complete:
    delay(status);

    // Retrieve the completed temperature measurement:
    // Note that the measurement is stored in the variable T.
    // Function returns 1 if successful, 0 if failure.

    status = pressure.getTemperature(T);
    if (status != 0)
    {
      // OLED pressure screen 2
  display.clearDisplay();
  display.setTextSize(1);      // Normal 1:1 pixel scale
  display.setTextColor(WHITE); // Draw white text
  display.setCursor(0, 0);     // Start at top-left corner
  display.cp437(true);         // Use full 256 char 'Code Page 437' font
      // Print out the temperature measurements:
      display.print("Temp: ");
      display.print(T,2);
      display.println(" deg C");
      display.print("Temp: ");
      display.print(1.8*T+32.0,2); // from C to degrees F conv
      display.print(" deg F");
      display.display();
      delay(3000);
      //Serial.println();
      // Start a pressure measurement:
      // The parameter is the oversampling setting, from 0 to 3 (highest res, longest wait).
      // If request is successful, the number of ms to wait is returned.
      // If request is unsuccessful, 0 is returned.

      status = pressure.startPressure(3);
      if (status != 0)
      {
        // Wait for the measurement to complete:
        delay(status);
        // Retrieve the completed pressure measurement:
        // Note that the measurement is stored in the variable P.
        // Note also that the function requires the previous temperature measurement (T).
        // (If temperature is stable, you can do one temperature measurement for a number of pressure measurements.)
        // Function returns 1 if successful, 0 if failure.

        status = pressure.getPressure(P,T);
        if (status != 0)
        {
          // OLED pressure screen 3
  display.clearDisplay();
  display.setTextSize(1);      // Normal 1:1 pixel scale
  display.setTextColor(WHITE); // Draw white text
  display.setCursor(0, 0);     // Start at top-left corner
  display.cp437(true);         // Use full 256 char 'Code Page 437' font
          // Print out the measurement:
          display.print("Abs Pres: ");
          display.print(P,2);
          display.println(" mb");
          display.print("Abs Pres: ");
          display.print(P*0.0295333727,2);
          display.print(" in Hg");
          display.display();
          delay(3000);
          // The pressure sensor returns abolute pressure, which varies with altitude.
          // To remove the effects of altitude, use the sealevel function and your current altitude.
          // This number is commonly used in weather reports.
          // Parameters: P = absolute pressure in mb, ALTITUDE = current altitude in m.
          // Result: p0 = sea-level compensated pressure in mb

        // OLED pressure screen 4
  display.clearDisplay();
  display.setTextSize(1);      // Normal 1:1 pixel scale
  display.setTextColor(WHITE); // Draw white text
  display.setCursor(0, 0);     // Start at top-left corner
  display.cp437(true);         // Use full 256 char 'Code Page 437' font
          p0 = pressure.sealevel(P,ALTITUDE); // 84m (Illogan, Cornwall)
          display.print("Sea Pres: ");
          display.print(p0,2);
          display.println(" mb");
          display.print("Sea Pres: ");
          display.print(p0*0.0295333727,2);
          display.print(" in Hg");
          display.display();
          delay(3000);
          // On the other hand, if you want to determine your altitude from the pressure reading,
          // use the altitude function along with a baseline pressure (sea-level or other).
          // Parameters: P = absolute pressure in mb, p0 = baseline pressure in mb.
          // Result: a = altitude in m.

          // OLED pressure screen 5
  display.clearDisplay();
  display.setTextSize(1);      // Normal 1:1 pixel scale
  display.setTextColor(WHITE); // Draw white text
  display.setCursor(0, 0);     // Start at top-left corner
  display.cp437(true);         // Use full 256 char 'Code Page 437' font
          a = pressure.altitude(P,p0);
          display.print("Computed Alt: ");
          display.print(a,0);
          display.println(" m");
          display.print("Computed Alt: ");
          display.print(a*3.28084,0);
          display.print(" ft");
          display.display();
          delay(3000);
        }
        else display.println("error pressure \n");
      }
      else display.println("error pressure \n");
    }
    else display.println("error temp \n");
  }
  else display.println("error temp \n");

}  //end void printBMP_Pressure_OLED()


void loop() {
   // "Smart delay" looks for GPS data while the Arduino's not doing anything else
  smartDelay(1000);
   // print position, altitude, speed, time/date, and satellites:
  //printGPSInfo();
  printGPS_OLED();
  //printBMP_Pressure();
  printBMP_Pressure_OLED();

} // end loop
Finally, the code with DHT11 data added:
This code displays how I want and has all serialmon code removed:
/******************************************************************************
  Steve_GPS_DHT_BMP_OLED.ino based on:
  TinyGPSPlus_GPS_Shield.ino
  TinyGPS++ Library Example for the SparkFun GPS Logger Shield
  By Jim Lindblom @ SparkFun Electronics
  February 9, 2016
  https://stevepedwards.today/github.com/sparkfun/GPS_Shield

  This example uses SoftwareSerial to communicate with the GPS module on
  pins 8 and 9. It uses the TinyGPS++ library to parse the NMEA strings sent
  by the GPS module, and prints interesting GPS information to the serial
  monitor.

  After uploading the code, open your serial monitor, set it to 9600 baud, and
  watch for latitude, longitude, altitude, course, speed, date, time, and the
  number of visible satellites.

  Resources:
  TinyGPS++ Library  - https://stevepedwards.today/github.com/mikalhart/TinyGPSPlus/releases
  SoftwareSerial Library

  Development/hardware environment specifics:
  Arduino IDE 1.6.7
  GPS Logger Shield v2.0 - Make sure the UART switch is set to SW-UART
  Arduino Uno, RedBoard, Pro, etc.
******************************************************************************/
//steve_station.ino - uses 84m elevation and daily pressure from https://www.sueandalan.plus.com/weewx/index.html
#include <TinyGPS++.h> // Include the TinyGPS++ library
TinyGPSPlus tinyGPS; // Create a TinyGPSPlus object
#include <Adafruit_GFX.h>
#include <Adafruit_SSD1306.h>
#include <SFE_BMP180.h>
#include <Wire.h>   // I2C bus
#include "dht.h"
// If you're using an Arduino Uno, RedBoard, or any board that uses the
// 0/1 UART for programming/Serial monitor-ing, use SoftwareSerial:
#include <SoftwareSerial.h>

#define ARDUINO_GPS_RX 9 // GPS TX, Arduino RX pin
#define ARDUINO_GPS_TX 8 // GPS RX, Arduino TX pin
SoftwareSerial ssGPS(ARDUINO_GPS_TX, ARDUINO_GPS_RX); // Create a SoftwareSerial

// Set gpsPort to either ssGPS if using SoftwareSerial or Serial1 if using an
// Arduino with a dedicated hardware serial port
#define gpsPort ssGPS  // Alternatively, use Serial1 on the Leonardo

// Define the serial monitor port. On the Uno, and Leonardo this is 'Serial'
//  on other boards this may be 'SerialUSB'
#define SerialMonitor Serial
#define GPS_BAUD 9600 // GPS module baud rate. GP3906 defaults to 9600.
#define dht_apin A0 // Analog Pin sensor is connected to
dht DHT;
#define ALTITUDE 84.0 // Altitude of sensor in meters
// OLED screen type parameters
#define SCREEN_WIDTH 128 // OLED display width, in pixels
#define SCREEN_HEIGHT 32 // OLED display height, in pixels
// Declaration for an SSD1306 display connected to I2C (SDA, SCL pins)
#define OLED_RESET     4 // Reset pin # (or -1 if sharing Arduino reset pin)
// NOTE: This define has to be placed below the Adafruit library it comes from as page is read top down!
Adafruit_SSD1306 display(SCREEN_WIDTH, SCREEN_HEIGHT, &Wire, OLED_RESET);

// You will need to create an SFE_BMP180 object, here called "pressure":
SFE_BMP180 pressure;

// This custom version of delay() ensures that the tinyGPS object
// is being "fed". From the TinyGPS++ examples.
static void smartDelay(unsigned long ms)
{
  unsigned long start = millis();
  do
  {
    // If data has come in from the GPS module
    while (gpsPort.available())
      tinyGPS.encode(gpsPort.read()); // Send it to the encode function
    // tinyGPS.encode(char) continues to "load" the tinyGPS object with new
    // data coming in from the GPS module. As full NMEA strings begin to come in
    // the tinyGPS library will be able to start parsing them for pertinent info
  } while (millis() - start < ms);
}  // end static void smartDelay

void setup()  {
    // OLED SSD1306_SWITCHCAPVCC = generate display voltage from 3.3V internally
    if(!display.begin(SSD1306_SWITCHCAPVCC, 0x3C)) { // Address 0x3C for 128x32
    Serial.println(F("SSD1306 allocation failed"));
    // Address 0x3C for 128x32 OLED
    for(;;); // Don't proceed, loop forever
    }

  // Initialize the BMP180 (it is important to get calibration values stored on the device).
    if (pressure.begin())
      Serial.println("BMP180 init success");
    else
    {
    // Oops, something went wrong, this is usually a connection problem,
    // see the comments at the top of this sketch for the proper connections.

  Serial.println("BMP180 init fail\n\n");
     while(1); // Pause forever.
    }

  SerialMonitor.begin(9600);
  gpsPort.begin(GPS_BAUD);

} // end setup

void printDHT_OLED()  {

  // DHT11 temp/humidity display section
  DHT.read11(dht_apin);
  // OLED screen page 1
  display.clearDisplay();
  display.setTextSize(1);      // Normal 1:1 pixel scale
  display.setTextColor(WHITE); // Draw white text
  display.setCursor(0, 0);     // Start at top-left corner
  display.cp437(true);         // Use full 256 char 'Code Page 437' font
  display.clearDisplay();
  display.print("DHT11 humid = ");
  display.print(DHT.humidity,1);
  display.println("%  ");
  display.display();
  display.print("DHT11 temp = ");
  display.print(DHT.temperature,1);
  display.println("C  ");
  display.display();
  delay(3000);  // See the data on OLED for 3 secs
} // end printDHT_OLED()

void printGPS_OLED()  {
  // OLED screen page 1
  // Print latitude, longitude, altitude in feet, course, speed, date, time,
  // and the number of visible satellites.
  display.clearDisplay();
  display.setTextSize(1);      // Normal 1:1 pixel scale
  display.setTextColor(WHITE); // Draw white text
  display.setCursor(0, 0);     // Start at top-left corner
  display.cp437(true);         // Use full 256 char 'Code Page 437' font
  display.print("GPSLat: "); display.println(tinyGPS.location.lat(), 6);
  display.print("GPSLong: "); display.println(tinyGPS.location.lng(), 6);
  display.print("GPSAlt: "); display.print(tinyGPS.altitude.feet()); display.println(" ft");
  int m = (tinyGPS.altitude.feet()) / 3.28084;
  display.print("GPSAlt: "); display.print(m); display.println(" m");
  display.display();
  delay(4000);
  // OLED screen page 2
  display.clearDisplay();
  display.setTextSize(1);      // Normal 1:1 pixel scale
  display.setTextColor(WHITE); // Draw white text
  display.setCursor(0, 0);     // Start at top-left corner
  display.cp437(true);         // Use full 256 char 'Code Page 437' font
  display.print("GPS Date: "); display.print(tinyGPS.date.day());
  display.print("/");
  display.print(tinyGPS.date.month());
  display.print("/");
  display.println(tinyGPS.date.year());
  display.print("GPS Time: "); display.print(tinyGPS.time.hour());
  display.print(":");
  if (tinyGPS.time.minute() < 10) display.print('0');
  display.print(tinyGPS.time.minute());
  display.print(":");
  if (tinyGPS.time.second() < 10) display.print('0');
  display.println(tinyGPS.time.second());
  display.print("GPS Sats: "); display.println(tinyGPS.satellites.value());
  display.println();
  display.display();
  delay(3000);  // See the data on OLED
} // end printGPS_OLED()

void printBMP_Pressure_OLED() {
  // If you want sea-level-compensated pressure, as used in weather reports,
  // you will need to know the altitude at which your measurements are taken.
  // We're using a constant called ALTITUDE in this sketch -:
  char status;
  double T,P,p0,a;
  // OLED pressure screen 1
  display.clearDisplay();
  display.setTextSize(1);      // Normal 1:1 pixel scale
  display.setTextColor(WHITE); // Draw white text
  display.setCursor(0, 0);     // Start at top-left corner
  display.cp437(true);         // Use full 256 char 'Code Page 437' font
  display.print("LocalSetAlt: ");
  display.print(ALTITUDE,0);
  display.println(" m");
  display.print("LocalSetAlt: ");
  display.print(ALTITUDE*3.28084,0); //dec place for feet
  display.println(" ft");
  display.display();
  delay(3000);  // See the data on OLED
  // If you want to measure altitude, and not pressure, you will instead need
  // to provide a known baseline pressure. This is shown at the end of the sketch.

  // You must first get a temperature measurement to perform a pressure reading.
  // Start a temperature measurement:
  // If request is successful, the number of ms to wait is returned.
  // If request is unsuccessful, 0 is returned.

  status = pressure.startTemperature();
  if (status != 0)  {
    // Wait for the measurement to complete:
    delay(status);

    // Retrieve the completed temperature measurement:
    // Note that the measurement is stored in the variable T.
    // Function returns 1 if successful, 0 if failure.

    status = pressure.getTemperature(T);
    if (status != 0)
    {
      // OLED pressure screen 2
  display.clearDisplay();
  display.setTextSize(1);      // Normal 1:1 pixel scale
  display.setTextColor(WHITE); // Draw white text
  display.setCursor(0, 0);     // Start at top-left corner
  display.cp437(true);         // Use full 256 char 'Code Page 437' font
      // Print out the temperature measurements:
      display.print("Temp: ");
      display.print(T,2);
      display.println(" deg C");
      display.print("Temp: ");
      display.print(1.8*T+32.0,2); // from C to degrees F conv
      display.print(" deg F");
      display.display();
      delay(3000);  // See the data on OLED

      status = pressure.startPressure(3);
      if (status != 0)
      {
        // Wait for the measurement to complete:
        delay(status);
        // Retrieve the completed pressure measurement:
        // Note that the measurement is stored in the variable P.
        // Note also that the function requires the previous temperature measurement (T).
        // (If temperature is stable, you can do one temperature measurement for a number of pressure measurements.)
        // Function returns 1 if successful, 0 if failure.

        status = pressure.getPressure(P,T);
        if (status != 0)
        {
          // OLED pressure screen 3
  display.clearDisplay();
  display.setTextSize(1);      // Normal 1:1 pixel scale
  display.setTextColor(WHITE); // Draw white text
  display.setCursor(0, 0);     // Start at top-left corner
  display.cp437(true);         // Use full 256 char 'Code Page 437' font
          // Print out the measurement:
          display.print("Abs Pres: ");
          display.print(P,2);
          display.println(" mb");
          display.print("Abs Pres: ");
          display.print(P*0.0295333727,2);
          display.print(" in Hg");
          display.display();
          delay(3000);       // See the data on OLED
          // The pressure sensor returns abolute pressure, which varies with altitude.
          // To remove the effects of altitude, use the sealevel function and your current altitude.
          // This number is commonly used in weather reports.
          // Parameters: P = absolute pressure in mb, ALTITUDE = current altitude in m.
          // Result: p0 = sea-level compensated pressure in mb

        // OLED pressure screen 4
  display.clearDisplay();
  display.setTextSize(1);      // Normal 1:1 pixel scale
  display.setTextColor(WHITE); // Draw white text
  display.setCursor(0, 0);     // Start at top-left corner
  display.cp437(true);         // Use full 256 char 'Code Page 437' font
          p0 = pressure.sealevel(P,ALTITUDE); // 84m (Illogan, Cornwall)
          display.print("Sea Pres: ");
          display.print(p0,2);
          display.println(" mb");
          display.print("Sea Pres: ");
          display.print(p0*0.0295333727,2);
          display.print(" in Hg");
          display.display();
          delay(3000);  // See the data on OLED
          // On the other hand, if you want to determine your altitude from the pressure reading,
          // use the altitude function along with a baseline pressure (sea-level or other).
          // Parameters: P = absolute pressure in mb, p0 = baseline pressure in mb.
          // Result: a = altitude in m.

          // OLED pressure screen 5
  display.clearDisplay();
  display.setTextSize(1);      // Normal 1:1 pixel scale
  display.setTextColor(WHITE); // Draw white text
  display.setCursor(0, 0);     // Start at top-left corner
  display.cp437(true);         // Use full 256 char 'Code Page 437' font
          a = pressure.altitude(P,p0);
          display.print("Computed Alt: ");
          display.print(a,0);
          display.println(" m");
          display.print("Computed Alt: ");
          display.print(a*3.28084,0);
          display.print(" ft");
          display.display();
          delay(3000);  // See the data on OLED
        }
        else display.println("error pressure \n");
      }
      else display.println("error pressure \n");
    }
    else display.println("error temp \n");
  }
  else display.println("error temp \n");

}  //end void printBMP_Pressure_OLED()


void loop() {
   // "Smart delay" looks for GPS data while the Arduino's not doing anything else
  smartDelay(1000);
   // print position, altitude, speed, time/date, and satellites:
  printGPS_OLED();
  printBMP_Pressure_OLED();
  printDHT_OLED();
} // end loop