![]()
Azure VNet Peering, Testing via Windows 11 ICMP Realities
1. Executive Lab Summary & Architecture
This technical summary documents the successful implementation of a multi-network sandbox environment built within an Azure trial subscription footprint. It covers the resolution of regional capacity constraints, public IP quota blockages, top-level address space boundaries, and local guest operating system firewall dynamics encountered during the Azure Network Engineer (AZ-700) curriculum.
1.Create VNet 1 Manually:Time: 2 mins.
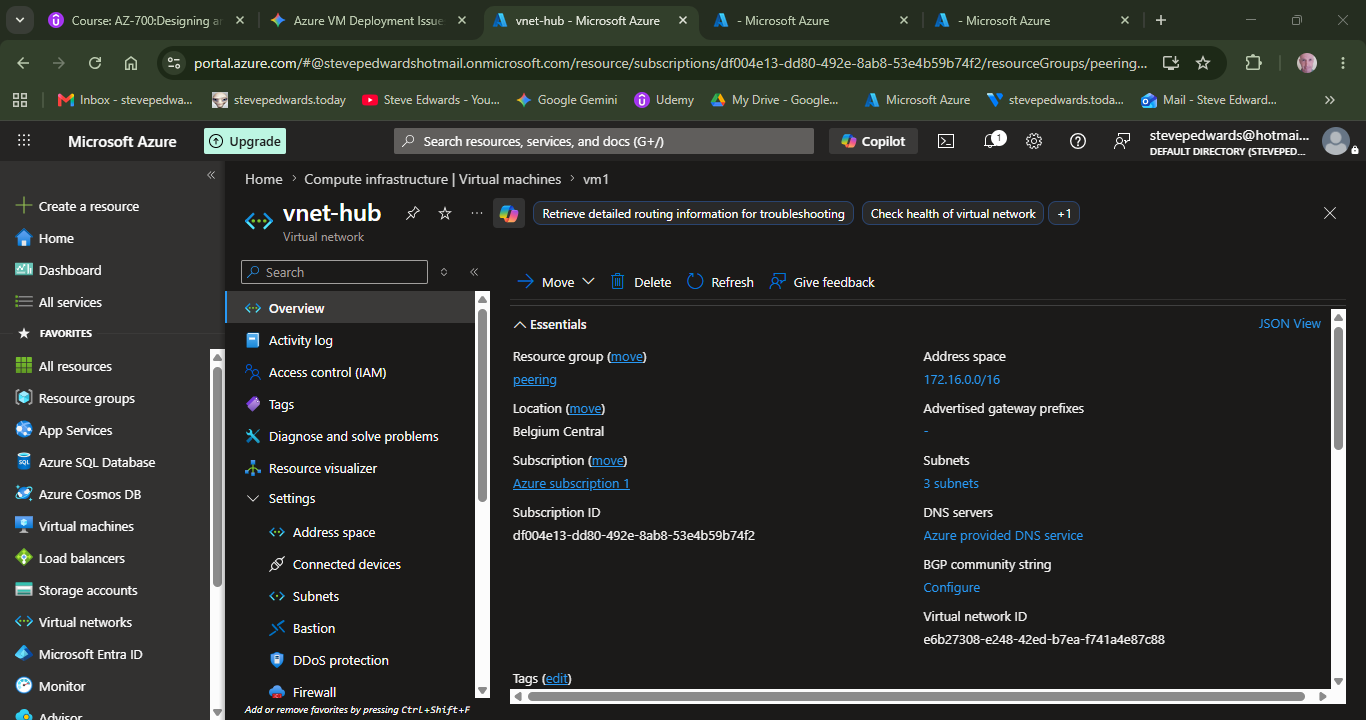
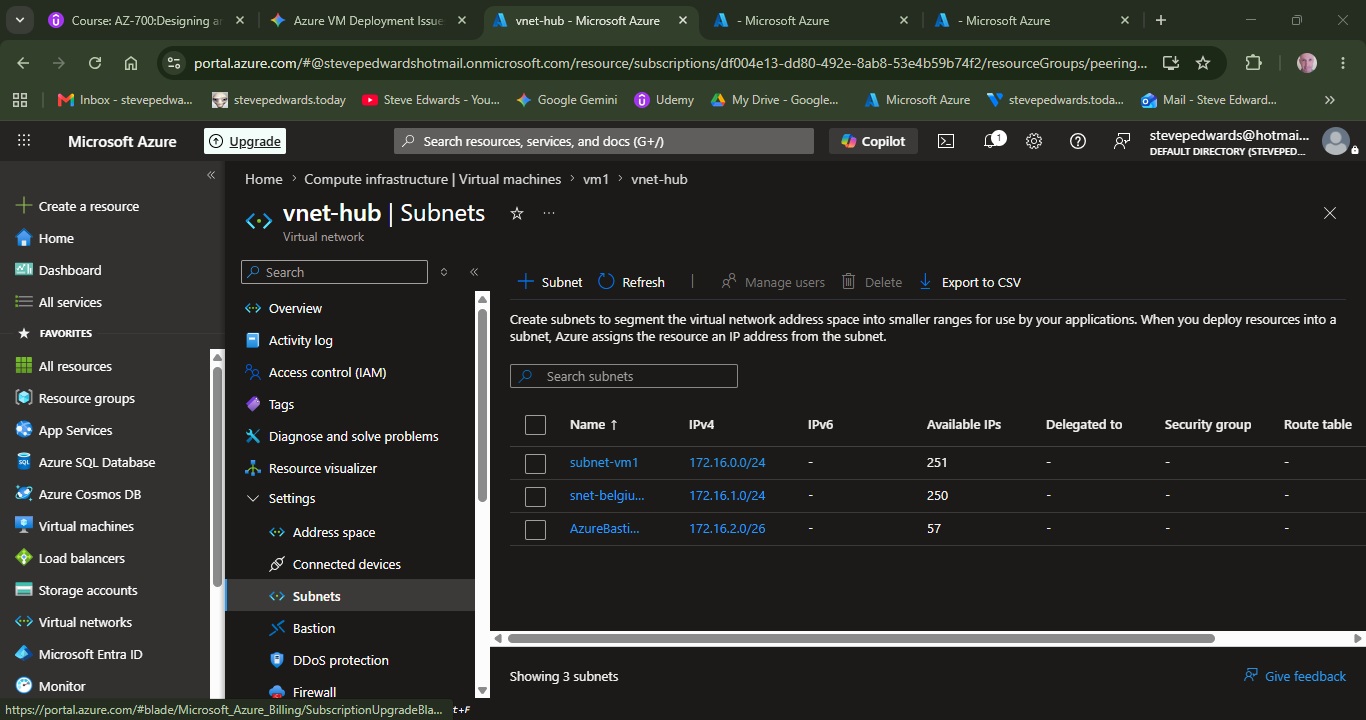
Search for Virtual Networks at the top of the portal and click Create. Name it vnet-hub. Set the Address Space to 172.16.0.0/16. Create a subnet inside it called subnet-vm1 set to 172.16.0.0/24. (No PIP):

Hit Create.
2.Create VNet 2 Manually:Time: 2 mins (The Anti-Overlap Step).
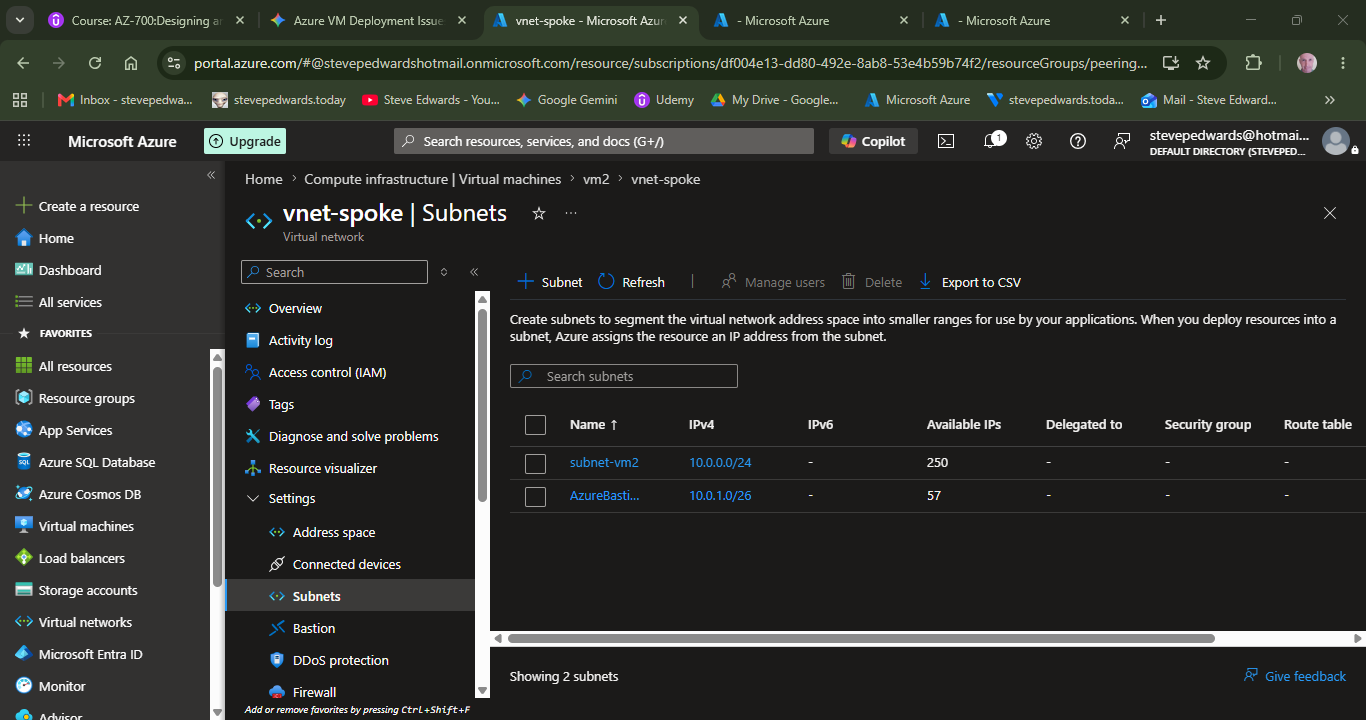
Click Create on Virtual Networks again. Name it vnet-spoke. Change the default numbers! Set the Address Space to 10.0.0.0/16. Create a subnet inside it called subnet-vm2 set to 10.0.1.0/24. (No PIP):
Hit Create.
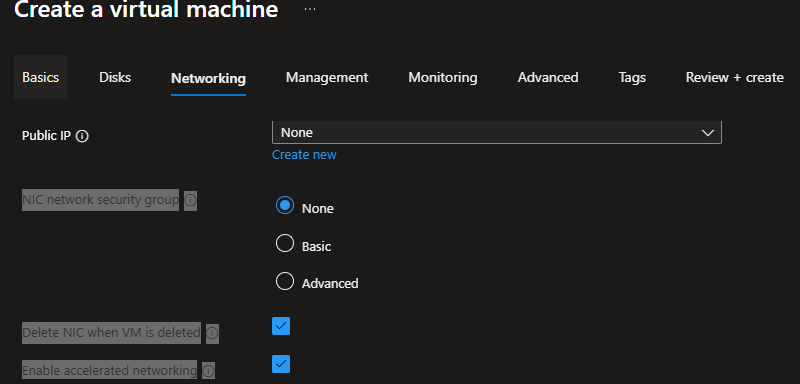
3.Deploy the VMs (No PIP):Time: 5 mins.
Now create your VMs. On the Networking tab for vm1, select vnet-hub. On the Networking tab for vm2, select vnet-spoke. For both VMs, switch the Public IP dropdown to None.
4.Link them with Peering:Time: 3 mins.
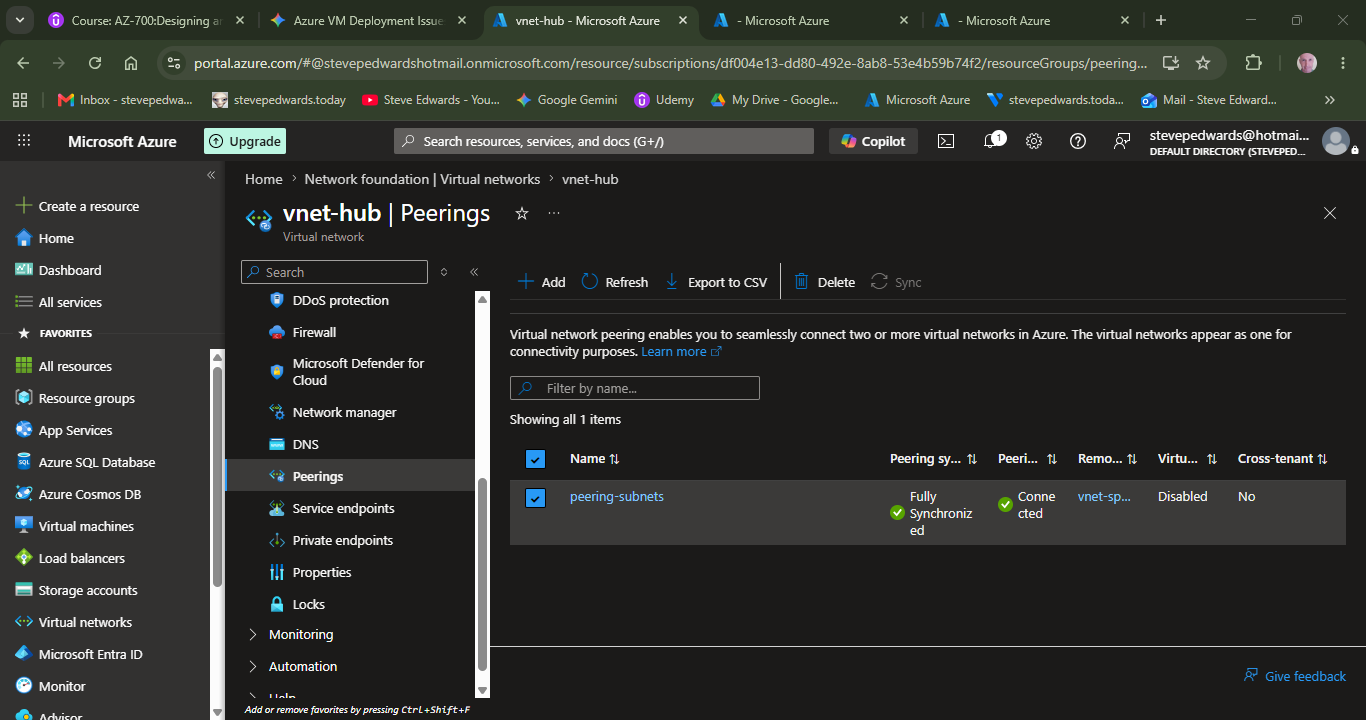
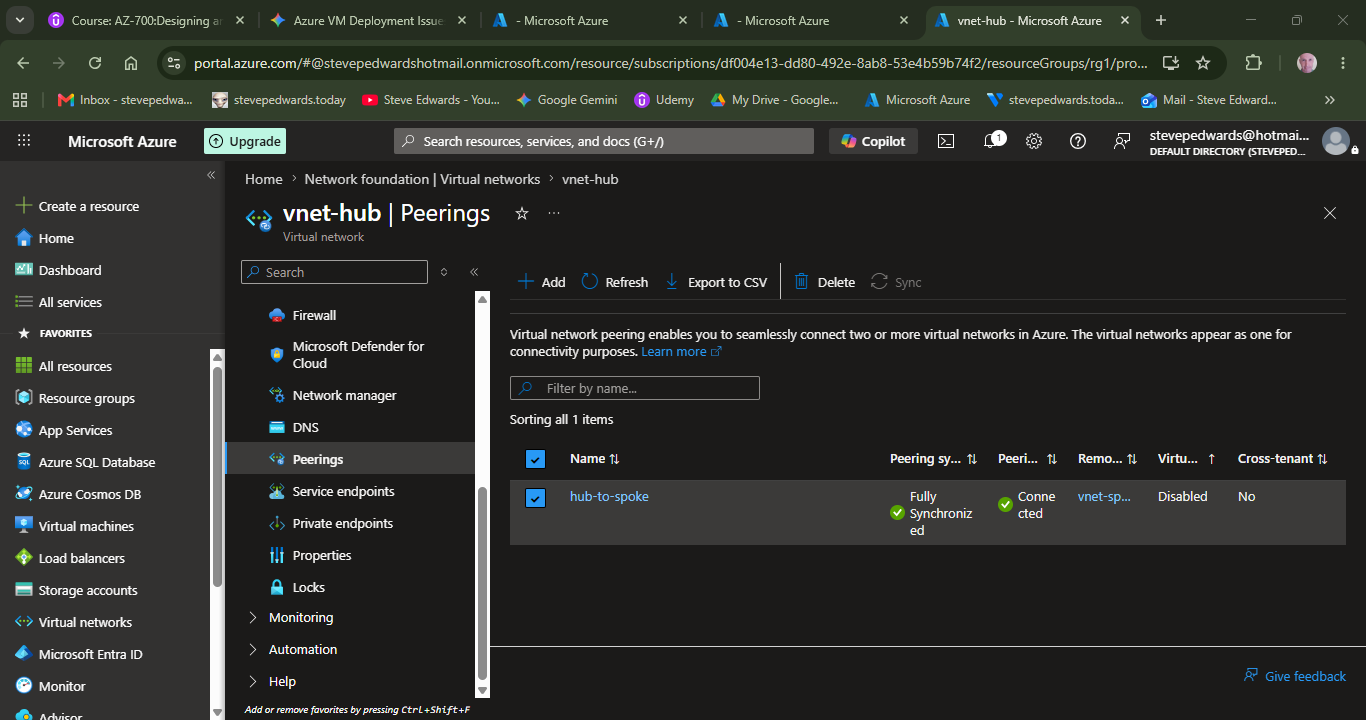
Once both VMs are running, go into vnet-hub, click Peerings, and add the link to vnet-spoke. Make sure both directional checkboxes are active so they link together.
Verified Working Network Configuration Architecture:

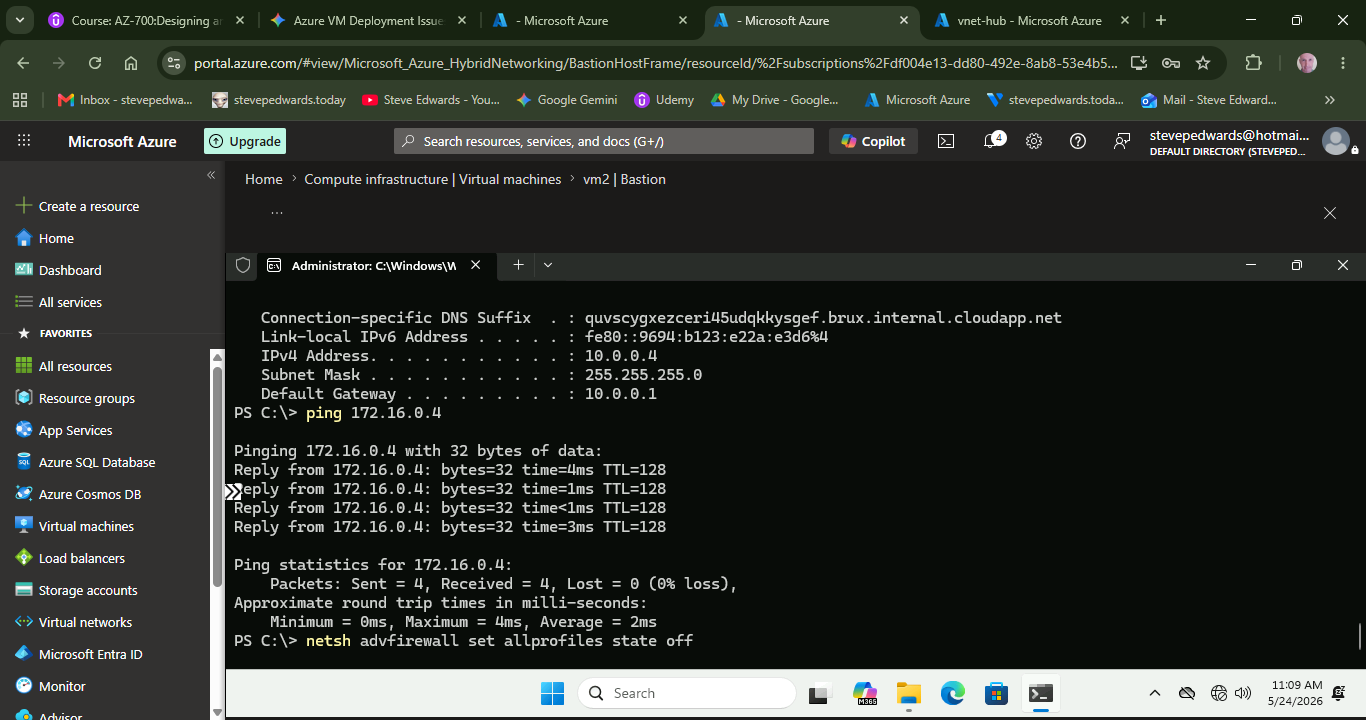
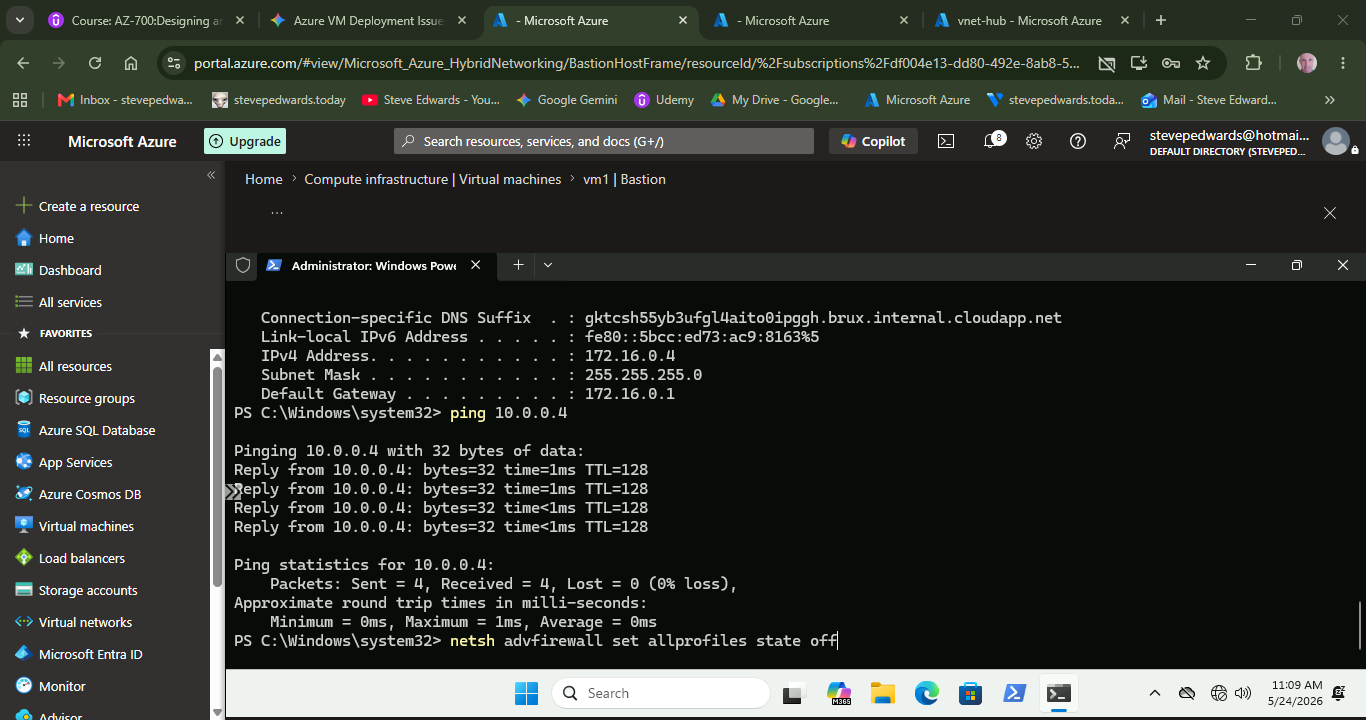
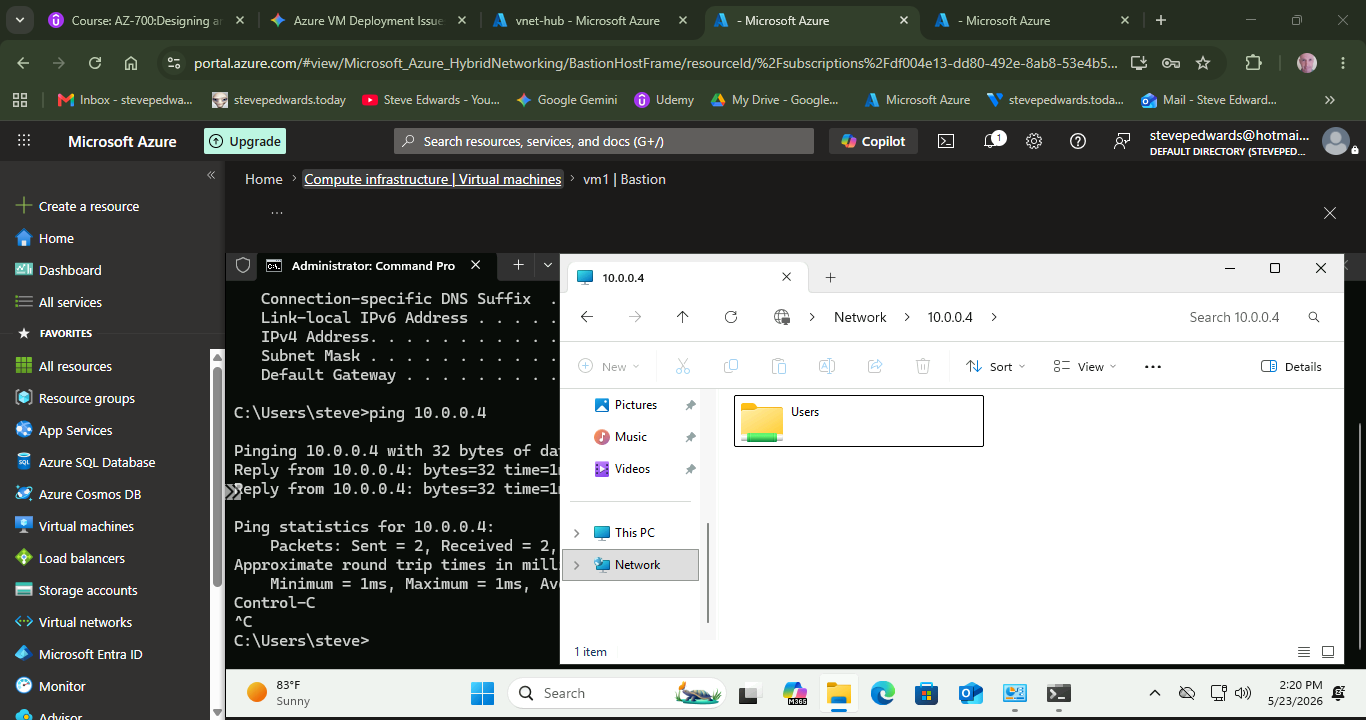
- Hub Infrastructure (VNet hub): Address Space = 172.16.0.0/16 | Subnet = 172.16.0.0/24 | VM1 Target IP = 172.16.0.4
- Spoke Infrastructure (VNet spoke): Address Space = 10.0.0.0/16 | Subnet = 10.0.1.0/24 | VM2 Target IP = 10.0.1.4
- Inbound Gateway Access: Secured completely via Azure Bastion host endpoints, utilizing no public IP attachments on individual VM network interfaces (NICs).
2. Core Technical Discoveries & Troubleshooting Phases
Phase A: Bypassing Regional Capacity & SKU Generation Locks
Azure Portal validation checks syntax and legal rights, but fails to cross-reference physical server availability prior to submission. Attempting deployments with legacy SKUs (e.g., standard Standard_D2 with no version suffix) features heavily restricted allocations because Microsoft limits obsolete physical host platforms. Upgrading explicitly to Standard_D2s_v3 maintains compatibility with standard x64 testing requirements while targeting active hardware clusters with open capacity pools in major regional hubs (such as West Europe).
Phase B: Solving the Public IP (PIP) Subscription Quota Wall
Trial and free tier subscriptions enforce a strict security threshold capping accounts at three simultaneous Basic Public IP addresses (SkuNotSpecified). If virtual machines are repeatedly deleted and recreated during testing, Azure holds onto the original public IP assets as detached, orphaned objects. The resolution requires hunting for "Public IP addresses" in the portal and deleting stale components, or changing the VM network layout properties directly to Public IP: None and routing administrative traffic safely over an internal Azure Bastion link.
Phase C: Eradicating Overlapping Top-Level Address Spaces
When relying entirely on automated wizard suggestions during VM creation, Azure assigns identical default supernet envelopes (typically 172.16.0.0/16) to distinct VNets. Even if underlying child subnets are configured with unique boundaries (e.g., 172.16.0.0/24 vs 172.16.1.0/24), the top-level boundaries overlap. The local VNet software routing tables intercept peer traffic, believing the remote address ranges sit inside their local interfaces. True connectivity mandates manual network planning, mapping entirely independent network classes (e.g., Class B 172.16.x.x vs Class A 10.x.x.x) prior to deployment.
| Infrastructure Challenge | Root Failure Mechanism | Verified Resolution Strategy |
|---|---|---|
| SkuNotAvailable Error | Legacy D2 generation physical racks are depleted/locked in smaller regions. | Select modern 's' variants (D2s_v3) inside hyper-scale hero nodes (West Europe). |
| PIP Quota Exceeded | Free trial tier enforces hard ceiling limit of 3 public IP allocations. | Wipe out orphaned pips from portal or toggle Public IP field entirely to 'None'. |
| Peering Drop / Broken Route | Implicit 172.16.0.0/16 default boundaries overlap on separate wizard VNets. | Pre-build infrastructure manually, separation scheme using Class B vs Class A blocks. |
Peering link name (in vnet-hub): Type something clear, like hub-to-spoke.
Virtual network deployment model: Leave it on Resource Manager.
Remote virtual network (still in vnet-hub): Click the dropdown and select your second network to connect to, vnet-spoke.
Peering link name (hub-to-spoke): Type the reverse name, like spoke-to-hub.
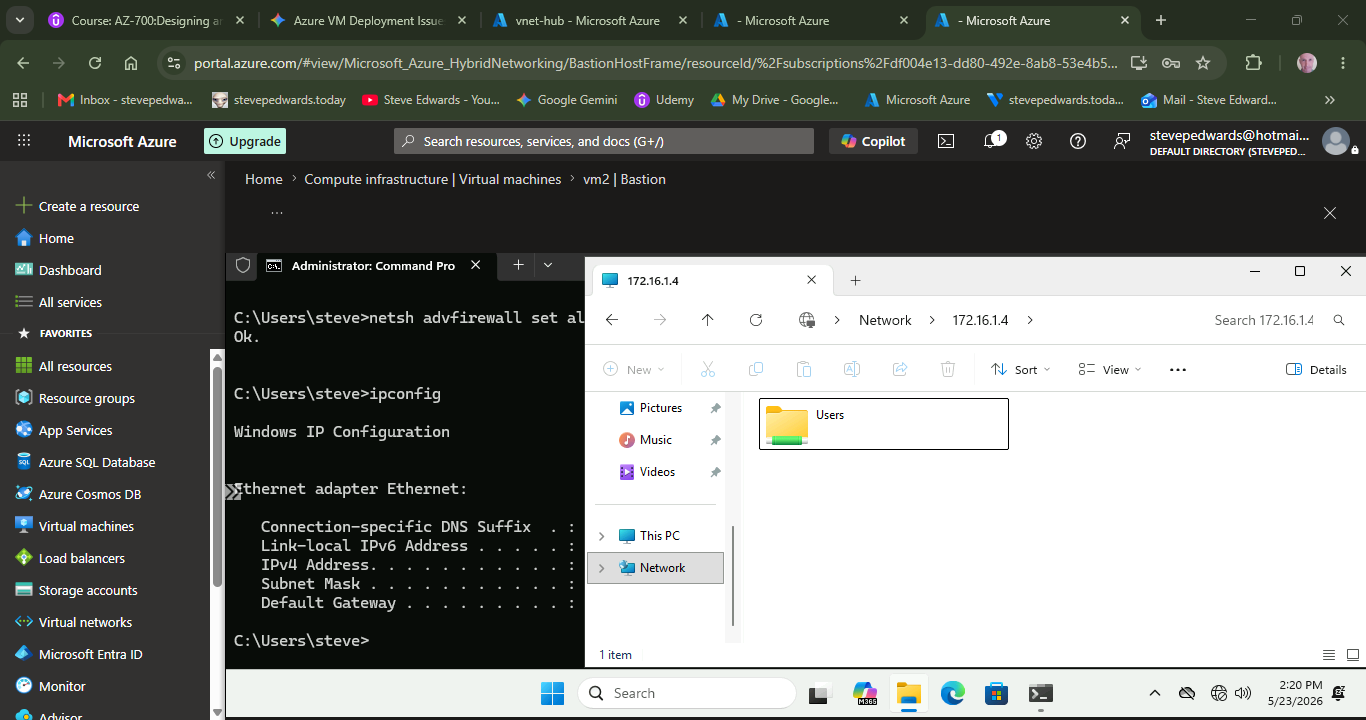
In each VM in a separate tab for each, Connect to Bastion to log in and ping the other VM. Firewall is probably ON!
Open in new browser tab tick box must be empty else as pop ups block the new tab. It only opens in the same shrunk window, but enough to use CMD. To see if ping is blocked for each VM to the other:
Get-NetConnectionProfile
netsh advfirewall set allprofiles state off
ok.
3. The Windows 11 ICMP / Ping Paradigm Explained
A common point of confusion during AZ-700 lab exercises is discovering that ICMP (ping) packets transmit successfully across a new network link without manually adding an explicit allow rule inside the guest operating system's firewall policies. It is a widespread industry assumption that modern client editions of Windows block all incoming diagnostic traffic by default. The real behavior is determined by the Network Profile Type assigned to the interface during provisioning.
Understanding Windows Firewall Profiles & Pre-Defined Rules:
- The Private Profile Auto-Exception: When an Azure VM boots using standard templates, the network connection profile is frequently configured automatically as a "Private" network rather than "Public". The built-in Windows Defender rule titled File and Printer Sharing (Echo Request - ICMPv4-In) is implicitly built into the operating system and is set to Enabled out of the box for Private profiles.
- Azure System Route Defaults: By default, every Virtual Network has a built-in Network Security Group rule called AllowVnetInbound. This allows any internal traffic inside the network envelope to flow freely. Once your VNet Peering link transitioned to 'Connected', Azure appended system routes treating the 10.0.0.0/16 and 172.16.0.0/16 spaces as part of the broader, trusted local VNet infrastructure environment. This cleared the cloud-level paths.
- Why SMB File Sharing Still Failed (The Scope Restriction): Unlike ICMP, which is broad, the default rule for File Sharing (SMB over Port 445) includes a strict firewall parameter called Scope. Even when active, its internal rule properties state: "Allow incoming traffic only if originating from the local subnet". Since VM2 (10.0.1.4) was outside VM1's local /24 subnet (172.16.0.x), Windows dropped the file-sharing packet despite the firewall being 'allowed'. Dropping the firewall completely temporarily proved the network path was clear, identifying the issue as an OS-level subnet scope constraint rather than a bad Azure configuration.
When the Defender FW is turned off on both VMs:
netsh advfirewall set allprofiles state off
They can both see each other´s shares by IP address (no DNS so VM name does not connect)
? CRITICAL AZ-700 LESSON LEARNED:
A successful 'ping' confirms Azure network peering routing tables are operating flawlessly, but it does NOT guarantee higher-layer services will function. Always check local guest firewall scope tables and application layer configurations whenever lower-level ICMP succeeds but upper-level protocols like SMB (445) or HTTP (80) fail.
Why Peering Is not a normal serial link via “Default Gateways”:
You have hit on an excellent mental model for visualizing this, but Azure actually pulls off a fascinating trick behind the scenes that makes VNet Peering significantly faster and more direct than a traditional router-to-router serial link.
Your analogy of connecting two distinct networks (router serial link) is structurally spot on, but the way the traffic actually moves is completely different.
The Traditional Model vs. The Azure Reality
In standard on-premises networking, if you wanted to connect VNet1 (172.16.0.0/16) and VNet2 (10.0.0.0/16), you would configure a point-to-point interface (like a serial or fiber link) between two physical routers.
- Traffic leaving vm1 would hit its default gateway.
- The router would look at its routing table, see the next-hop IP of the peer router across that serial link, rewrite the packet header, and push it across.
- This introduces a bottle-neck: the traffic is restricted by the physical throughput of those router interfaces and the serialization delay of the link.
How Azure VNet Peering Actually Works: "The SDN Shortcut"
Azure doesn't use physical routers, virtual appliances, or serial links to handle peering. Instead, it relies entirely on Software-Defined Networking (SDN) running on Microsoft’s global Jupiter network fabric.
When you click "Connect" on a VNet Peering link, Azure doesn't route your traffic through an intermediary gateway device. Instead, it alters the underlying physical host hypervisors directly:
- No Intermediate Gateways: When vm1 sends a packet to vm2 (10.0.1.4), it still hits Azure's default virtual gateway IP (the .1 address of its subnet).
- Hypervisor-to-Hypervisor Routing: Azure’s software-defined control plane looks at the destination, recognizes the peered relationship, and hands the packet directly to the physical server blade hosting vm2.
- Internal Fabric Speed: The packet travels across Microsoft's internal datacenter backbone using private encapulated traffic. It moves at the raw wire-speed of the underlying hardware switches, completely bypassing any virtual routing chokepoints.
Why the Exam Cares About This Difference
This architectural quirk is why VNet Peering is the absolute holy grail for Azure network designs, and it's heavily emphasized on the AZ-700 exam:
- Zero Performance Hit: Because there is no actual "router" processing the packet headers in the middle, VNet Peering introduces zero latency overhead and handles massive bandwidth effortlessly.
- The Charging Model: Azure doesn't charge you for a gateway processing data; it simply charges a nominal, flat per-gigabit fee for data transferring in and out of the peering link.
- Gateway Transit Exceptions: If you do want traffic to pass through a central router (like a firewall appliance or a VPN gateway), you have to explicitly check a box called "Use Remote Gateways" or set up User Defined Routes (UDRs) to break Azure's default shortcut and force it to act like your traditional serial-link model.
So, while treating it like a point-to-point serial link is perfect for planning your subnets and address spaces, you can smile knowing that Azure is actually doing a massive software-defined teleportation trick under the hood!
So why would anyone use a remote gateway at all then? For traffic out of the Azure space to an Internet linked site or similar?
That is exactly the right intuition! You’ve hit on one of the core architectural patterns tested in the AZ-700 exam: the Hub-and-Spoke network topology.
While VNet Peering's default behavior is perfect for letting VMs chat directly with each other at lightning speeds, it has one major limitation: it is not transitive by default. If VNet A is peered to VNet B, and VNet B is peered to VNet C, VNet A and VNet C cannot talk to each other.
This is exactly where the "Use Remote Gateways" (or gateway transit) feature comes into play. It allows a centralized VNet to act as a shared corporate gateway for all other isolated networks.
The Three Main Reasons to Use a Remote Gateway
The two biggest use cases for enabling this setting are exactly what you suspected—getting traffic safely out of Azure or connecting back to a physical office network.
1. Connecting Back to On-Premises Networks (ExpressRoute / VPN)
Imagine an enterprise with 50 different departmental VNets (Spokes) in Azure. If every single one of those spokes needed to connect back to the physical head office or an on-premises data center, buying a dedicated ExpressRoute circuit or VPN Gateway for all 50 VNets would cost a fortune and be a nightmare to manage.
Instead, the company builds one central network:
- The Hub VNet: Houses a single, powerful Azure VPN Gateway or ExpressRoute circuit connected to the corporate office.
- The Spoke VNets: Each spoke peers directly to the Hub. By checking the box for "Use Remote Gateways", the spokes are granted permission to "piggyback" off the Hub’s gateway.
Traffic from a spoke VM flows across the peering link, hits the Hub's gateway, and shoots down the VPN tunnel to the office.
2. Centralized Internet Ingress/Egress (Firewall Inspection)
In enterprise environments, security teams absolutely hate the idea of every virtual network having its own wild-west access to the public internet. They want to inspect, log, and filter every single packet leaving or entering the cloud environment.
By routing traffic through a remote gateway or a centralized Azure Firewall in a Hub VNet, organizations can enforce a single choke-point for compliance. If a VM in a spoke network tries to pull an update from the internet, its traffic is forced across the peering link to the Hub Firewall first. If the traffic passes inspection, the Hub's gateway sends it out to the internet.
3. Massively Reducing Cost and Administrative Overhead
Azure VPN and ExpressRoute gateways are billed hourly based on their performance tier (SKU), and they aren't cheap.
Using remote gateways allows a single gateway asset to be shared across hundreds of peered spokes. This architecture dramatically slashes subscription costs and ensures that network administrators only have to manage, patch, and monitor one central gateway infrastructure instead of deploying dozens of redundant ones.
How the Settings Line Up in the Portal
When you configure this on a VNet Peering link, Azure sets up a specific relationship between the two networks:
- On the Hub Peering Link: You check the box for "Allow gateway transit". This tells the network fabric, "I am holding a gateway, and I am willing to share it with my peered neighbors."
- On the Spoke Peering Link: You check the box for "Use remote gateways". This tells the network fabric, "I don't have my own gateway, so I want to route my external traffic through my neighbor's gateway."
?? The Exam Gotcha: You can only enable "Use Remote Gateways" if the peered network actually has a gateway deployed in a subnet named exactly GatewaySubnet. If you try to check the box and no gateway exists on the other side, the Azure Portal will throw a validation error and block the configuration!