Admin 2008 -->
Admin 2008 -->
Admin 2008 -->
Setting up an apache web server with password access
and SSL certification
apt-get install apache2
Also installed is
make-ssl-cert
Password Access:
Create an emtpy pwd file where you like:
vi /etc/apache2/pwd
htpasswd -c
/etc/apache2/pwd uname
New password:
Re-type new password:
Adding password for user uname
The contents of the pwd file is now:
stevee:v.rxFwkFPeKfU
The contents of the default site file for password access is:
<VirtualHost *:80>
ServerAdmin webmaster@localhost
DocumentRoot /LVMFW/www/
<Directory />
Options FollowSymLinks
AllowOverride None
</Directory>
<Directory /var/www/>
Options Indexes FollowSymLinks MultiViews
AllowOverride None
Order allow,deny
allow from all
AuthType Basic
AuthName
"uname"
AuthUserFile
/etc/apache2/pwd
Require user uname pwxxxxxx
</Directory>
ScriptAlias /cgi-bin/ /usr/lib/cgi-bin/
<Directory "/usr/lib/cgi-bin">
AllowOverride None
Options +ExecCGI -MultiViews +SymLinksIfOwnerMatch
Order allow,deny
Allow from all
</Directory>
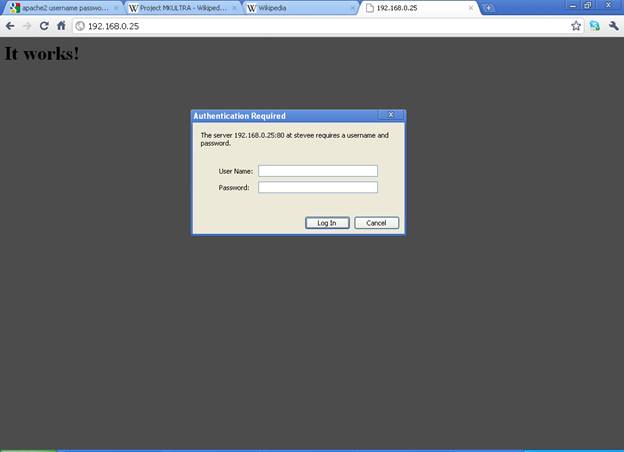
Then restart apache and connect:
/etc/init.d/apache2
restart
Apache SSL Certification Access
Make a directory for the SSL Certs:
mkdir
/etc/apache2/ssl
User docs are in:
vi /usr/share/doc/apache2/README.Debian.gz
Enabling SSL
------------
To enable SSL, type (as user root):
a2ensite
default-ssl
Enabling site default-ssl.
Run '/etc/init.d/apache2 reload' to activate new configuration!
debianvm:~#
a2enmod ssl
Enabling module ssl.
See /usr/share/doc/apache2.2-common/README.Debian.gz on how to configure SSL and create self-signed certificates.
Run '/etc/init.d/apache2 restart' to activate new configuration!
If you want to use self-signed certificates, you should install the ssl-cert
package (see below). Otherwise, just adjust the SSLCertificateFile and
SSLCertificateKeyFile directives in /etc/apache2/sites-available/default-ssl to
point to your SSL certificate. Then restart apache:
/etc/init.d/apache2 restart
Creating self-signed certificates
---------------------------------
If you install the ssl-cert package, a self-signed certificate will be
automatically created using the hostname currently configured on your computer.
You can recreate that certificate (e.g. after you have changed /etc/hosts or
DNS to give the correct hostname) as user root with:
make-ssl-cert generate-default-snakeoil --force-overwrite
To create more certificates with different host names, you can use
make-ssl-cert /usr/share/ssl-cert/ssleay.cnf /path/to/cert-file.crt
This will ask you for the hostname and place both SSL key and certificate in
the file /path/to/cert-file.crt . Use this file with the SSLCertificateFile
directive in the apache config (you don't need the SSLCertificateKeyFile in
this case).
Looking in the
vi /etc/ssl/certs/
shows all the certificates stored on the system and the newly created
ssl-cert-snakeoil.pem
Looking in the
vi /etc/apache2/sites-available/default-ssl
shows the SSL functions activated:
#SSL Engine Switch:
#Enable/Disable SSL for this virtual host.
SSLEngine on
#A self-signed (snakeoil) certificate can be created by installing
#the ssl-cert package. See
#/usr/share/doc/apache2.2-common/README.Debian.gz for more info.
#If both key and certificate are stored in the same file, only the
#SSLCertificateFile directive is needed.
SSLCertificateFile/etc/ssl/certs/ssl-cert-snakeoil.pem
SSLCertificateKeyFile /etc/ssl/private/ssl-cert-snakeoil.key
/etc/init.d/apache2 restart
Restarting web server: apache2 ... waiting .
Now the https page should be available showing the cert block page:
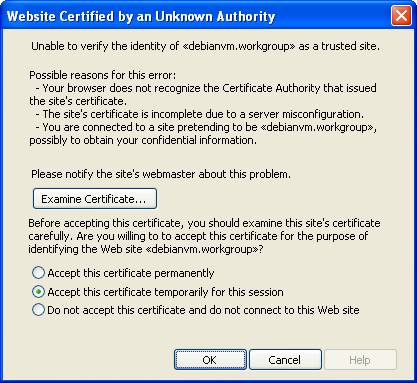
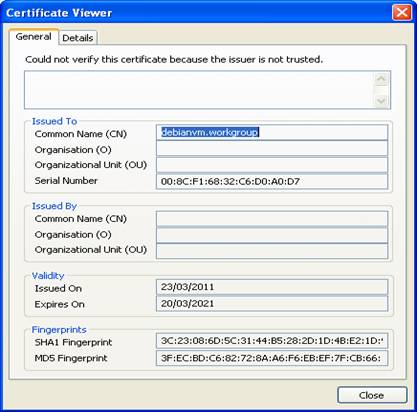
Looking at the certificate
info it is local machine based: